ELEMENTALIST HEAVY ATTACK SUBCLASS SOLO GUIDE
Last updated: Update 46 - 27th June 2025
This is a roleplay build where I'm not always choosing the most optimal option
This build is capable of soloing every Veteran dungeon that doesnt have a specific mechanic that requires multiple people. Its also capable of soloing most Hard Mode dungeons, and with some adjustments even the more difficult ones.
In this guide Ill be regularly using the terms Regular and Difficult. Regular refers to content that is intended to be solo-ed (such as Maelstrom Arena or Vateshran Arena) and to any overland content such as World Bosses, Dolmens, Dragons, Volcanic Vents, Harrowstorms, Mirrormoor Incursions, etc. Majority of dungeon fights will also fall under that category. Difficult refers to extremely difficult dungeon fights.
SUBCLASSING
Combination

Dragonknight - Ardent Flame

Warden - Winter's Embrace

Sorcerer - Storm Calling
Base Class
This build can use either Dragonknight, Warden or Sorcerer as your base class. There are differences between base classes because we can use the Class Mastery script on Banner Bearer, but the differences are very small. Dragonknight 's Class Mastery grants Weapon and Spell Damage and damage reduction, Warden 's Class Mastery grants sustain and Crowd Control, and on a Sorcerer you can simply use the Cavalier's Charge script instead of Class Mastery, which grants Weapon and Spell Damage.
SKILL SETUPS
Base Setup
A base setup that will work for most situations and which should be your starting point when making situational setups
| Front Bar | Back Bar |
|---|---|
| Slot 1: Ulfsild's Contingency | Slot 1: Soul Burst |
| Slot 2: Hurricane | Slot 2: Flames of Oblivion |
| Slot 3: Critical Surge | Slot 3: Elemental Susceptibility |
| Slot 4: Arctic Blast | Slot 4: Elemental Blockade |
| Slot 5: Banner Bearer | Slot 5: Banner Bearer |
| Ultimate: Energy Overload | Ultimate: Standard of Might |

Ulfsild's Contingency -Frost,Lingering Torment,Force
- Gladiator's Tenacity - use it instead of Lingering Torment when you need more damage mitigation
Banner Bearer -Magic,Class Mastery,Berserk
- Mitigation - use it instead of Magic when you need more damage mitigation
- Cavalier's Charge - use it instead of Class Mastery if you want more damage and your base class isn't Dragonknight
- Warmage’s Defense - use it instead of Class Mastery if you need more survivability. Keep in mind that depending on situation Dragonknight's or Warden's Class Mastery can be better
- Resolve - use it if you need more damage mitigation and you're not already getting Minor Resolve from a situational skill like Resolving Vigor
- Ulfsild's Contingency - your source of crucial Empower buff, which increases damage done by Heavy Attack by 70%. Since Ulfsild's Contingency is a Mages Guild skill, it will trigger the Might of the Guild passive, which grants you Empower for 10 seconds. It also deals decent damage in an AoE and grants you Minor Force buff, increasing your Critical Damage by 10%. Ulfsild's Contingency is delayed until the next skill cast but whenever it's needed you can activate it early by bashing your enemy. If you cast this ability as you're finishing your Heavy Attack, the Empower you gain from it will start working just in time to boost the final tick of that Heavy Attack you just finished
- Hurricane - an ability which provides a crucial Major Resolve buff which provides 5948 armor and it deals very good damage. It also grants you a 15% movement speed buff during its duration
- Critical Surge - your source of Major Brutality and Sorcery that will also heal you for 3300 whenever you deal critical damage, up to once every second. The heal itself can also be a critical heal
- Arctic Blast - a decent AoE DoT with very high chance to proc Chilled status effect, which deals increased damage thanks to the Glacial Presence passive. It can also stun small adds and heal you when used away from enemies
- Banner Bearer - increases your Magical damage done by 6%, provides various bonuses depending on your 2nd script and class, and provides Minor Berserk, increasing your damage done by 5%. It also severely decreases your sustain but it's not an issue on a Heavy Attack build
- Energy Overload - an ultimate we won't be using, but we'll have it slotted on frontbar for the Expert Mage passive. It can also be used in emergency when you're running out of resources
- Soul Burst - an AoE DoT which grants you Minor Courage, increasing your Weapon and Spell Damage by 215
- Flames of Oblivion - an ability that shoots out 3 fireballs at enemies at the start and then every 5 seconds for 15 seconds (4 times in total). It deals a lot of damage per cast and passively grants you Major Savagery and Major Prophecy
- Elemental Susceptibility - an extremely strong ability that does a multitude of things. It’s completely free to cast so it'll help you sustain. It applies Major Breach, which reduces enemies’ armor by 5948 which is a massive damage increase. It also applies Burning, Chilled and Concussed status effects at the beginning and then every 7.5 seconds. All of these Status Effects deal decent damage,but Concussed will also apply Minor Vulnerability for 4 seconds, increasing enemies’ damage taken by 5%. Chilled will also apply Minor Maim for 4 seconds, reducing enemies’ damage done by 5%. The Concussed proc will also synergise with our Elemental Blockade
- Elemental Blockade - this ability will constantly apply your Weapon Damage enchantment. It will also constantly apply Off Balance to enemies who are Concussed, and they’ll be Concussed thanks to Elemental Susceptibility. Enemies who are Off Balance take 70% increased damage from Heavy Attacks
- Standard of Might - extremely powerful ultimate that deals damage over time, increases all of your damage done and decreases all of your damage taken
Soul Burst is the first skill that has to go when you need to slot something situational, unless the situational skill specifically says that it's replacing something else. Arctic Blast is the second skill that has to go
- Resolving Vigor - a very strong HoT which provides Minor Resolve. It can be used as your main source of healing before you obtain the Ring of the Pale Order Mythic or in fights with invulnerability phases where you can't heal with Ring of the Pale Order
- Silver Leash - a chain ability that you can slot in trash packs to stack enemies and get through them faster
- Revealing Flare - slot it for more difficult fights where you need more damage mitigation. It's a skill that passively grants Major Protection, reducing your damage taken by 10%. It will also trigger the Magicka Aid passive, which increases Magicka Recovery by 10%
- Temporal Guard - slot it formore difficult fights where you need more damage mitigation. It's an ultimate we canfrontbar for the passive Minor Protection which decreases your damage taken by 5%. It willalso trigger the Concentrated Barrier passive
- Wield Soul - a strong damage shield that restores your Stamina and grants you Major Vitality, increasing your healing received and strength of damage shields by 12%
- Burning Embers - a single target DoT which heals you for 100% of the damage it causes. It can be useful in fights where you need more HPS
- Shimmering Shield - massive damage shield that works only against projectiles. Extremely strong but very situational. It also grants you Major Heroism when it absorbs projectiles, increasing your Ultimate generation
- Precognition - an ultimate that breaks you out of some otherwise unavoidable stuns, you'll need it to get around some mechanics which are otherwise impossible or very difficult to solo, like for example Inferno's Hold in Zaan the Scalecaller fight
- Ball of Lightning - an ability that teleports you forward. Use it in fights where you need more mobility or in fights where this teleport allows you to invalidate some mechanic
Priority List
I don't use a static rotation so this is just a list of priorities. Simply recast abilities when they run out and follow this list of priorities when there are multiple things to refresh
- Use Ulfsild's Contingency if your Empower is out or if it's going to run out by the end of the Heavy Attack you're channeling
- Use Critical Surge (you can recast this early)
- Use Elemental Susceptibility
- Use Elemental Blockade
- Use Hurricane
- Use Flames of Oblivion
- Use Arctic Blast
- Use Soul Burst
- Use Standard of Might
- Use Ulfsild's Contingency
Pre-buff
These abilities can be pre-cast before entering combat
- Ulfsild's Contingency
- Hurricane
- Critical Surge
- Flames of Oblivion
- Arctic Blast
- Soul Burst (the Minor Courage, not the damage)
Final Setups
A few examples of final setups you could end up with after applying the situational skills to the base setup
A setup with lots of damage mitigation for bosses that hit very hard
| Front Bar | Back Bar |
|---|---|
| Slot 1: Ulfsild's Contingency | Slot 1: Critical Surge |
| Slot 2: Hurricane | Slot 2: Flames of Oblivion |
| Slot 3: Wield Soul | Slot 3: Elemental Susceptibility |
| Slot 4: Revealing Flare | Slot 4: Elemental Blockade |
| Slot 5: Banner Bearer | Slot 5: Banner Bearer |
| Ultimate: Temporal Guard | Ultimate: Standard of Might |
EXPLANATION:
- Revealing Flare replaces Arctic Blast because it grants 10% damage mitigation
- Wield Soul replaces Soul Burst and then swaps places with Critical Surge so it's easily accessible on frontbar
- Temporal Guard replaces Energy Overload because it grants 5% damage mitigation
- Ulfsild's Contingency should use Gladiator's Tenacity instead of Lingering Torment, because it's a tiny DPS loss for a decent increase in survivability
- Banner Bearer's Magic script can change to Mitigation, depending on how much mitigation you need. It's not a default choice because it's a decent DPS loss for a decent increase in survivability
- Banner Bearer's Berserk script can change to Resolve, depending on how much mitigation you need. It's not a default choice because it's a decent DPS loss for a decent increase in survivability
A setup I've used when fighting Executor Jerensi in the Exiled Redoubt dungeon
| Front Bar | Back Bar |
|---|---|
| Slot 1: Ulfsild's Contingency | Slot 1: Critical Surge |
| Slot 2: Hurricane | Slot 2: Flames of Oblivion |
| Slot 3: Wield Soul | Slot 3: Elemental Susceptibility |
| Slot 4: Ball of Lightning | Slot 4: Elemental Blockade |
| Slot 5: Banner Bearer | Slot 5: Banner Bearer |
| Ultimate: Temporal Guard | Ultimate: Standard of Might |
EXPLANATION:
- Wield Soul replaces Soul Burst and then swaps places with Critical Surge so it's easily accessible on frontbar. It's required to survive Death Knell
- Ball of Lightning replaces Arctic Blast, because it's required to deal with the Execute mechanic
A setup I've used when fighting Prime Sorcerer Vandorallen in the Exiled Redoubt dungeon
| Front Bar | Back Bar |
|---|---|
| Slot 1: Ulfsild's Contingency | Slot 1: Critical Surge |
| Slot 2: Hurricane | Slot 2: Flames of Oblivion |
| Slot 3: Dampen Magic | Slot 3: Elemental Susceptibility |
| Slot 4: Revealing Flare | Slot 4: Elemental Blockade |
| Slot 5: Banner Bearer | Slot 5: Banner Bearer |
| Ultimate: Temporal Guard | Ultimate: Standard of Might |
EXPLANATION:
- Dampen Magic replaces Soul Burst and then swaps places with Critical Surge so it's easily accessible on frontbar. This time it's Dampen Magic instead of Wield Soul because this fight is bugged and the shield from your Wield Soul would constantly apply to the NPC. You will have to change your Monster Set to Light Armor type to be able to use Dampen Magic
- Revealing Flare replaces Arctic Blast because it grants 10% damage mitigation
PASSIVES
 Class
Class Weapon
 Armor
Armor Guild
Guild Alliance War
 Racial
 Craft
Craft
Class - Ardent Flame
![]() Combustion - High Priority
Combustion - High Priority
![]() Warmth - Medium Priority
Warmth - Medium Priority
![]() Searing Heat - High Priority
Searing Heat - High Priority
![]() World in Ruin - High Priority
World in Ruin - High Priority
GEAR
Example of a beginner setup made with just crafted gear.
| Gear Slot | Set | Weight/Type | Trait | Enchantment |
|---|---|---|---|---|
 Head |
New Moon Acolyte | Medium | Training/ Divines | Magicka |
 Shoulders |
New Moon Acolyte | Medium | Training/ Divines | Magicka |
 Chest |
Order's Wrath | Heavy | Training/ Reinforced | Magicka |
 Hands |
Order's Wrath | Light | Training/ Divines | Magicka |
 Belt |
Order's Wrath | Light | Training/ Divines | Magicka |
 Legs |
Order's Wrath | Medium | Training/ Divines | Magicka |
 Boots |
Order's Wrath | Light | Training/ Divines | Magicka |
 Necklace |
New Moon Acolyte | Jewelry | Bloodthirsty | Increase Physical Harm |
 Ring |
New Moon Acolyte | Jewelry | Bloodthirsty | Increase Physical Harm |
Ring |
New Moon Acolyte | Jewelry | Bloodthirsty | Increase Physical Harm |
 Frontbar Main Hand |
Assassin's Guile | Lightning Staff | Precise | Absorb Stamina |
Backbar Main Hand |
Assassin's Guile | Lightning Staff | Infused | Weapon Damage |
The setup in the table uses only crafted gear, but if you already own parts of the Regular setup like Ring of the Pale Order you can start using them immediately
You don't need to start with crafted gear, simply pick 2 sets from the Alternative section that are easiest for you to obtain
Gear that might be easier to obtain and can be used while you work towards the best gear
Dungeon gear isn't always an upgrade to Crafted/Overland gear. It's listed in case you already own some of it
Crafted:
All of these are tradable and can be bought from other players
Overland:
All of these are tradable and can be bought from other players
- Mother’s Sorrow (Light) - Deshaan
- Back-Alley Gourmand (Light) - Galen and Y'ffelon
- Dragonguard Elite (Medium) - Southern Elsweyr
PvP:
All of these are tradable and can be bought from other players
- Deadly Strike (Medium) - Bruma Elite Gear Vendor
Dungeons:
- Sergeant's Mail (Heavy) - Wayrest Sewers 1 & 2
- Noble Duelist's Silks (Light) - Blessed Crucible
- Storm Master (Medium) - Tempest Island
- Undaunted Infiltrator (Medium) - Arx Corinium
- Undaunted Unweaver (Light) - Blackheart Haven
- Tzogvin’s Warband (Medium) - Frostvault
- Use Training traits if you're still leveling. If you're already max level and have enough Champion Points you can instead use Divines and Reinforced on the chest piece
This is my suggested setup for regular content, such as Solo Arenas, World Bosses, Dolmens, Dragons, Volcanic Vents, Harrowstorms, Mirrormoor Incursions and majority of the dungeons.
| Gear Slot | Set | Weight/Type | Trait | Enchantment |
|---|---|---|---|---|
Head |
Ilambris | Medium | Divines | Magicka |
Shoulders |
Ilambris | Medium | Divines | Magicka |
Chest |
Sergeant's Mail | Heavy | Reinforced | Magicka |
Hands |
Noble Duelist | Light | Divines | Magicka |
Belt |
Noble Duelist | Light | Divines | Magicka |
Legs |
Armor of the Trainee | Medium | Divines | Magicka |
Boots |
Noble Duelist | Light | Divines | Magicka |
Necklace |
Sergeant's Mail | Jewelry | Bloodthirsty | Increase Physical Harm |
Ring |
Sergeant's Mail | Jewelry | Bloodthirsty | Increase Physical Harm |
Ring |
Ring of the Pale Order | Jewelry | Bloodthirsty | Increase Physical Harm |
Frontbar Main Hand |
Sergeant's Mail | Lightning Staff | Precise | Absorb Stamina |
Backbar Main Hand |
Noble Duelist | Lightning Staff | Infused | Weapon Damage |
- Ilambris isn't the strongest option, it's used for the Elementalist roleplay. If you want the strongest option use Anthelmir’s Construct
This is my suggested setup for soloing extremely difficult fights in dungeons.
| Gear Slot | Set | Weight/Type | Trait | Enchantment |
|---|---|---|---|---|
Head |
Ilambris | Medium | Divines/ Well-Fitted | Magicka |
Shoulders |
Ilambris | Medium | Divines/ Well-Fitted | Magicka |
Chest |
Sergeant's Mail | Heavy | Reinforced | Magicka |
Hands |
Vestment of Olorime | Light | Divines/ Well-Fitted | Magicka |
Belt |
Vestment of Olorime | Light | Divines/ Well-Fitted | Magicka |
Legs |
Armor of the Trainee | Medium | Divines/ Well-Fitted | Magicka |
Boots |
Vestment of Olorime | Light | Divines/ Well-Fitted | Magicka |
Necklace |
Sergeant's Mail | Jewelry | Bloodthirsty | Increase Physical Harm |
Ring |
Sergeant's Mail | Jewelry | Bloodthirsty | Increase Physical Harm |
Ring |
Ring of the Pale Order | Jewelry | Bloodthirsty | Increase Physical Harm |
Frontbar Main Hand |
Sergeant's Mail | Lightning Staff | Precise | Absorb Stamina |
Backbar Main Hand |
Vestment of Olorime | Lightning Staff | Infused | Weapon Damage |
- You can change some (or all) of the Magicka enchants to Health ones for extremely hard hitting bosses
- Ilambris isn't the strongest option, it's used for the Elementalist roleplay. If you want the strongest option use Anthelmir’s Construct
CHAMPION POINTS
Warfare
- Weapons Expert (20% Light and Heavy Attack Damage)
- Deadly Aim (6% Single Target Damage)
- Fighting Finesse (8% Critical Damage and Healing)
- Exploiter (10% Damage against Off Balance enemies)
Fitness
- Boundless Vitality (1400 Max Health)
- Fortified (1731 armor)
- Bloody Renewal (1500 Stamina on kills)
- Rejuvenation (90 Health, Stamina and Magicka Recovery)
ADDITIONAL INFO:
- Replace Rejuvenation with Bastion when using Wield Soul
- When soloing extremely difficult dungeons you should replace Exploiter and Fighting Finesse with 2 of the 4 mitigation CPs ( Ironclad, Duelist’s Rebuff, Enduring Resolve, Unassailable )
RACE
When it comes to solo PvE, you need both damage and survivability so pretty much all races have useful racials.
The best race for dealing damage is Khajiit. While the Critical Damage from Feline Ambush can sometimes be wasted due to Critical Damage being capped at 125%, it will never happen in solo content, because there will be no tanks or healers providing you with the Major Force buff.
The best race for survivability is Nord. The Rugged racial will provide around 6% damage mitigation.
MUNDUS
 The Thief
 The Lover
 The Lady
ATTRIBUTES
HEALTH
0
STAMINA
0
MAGICKA
64
For most content you should put all 64 points into Magicka. For difficult content you should devote as many attribute points as necessary to Health - for some content youll be able to get away with 32 Health 32 Magicka, for the extremely difficult stuff youll need 64 Health.
FOOD
You should use the Artaeum Pickled Fish Bowl. If you need a cheaper alternative, Solitude Salmon-Millet Soup provides only slightly lower stats.
Other decent foods:
- Orzorga's Tripe Trifle Pocket provides Stamina Recovery at the cost of Maximum Magicka. It will lower your damage, but its very useful for fights where you have to dodge roll a lot.
- Orzorga's Smoked Bear Haunch provides Magicka and Stamina Recovery at the cost of Maximum Magicka. It will lower your damage, but its very useful for fights where you have to both dodge roll a lot and spam your Wield Soul damage shield.
POTIONS

Since your sustain is being taken care of by the fact that Heavy Attacks restore resources, you can instead use the Armor potions, which will increase your armor by 5280. You can craft them by combiningBugloss,Mountain's Flower andMudcrab Chitin.
PARSE
50.5k on the 6mil dummy using Regular setup
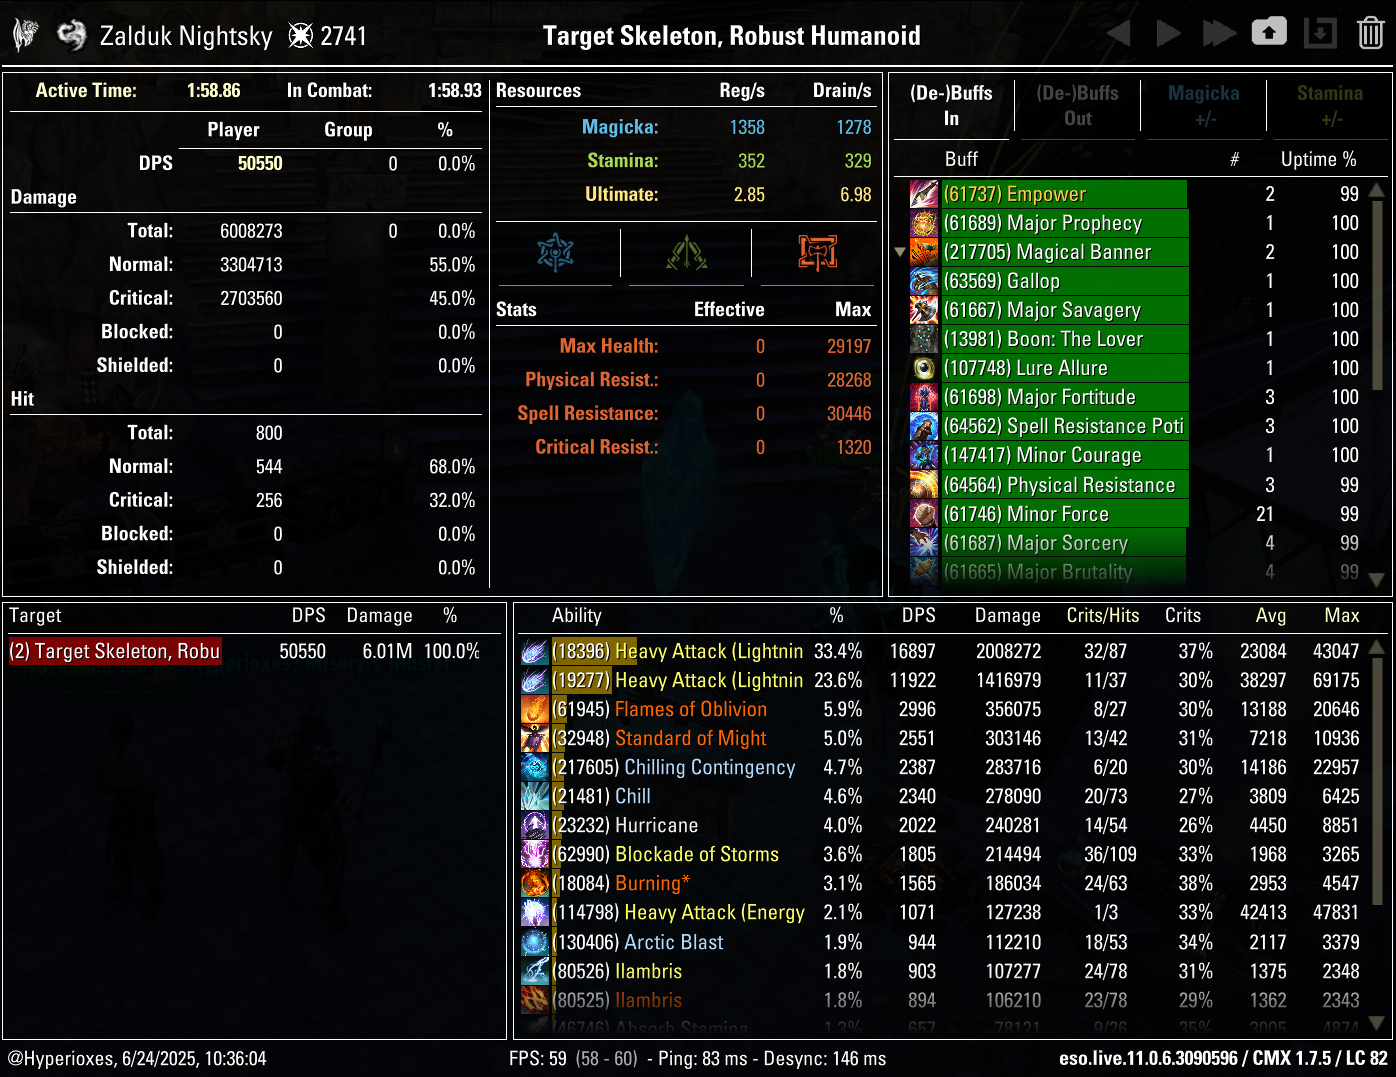
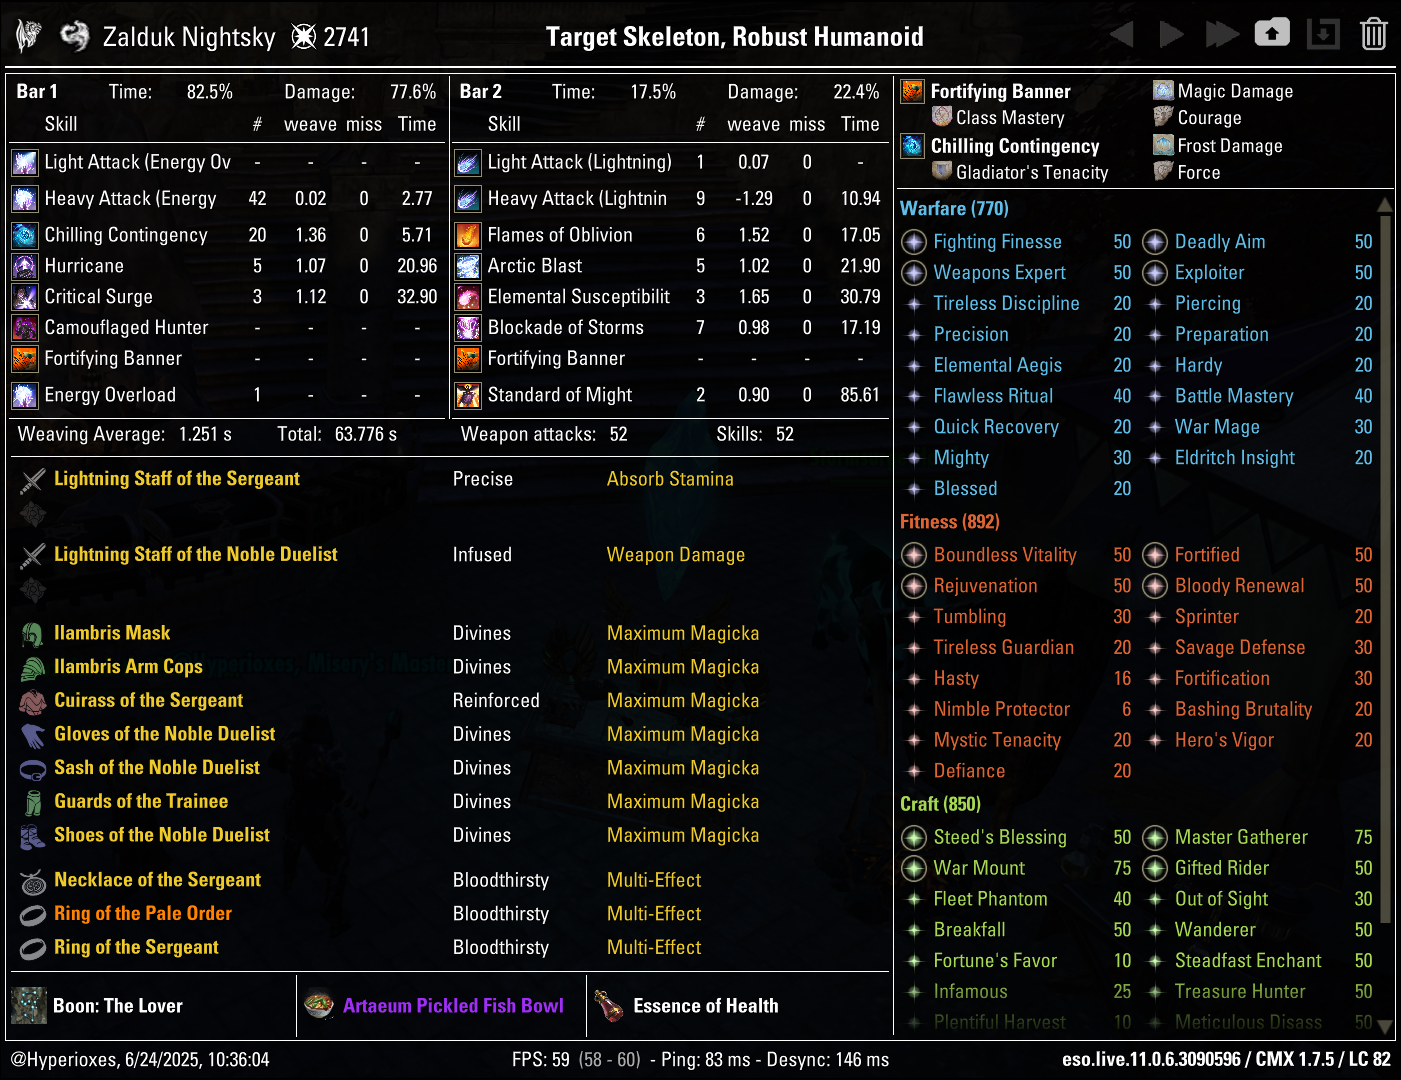
Recording of the 50.5k parse
GAMEPLAY
Here you can see this build tackling Veteran dungeons
THANKS FOR READING

If you've enjoyed this guide and want to support me, you can do so through Patreon. Your support will help me produce more guides.