One Bar Stamina Dragonknight DPS Build - ESO Guide
This build focuses on using Lethal Arrow which is extremely powerful on a Dragonknight because of the World in Ruin and Combustion passives, one of which straight up boosts Lethal Arrow's damage by 5% and the other one boosts the damage of the Poisoned status effect which Lethal Arrow is guaranteed to apply by 40%.
Works in normal and veteran dungeons, trials, hard modes, Dragonstar Arena, and Blackrose Prison.
Skill Setups
Base Setup
A base setup that will work for most situations and which should be your starting point when making situational setups
A skill setup that combines Single Target and AoE capabilities. It won't be perfect for any fight, but it's what you should use if you don't want to ever swap your skills
| Front Bar |
|---|
| Slot 1: Lethal Arrow |
| Slot 2: Acid Spray |
| Slot 3: Eruption |
| Slot 4: Engulfing Flames |
| Slot 5: Flames of Oblivion |
| Ultimate: Standard of Might |
- Lethal Arrow - an extremely powerful spammable that synergizes extremely well with Dragonknight's passives because it deals increased damage thanks to the World in Ruin passive and the Poisoned status effect it applies deals increased damage thanks to the Combustion passive
- Acid Spray - a decent AoE DoT that becomes your spammable when you need to damage multiple enemies
- Eruption - a ground DoT that also deals direct damage at the beginning, up to once every 10 seconds. It's crucial for proccing the Mountain’s Blessing passive which will grant you and your group the unique Minor Brutality buff, increasing everyone's Weapon Damage by 10%
- Engulfing Flames - a decent DoT that's going to increase enemies' Flame damage taken by 6%
- Flames of Oblivion - an ability that deals lots of damage per cast
- Standard of Might - extremely powerful ultimate that deals damage over time, increases all of your damage done and decreases all of your damage taken
- Resolving Vigor - a self-heal you'll need for some fights depending on mechanics you're assigned to deal with (for example if you're assigned to Reef Hearts in Reef Guardian fight). Replace Engulfing Flames with it
Final Setups
A few examples of final setups you could end up with after applying the situational skills to the base setup
AoE focused skill setup for dealing with trash packs
| Front Bar |
|---|
| Slot 1: Acid Spray |
| Slot 2: Burning Talons |
| Slot 3: Eruption |
| Slot 4: Engulfing Flames |
| Slot 5: Flames of Oblivion |
| Ultimate: Standard of Might |
- Acid Spray - a decent AoE DoT that's also your spammable
- Burning Talons - a very strong short AoE DoT that also grants your allies the Ignite synergy
- Eruption - a ground DoT that also deals direct damage at the beginning, up to once every 10 seconds. It's crucial for proccing the Mountain’s Blessing passive which will grant you and your group the unique Minor Brutality buff, increasing everyone's Weapon Damage by 10%
- Engulfing Flames - a decent DoT that's going to increase enemies' Flame damage taken by 6%
- Flames of Oblivion - an ability that deals lots of damage per cast
- Standard of Might - extremely powerful ultimate that deals damage over time, increases all of your damage done and decreases all of your damage taken
Single Target focused setup with a bit of AoE damage for dealing with bosses
| Front Bar |
|---|
| Slot 1: Lethal Arrow |
| Slot 2: Venomous Claw |
| Slot 3: Eruption |
| Slot 4: Engulfing Flames |
| Slot 5: Flames of Oblivion |
| Ultimate: Standard of Might |
- Lethal Arrow - an extremely powerful spammable that synergizes extremely well with Dragonknight's passives because it deals increased damage thanks to the World in Ruin passive and the Poisoned status effect it applies deals increased damage thanks to the Combustion passive
- Venomous Claw - a strong DoT that is also guaranteed to proc the Poisoned status effect
- Eruption - a ground DoT that also deals direct damage at the beginning, up to once every 10 seconds. It's crucial for proccing the Mountain’s Blessing passive which will grant you and your group the unique Minor Brutality buff, increasing everyone's Weapon Damage by 10%
- Engulfing Flames - a decent DoT that's going to increase enemies' Flame damage taken by 6%
- Flames of Oblivion - an ability that deals lots of damage per cast
- Standard of Might - extremely powerful ultimate that deals damage over time, increases all of your damage done and decreases all of your damage taken
- Resolving Vigor - a self-heal you'll need for some fights depending on mechanics you're assigned to deal with (for example if you're assigned to Reef Hearts in Reef Guardian fight). Replace Engulfing Flames with it
- Acid Spray - for boss fights that require more AoE replace Venomous Claw with Acid Spray, which is an AoE DoT that can also be used as a spammable
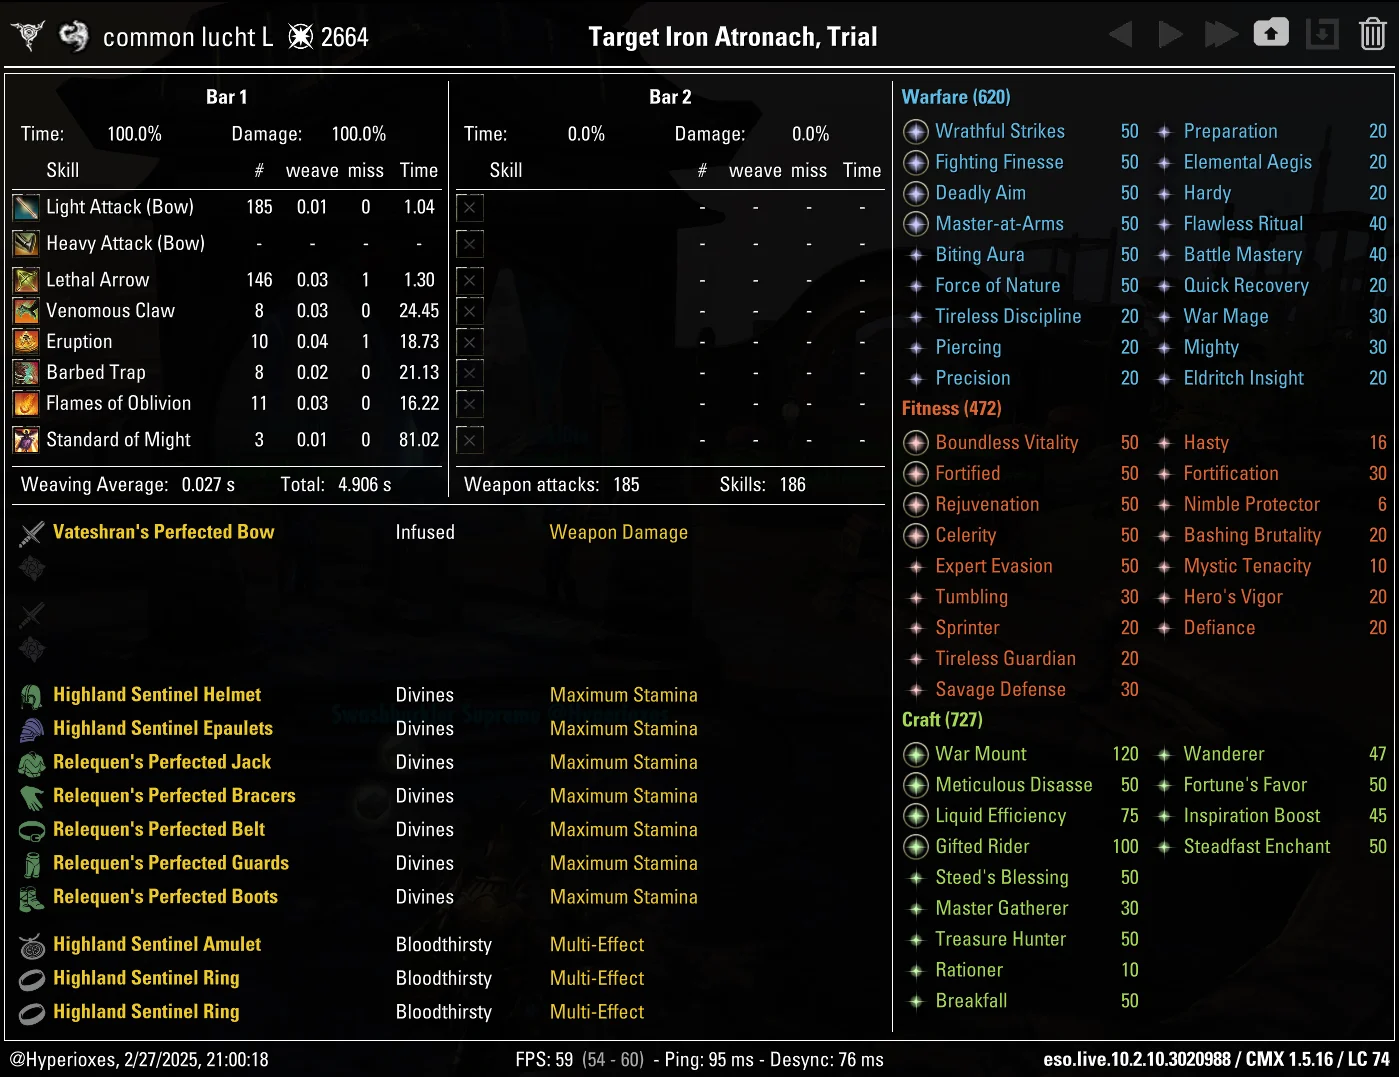
A skill setup for parsing on a dummy. Parse gear setup doesn't use Oakensoul Ring so it can utilise backbarred Molten Whip for additional passive Weapon and Spell Damage
| Front Bar | Back Bar |
|---|---|
| Slot 1: Lethal Arrow | Slot 1: Molten Whip |
| Slot 2: Venomous Claw | |
| Slot 3: Eruption | |
| Slot 4: Barbed Trap | |
| Slot 5: Flames of Oblivion | |
| Ultimate: Standard of Might |
- Lethal Arrow - an extremely powerful spammable that synergizes extremely well with Dragonknight's passives because it deals increased damage thanks to the World in Ruin passive and the Poisoned status effect it applies deals increased damage thanks to the Combustion passive
- Venomous Claw - a strong DoT that is also guaranteed to proc the Poisoned status effect. It's also going to grant you a stack of Molten Whip
- Eruption - a ground DoT that also deals direct damage at the beginning, up to once every 10 seconds. It's crucial for proccing the Mountain’s Blessing passive which will grant you the unique Minor Brutality buff, increasing your Weapon Damage by 10%
- Barbed Trap - a DoT that will also apply Hemorrhage status effect at the start and grant you Minor Force buff, increasing your Critical Damage by 10%. It will also trigger the Slayer passive
- Flames of Oblivion - an ability that deals lots of damage per cast. It's also going to grant you a stack of Molten Whip
- Standard of Might - extremely powerful ultimate that deals damage over time, increases all of your damage done and decreases all of your damage taken. It's also going to grant you a stack of Molten Whip
- Molten Whip - an ability you can keep slotted on your backbar to gain its passive benefits. It will grant you 300 Weapon and Spell Damage as it will be procced by Venomous Claw, Burning Embers and Standard of Might
Passives
There are no passives you need to skip with this build, you should get all of them.
Gear
Base Setup
A base setup that will work for most situations and which should be your starting point when making situational setups
Default setup for dungeons and trials
| Gear Slot | Set | Weight/Type | Trait | Enchantment |
|---|---|---|---|---|
 Head Head
|
Ansuul's Torment | Medium | Divines | Stamina |
 Shoulders Shoulders
|
Slimecraw | Light | Divines | Stamina |
 Chest Chest
|
Arms of Relequen | Medium | Divines | Stamina |
 Hands Hands
|
Arms of Relequen | Medium | Divines | Stamina |
 Belt Belt
|
Arms of Relequen | Medium | Divines | Stamina |
 Legs Legs
|
Arms of Relequen | Medium | Divines | Stamina |
 Boots Boots
|
Arms of Relequen | Medium | Divines | Stamina |
 Necklace Necklace
|
Ansuul's Torment | Jewelry | Bloodthirsty | Increase Physical Harm |
 Ring Ring
|
Ansuul's Torment | Jewelry | Bloodthirsty | Increase Physical Harm |
| Ring
|
Oakensoul Ring | Jewelry | Bloodthirsty | Increase Physical Harm |
 Frontbar Main Hand Frontbar Main Hand
|
Ansuul's Torment | Bow | Infused | Weapon Damage |
When choosing different sets, at least one of your sets has to be Medium weight. When choosing a Light set, use it on Weapon, Jewelry and the Shoulder or Head piece, so you end up with 6 Medium/1 Light combination. Keep in mind that Crafted sets and Monster sets come in all weights
For example, a default setup for trash packs would replace Arms of Relequen with Sul-Xan's Torment
How to choose which set to replace:
- Arms of Relequen - extremely powerful but Single Target focused, so you won't want to use it in AoE fights. It's also less optimal in Single Target fights where you constantly have to switch targets, which means you can't keep up Relequen stacks
- Ansuul’s Torment - less powerful than Relequen, but extremely reliable. There is no fight in the game that invalidates Ansuul. It can also gain slight edge in fights where you can interrupt your enemies
Gear that can be stronger than the setup from the table in specific situations or when specific circumstances are present
- Sul-Xan's Torment - the best set for trash packs and for bosses that regularly spawn smaller adds
- Highland Sentinel - the strongest set if you are able to stand still in a certain encounter
- Roar of Alkosh - a support set that allows you to provide 6000 penetration for your team, as long as they provide you with at least 1 synergy every 10 seconds. It's extremely beneficial to have at least 1 Alkosh user in trial groups. Using Alkosh in dungeons will also allow you to keep using The Thief Mundus even if your tank doesn't use any penetration sets
Gear that is easier to obtain and can be used while you work towards the best gear
Crafted:
All of these are tradable and can be bought from other players
Overland:
All of these are tradable and can be bought from other players
- Mother’s Sorrow (Light) - Deshaan
- Back-Alley Gourmand (Light) - Galen and Y'ffelon
- Dragonguard Elite (Medium) - Southern Elsweyr
Dungeons:
- Tzogvin’s Warband (Medium) - Frostvault
- Pillar of Nirn (Medium) - Falkreath Hold
- Essence Thief (Medium) - White-Gold Tower
- Leviathan (Medium) - Crypt of Heart 1 & 2
Final Setups
A few examples of final setups you could end up with after applying situational rules to the base setup
Setup for parsing on the practice dummy
| Gear Slot | Set | Weight/Type | Trait | Enchantment |
|---|---|---|---|---|
| Head
|
Highland Sentinel | Medium | Divines | Stamina |
| Shoulders
|
Highland Sentinel | Light | Divines | Stamina |
| Chest
|
Arms of Relequen | Medium | Divines | Stamina |
| Hands
|
Arms of Relequen | Medium | Divines | Stamina |
| Belt
|
Arms of Relequen | Medium | Divines | Stamina |
| Legs
|
Arms of Relequen | Medium | Divines | Stamina |
| Boots
|
Arms of Relequen | Medium | Divines | Stamina |
| Necklace
|
Highland Sentinel | Jewelry | Bloodthirsty | Increase Physical Harm |
| Ring
|
Highland Sentinel | Jewelry | Bloodthirsty | Increase Physical Harm |
| Ring
|
Highland Sentinel | Jewelry | Bloodthirsty | Increase Physical Harm |
| Frontbar Main Hand
|
Point-Blank Snipe | Bow | Infused | Weapon Damage |
Champion Points
Race
The difference between best and worst race is about 5% of DPS and there is no content in the entire game that you'd be blocked from completing because of choosing a bad race.
Other decent options


Mundus


Attributes
You should always put all 64 attribute points into Stamina.
Food
Potions
Most of the time you should use Tri-Stat potions for the extra resources and healing.
Use the Weapon Power potions. They'll improve your Stamina sustain and provide Major Brutality.
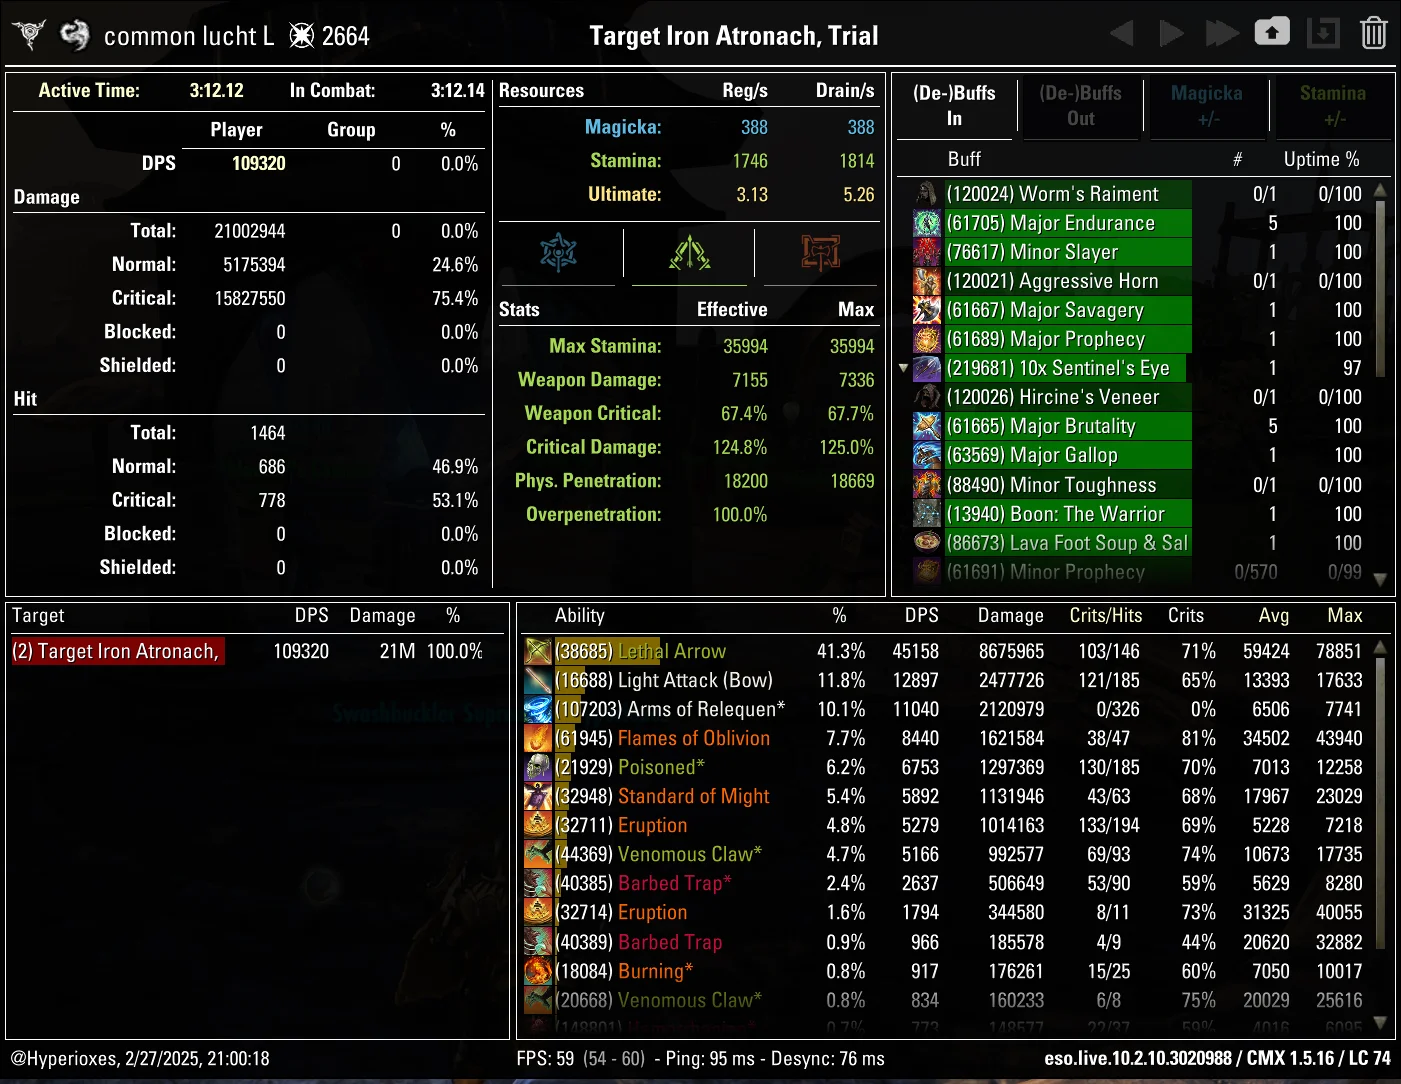
Parses

THANKS FOR READING

If you've enjoyed this guide and want to support me, you can do so through Patreon. Your support will help me produce more guides.