


One Hand and Shield Stamina Dragonknight Solo Build - ESO Guide
This build is archived. Use the current Stamina Dragonknight Solo build with a Sword and Shield if you want the same playstyle.
While One Hand and Shield isn't usually the ideal weapon type for Solo, it has its niche, and that niche are fights with a lot of blockable direct damage, like for example Anthelmir in Oathsworn Pit or basically any fight in the Bal Sunnar dungeon. And even outside of that niche, it's not that far behind Dual Wield in terms of DPS.
This build is capable of soloing every Veteran dungeon that doesn't have a specific mechanic that requires multiple people. It's also capable of soloing most Hard Mode dungeons, and with some adjustments even the more difficult ones.
In this guide I'll be regularly using the terms Regular and Difficult. Regular refers to content that is intended to be solo-ed (such as Maelstrom Arena or Vateshran Arena) and to any overland content such as World Bosses, Dolmens, Dragons, Volcanic Vents, Harrowstorms, Mirrormoor Incursions, etc. Majority of dungeon fights will also fall under that category. Difficult refers to extremely difficult dungeon fights.
Skill Setups
Base Setup
A base setup that will work for most situations and which should be your starting point when making situational setups
| Front Bar | Back Bar |
|---|---|
| Slot 1: Shield Throw | Slot 1: Soul Burst |
| Slot 2: Burning Embers | Slot 2: Eruption |
| Slot 3: Noxious Breath | Slot 3: Elemental Susceptibility |
| Slot 4: Barbed Trap | Slot 4: Elemental Blockade |
| Slot 5: Flames of Oblivion | Slot 5: Molten Whip |
| Ultimate: Flawless Dawnbreaker | Ultimate: Standard of Might |
- Shield Throw - Physical, Knight's Valor, Resolve. Use Power Slam instead if you don't have access to Scribing
- Soul Burst - Bleed, Lingering Torment, Courage. Use Volatile Armor instead if you don't have access to Scribing.
- Shield Throw - a spammable that will also interrupt enemies who are channeling and grant you Major Resolve for 10 seconds, which increases your armor by 5984 and is a crucial defensive buff
- Burning Embers - a DoT that will heal you for 100% of its damage done. It applies the Burning status effect at the beginning which will also proc the Combustion passive if it's off cooldown. It's also going to grant you a stack of Molten Whip
- Noxious Breath - an AoE DoT that applies the Major Breach debuff, which reduces enemies' armor by 5948 and is crucial for any non-overland content, though in this build we're also getting Major Breach from Elemental Susceptibility so Noxious Breath is used just because it's a strong AoE DoT, not because of its Major Breach. You can also use it as a spammable when facing multiple enemies. It will also grant you a stack of Molten Whip
- Barbed Trap - a DoT that will also apply Hemorrhage status effect at the start and grant you Minor Force buff, increasing your Critical Damage by 10%. It will also trigger the Slayer passive
- Flames of Oblivion - an ability that deals lots of damage per cast and passively grants you Major Savagery buff, which increases your Critical Chance by 12%, though it's less important because you'll already have that buff from your potion. It will also empower your Molten Whip
- Flawless Dawnbreaker - an ultimate that we won't be using, unless the fight is about to end and it's clear you won't be able to get another Standard of Might. Flawless Dawnbreaker is there just to proc the Slayer passive, which increases your Weapon and Spell Damage by 3%
- Soul Burst - an AoE DoT that will grant your Minor Courage buff, increasing your Weapon and Spell Damage by 215
- Eruption - a ground DoT that also deals direct damage at the beginning, up to once every 10 seconds. It's crucial for proccing the Mountain’s Blessing passive which will grant you the unique Minor Brutality buff, increasing your Weapon Damage by 10%
- Elemental Susceptibility - an extremely loaded ability that does a multitude of things. It’s completely free to cast so it'll help you sustain. It applies Major Breach, which reduces enemies’ armor by 5948 which is a massive damage increase. It also applies Burning, Chilled and Concussed status effects at the beginning and then every 7.5 seconds. The Burning status effect will also proc the Combustion passive if it's off cooldown. All of these Status Effects deal decent damage, but Concussed will also apply Minor Vulnerability for 4 seconds, increasing enemies’ damage taken by 5%. Chilled will also apply Minor Maim for 4 seconds, reducing enemies’ damage done by 5% and it will also apply Minor Brittle for 4 seconds if you were on your Ice Staff bar while the Chilled effect procced, which is always going to happen at the beginning when you cast Elemental Susceptibility. Minor Brittle increase Critical Damage taken by 10%. The Chilled proc will also synergise with our Elemental Blockade
- Elemental Blockade - this ability will constantly apply your Weapon Damage enchantment. It will also constantly apply Minor Breach to enemies who are Chilled, and they’ll be Chilled thanks to Elemental Susceptibility
- Molten Whip - ability that will cause our other Ardent Flame abilities to grant us 100 Weapon and Spell Damage and empower next Molten Whip by 20%, stacking up to 3 times and lasting 15 seconds. Use it when it's at 3 stacks. Using up the stacks doesn't remove the Weapon and Spell Damage buff
- Standard of Might - extremely powerful ultimate that deals damage over time, increases all of your damage done and decreases all of your damage taken. It will also grant you a stack of Molten Whip
Molten Whip and Soul Burst are the first skills that have to go when you need to slot something situational, unless the situational skill specifically says that it's replacing something else
- Resolving Vigor - use it for more difficult fights where the pressure is constant and thus you need the Minor Resolve. It can also be used as your main source of healing before you obtain the Ring of the Pale Order Mythic or in fights with invulnerability phases where you can't heal with Ring of the Pale Order
- Silver Leash - a chain ability that you can slot in trash packs to stack enemies and get through them faster
- Ulfsild's Contingency (Flame, Gladiator's Tenacity, Force) - a replacement for Barbed Trap in fights where you need more damage mitigation. It's a delayed AoE damage that also grants you 8% damage reduction for 8 seconds and Minor Force for 22 seconds, which increases your Critical Damage by 10%. You should recast it every 8 seconds when under pressure and every 22 seconds otherwise. Having it slotted on your frontbar will also trigger the Magicka Controller passive which will slightly improve your magicka sustain
- Temporal Guard - slot it for more difficult fights where you need more damage mitigation. It's an ultimate we can frontbar for the passive Minor Protection which decreases your damage taken by 5%. It will also trigger the Concentrated Barrier passive
- Revealing Flare - slot it for more difficult fights where you need more damage mitigation. It's a skill that passively grants Major Protection, reducing your damage taken by 10%. It will also trigger the Magicka Aid passive, which increases Magicka Recovery by 10%
- Venomous Claw - other morph of Burning Embers which deals more damage but doesn't heal you. You can use it when you want to trade survivability for more damage. Since you're switching a Magicka ability for a Stamina one, you should also change your Soul Burst's Bleed script to Flame script so that it costs Magicka instead of Stamina
- Power Slam - a replacement for Shield Throw in fights where you have to block a lot. Power Slam has decreased cost after blocking so it's the only way to sustain this kind of fights. When swapping out Shield Throw, you have to also swap Molten Whip to Volatile Armor to get your Major Resolve back
- Precognition - an ultimate that breaks you out of some otherwise unavoidable stuns, you'll need it to get around some mechanics which are otherwise impossible or very difficult to solo, like for example Inferno's Hold in Zaan the Scalecaller fight
- Defensive Stance - use it for fights where you have to block a lot of attacks. This skill will passively increase your Block Mitigation by 10% and reduce your Block Cost by 10%. It can also be used to gain a damage shield and reflect the next ranged attack within 6 seconds
- Shield Wall (either morph) - a decent ultimate for fights where you have to hold block for a very long period of time, like for example Roksa the Warped fight in Bal Sunnar
Priority List
Use this as a priority list. Recast abilities when they run out and follow this list when there are multiple things to refresh
Thanks to the Deadly Bash passive, this build has potential to utilise "bash-weaving", which means using a bash after each ability. If you want to do that, make sure to set a separate keybind for Bash instead of using the Block+Light Attack combination, as blocking will halt your Stamina Recovery. You should stop bash-weaving once your stamina gets too low.
- If your Molten Whip's Weapon and Spell Damage buff is about to run out while all of your Ardent Flame abilities are already running, re-cast Burning Embers or Noxious Breath early, whichever has less time remaining
- Use Shield Throw if you don't have Major Resolve, you can skip this step in easier fights
- Use Elemental Susceptibility
- Use Eruption
- Use Elemental Blockade
- Use Barbed Trap
- Use Soul Burst
- Use Molten Whip if it's at 3 stacks
- Use Flames of Oblivion
- Use Burning Embers
- Use Noxious Breath
- Use Standard of Might
- Use Shield Throw
Pre-buff
These abilities can be pre-cast before entering combat
- Flames of Oblivion
- Soul Burst
- Eruption (place it anywhere to get the Minor Brutality from Mountain’s Blessing)
Final Setups
A few examples of final setups you could end up with after applying the situational skills to the base setup
A setup with chains for dealing with trash packs
| Front Bar | Back Bar |
|---|---|
| Slot 1: Shield Throw | Slot 1: Soul Burst |
| Slot 2: Burning Embers | Slot 2: Eruption |
| Slot 3: Noxious Breath | Slot 3: Elemental Susceptibility |
| Slot 4: Ulfsild's Contingency | Slot 4: Elemental Blockade |
| Slot 5: Flames of Oblivion | Slot 5: Silver Leash |
| Ultimate: Flawless Dawnbreaker | Ultimate: Standard of Might |
A setup with lots of damage mitigation for bosses that hit very hard
| Front Bar | Back Bar |
|---|---|
| Slot 1: Shield Throw | Slot 1: Burning Embers |
| Slot 2: Revealing Flare | Slot 2: Eruption |
| Slot 3: Noxious Breath | Slot 3: Elemental Susceptibility |
| Slot 4: Ulfsild's Contingency | Slot 4: Elemental Blockade |
| Slot 5: Flames of Oblivion | Slot 5: Resolving Vigor |
| Ultimate: Temporal Guard | Ultimate: Standard of Might |
A setup I've used when fighting Zaan the Scalecaller in the Scalecaller Peak dungeon
| Front Bar | Back Bar |
|---|---|
| Slot 1: Shield Throw | Slot 1: Soul Burst |
| Slot 2: Burning Embers | Slot 2: Eruption |
| Slot 3: Noxious Breath | Slot 3: Elemental Susceptibility |
| Slot 4: Barbed Trap | Slot 4: Elemental Blockade |
| Slot 5: Flames of Oblivion | Slot 5: Molten Whip |
| Ultimate: Flawless Dawnbreaker | Ultimate: Precognition |
What Changes
Changes compared to the Base Setup
- Precognition is required to break out of Inferno's Hold
A setup I've used when fighting Kovan Giryon in the Bal Sunnar dungeon
| Front Bar | Back Bar |
|---|---|
| Slot 1: Power Slam | Slot 1: Soul Burst |
| Slot 2: Burning Embers | Slot 2: Eruption |
| Slot 3: Noxious Breath | Slot 3: Elemental Susceptibility |
| Slot 4: Barbed Trap | Slot 4: Elemental Blockade |
| Slot 5: Flames of Oblivion | Slot 5: Volatile Armor |
| Ultimate: Flawless Dawnbreaker | Ultimate: Standard of Might |
What Changes
Changes compared to the Base Setup
- Power Slam replaces Shield Throw because Kovan's light attacks hit very hard so you'll have to block most of them, and in order to sustain that much blocking combined with casting your skills you'll have to use Power Slam which has reduced cost after blocking an attack
- Since you no longer have Shield Throw providing you with Major Resolve, you have to replace Molten Whip with Volatile Armor to get that important buff back
A setup I've used when fighting Roksa the Warped in the Bal Sunnar dungeon
| Front Bar | Back Bar |
|---|---|
| Slot 1: Shield Throw | Slot 1: Soul Burst |
| Slot 2: Burning Embers | Slot 2: Eruption |
| Slot 3: Defensive Stance | Slot 3: Elemental Susceptibility |
| Slot 4: Barbed Trap | Slot 4: Elemental Blockade |
| Slot 5: Flames of Oblivion | Slot 5: Noxious Breath |
| Ultimate: Spell Wall | Ultimate: Standard of Might |
What Changes
Changes compared to the Base Setup
- Defensive Stance's increased block mitigation and reduced block cost help with surviving and sustaining blocking Roksa's beam
- Spell Ward ultimate helps with sustaining Stamina to block Roksa's beam
A setup I've used when fighting Matriarch Lladi Telvanni in the Bal Sunnar dungeon
| Front Bar | Back Bar |
|---|---|
| Slot 1: Shield Throw | Slot 1: Soul Burst |
| Slot 2: Burning Embers | Slot 2: Eruption |
| Slot 3: Noxious Breath | Slot 3: Elemental Susceptibility |
| Slot 4: Barbed Trap | Slot 4: Elemental Blockade |
| Slot 5: Flames of Oblivion | Slot 5: Resolving Vigor |
| Ultimate: Flawless Dawnbreaker | Ultimate: Standard of Might |
What Changes
Changes compared to the Base Setup
- Matriarch Lladi Telvanni has a phase where she becomes invulnerable and it becomes impossible to heal off of damaging her through Ring of the Pale Order. During that phase you'll have to keep up Resolving Vigor's HoT
Passives
The only passive you specifically have to skip is Tri Focus
 Class
Class
 Weapon
 Armor
Armor
 Guild
Guild
 Alliance War
 Racial
 Craft
Craft
Class - Ardent Flame
![]() Combustion - High Priority
Combustion - High Priority
![]() Warmth - Low Priority
Warmth - Low Priority
![]() Searing Heat - High Priority
Searing Heat - High Priority
![]() World in Ruin - High Priority
World in Ruin - High Priority
Class - Draconic Power
![]() Iron Skin - Medium Priority
Iron Skin - Medium Priority
![]() Burning Heart - Low Priority
Burning Heart - Low Priority
![]() Elder Dragon - Low Priority
Elder Dragon - Low Priority
![]() Scaled Armor - High Priority
Scaled Armor - High Priority
Class - Earthen Heart
![]() Eternal Mountain - Medium Priority
Eternal Mountain - Medium Priority
![]() Battle Roar - High Priority
Battle Roar - High Priority
![]() Mountain's Blessing - High Priority
Mountain's Blessing - High Priority
![]() Helping Hands - Low Priority
Helping Hands - Low Priority
Weapon - One Hand and Shield
![]() Fortress - High Priority
Fortress - High Priority
![]() Sword and Board - High Priority
Sword and Board - High Priority
![]() Deadly Bash - Medium Priority
Deadly Bash - Medium Priority
![]() Deflect Bolts - Medium Priority
Deflect Bolts - Medium Priority
![]() Battlefield Mobility - Medium Priority
Battlefield Mobility - Medium Priority
Weapon - Destruction Staff
![]() Tri Focus - Do Not Unlock
Tri Focus - Do Not Unlock
![]() Penetrating Magic - Low Priority
Penetrating Magic - Low Priority
![]() Elemental Force - Medium Priority
Elemental Force - Medium Priority
![]() Ancient Knowledge - Medium Priority
Ancient Knowledge - Medium Priority
![]() Destruction Expert - Low Priority
Destruction Expert - Low Priority
Armor - Light Armor
![]() Grace - Low Priority
Grace - Low Priority
![]() Evocation - Low Priority
Evocation - Low Priority
![]() Spell Warding - Low Priority
Spell Warding - Low Priority
![]() Prodigy - High Priority
Prodigy - High Priority
![]() Concentration - High Priority
Concentration - High Priority
Armor - Medium Armor
![]() Dexterity - High Priority
Dexterity - High Priority
![]() Wind Walker - Low Priority
Wind Walker - Low Priority
![]() Improved Sneak - Not needed
Improved Sneak - Not needed
![]() Agility - High Priority
Agility - High Priority
![]() Athletics - Low Priority
Athletics - Low Priority
Armor - Heavy Armor
![]() Resolve - Medium Priority
Resolve - Medium Priority
![]() Constitution - Low Priority
Constitution - Low Priority
![]() Juggernaut - Medium Priority
Juggernaut - Medium Priority
![]() Revitalize - Low Priority
Revitalize - Low Priority
![]() Rapid Mending - Low Priority
Rapid Mending - Low Priority
Guild - Fighters Guild
![]() Intimidating Presence - Medium Priority
Intimidating Presence - Medium Priority
![]() Slayer - High Priority
Slayer - High Priority
![]() Banish the Wicked - Medium Priority
Banish the Wicked - Medium Priority
![]() Skilled Tracker - Medium Priority
Skilled Tracker - Medium Priority
![]() Bounty Hunter - Not needed
Bounty Hunter - Not needed
Guild - Mages Guild
![]() Persuasive Will - Not needed
Persuasive Will - Not needed
![]() Mage Adept - Low Priority
Mage Adept - Low Priority
![]() Everlasting Magic - Medium Priority
Everlasting Magic - Medium Priority
![]() Magicka Controller - Low Priority
Magicka Controller - Low Priority
![]() Might of the Guild - Low Priority
Might of the Guild - Low Priority
Alliance War - Support
![]() Magicka Aid - Medium Priority
Magicka Aid - Medium Priority
![]() Combat Medic - Not needed
Combat Medic - Not needed
![]() Battle Resurrection - Not needed
Battle Resurrection - Not needed
Race - Your race
Get all of your racials, no matter which race you are
Craft - Alchemy
![]() Solvent Proficiency - Not needed
Solvent Proficiency - Not needed
![]() Keen Eye: Reagents - Not needed
Keen Eye: Reagents - Not needed
![]() Medicinal Use - High Priority
Medicinal Use - High Priority
![]() Chemistry - Not needed
Chemistry - Not needed
![]() Laboratory Use - Not needed
Laboratory Use - Not needed
![]() Snakeblood - Not needed
Snakeblood - Not needed
Gear
Example of a beginner setup made with just crafted gear.
| Gear Slot | Set | Weight/Type | Trait | Enchantment |
|---|---|---|---|---|
 Head |
Threads of War | Medium | Training /Divines | Stamina |
 Shoulders |
Threads of War | Medium | Training /Divines | Stamina |
 Chest |
Order's Wrath | Heavy | Training /Reinforced | Stamina |
 Hands |
Order's Wrath | Medium | Training /Divines | Stamina |
 Belt |
Order's Wrath | Light | Training /Divines | Stamina |
 Legs |
Order's Wrath | Medium | Training /Divines | Stamina |
 Boots |
Order's Wrath | Medium | Training /Divines | Stamina |
 Necklace |
Threads of War | Jewelry | Bloodthirsty | Increase Physical Harm |
 Ring |
Threads of War | Jewelry | Bloodthirsty | Increase Physical Harm |
Ring |
Threads of War | Jewelry | Bloodthirsty | Increase Physical Harm |
 Frontbar Main Hand |
Assassin's Guile | Any 1-handed | Charged | Poison |
 Frontbar Off Hand |
Assassin's Guile | Shield | Training /Divines | Stamina |
Backbar Main Hand |
Assassin's Guile | Ice Staff | Infused | Weapon Damage |
The setup in the table uses only crafted gear, but if you already own parts of the Regular setup like Ring of the Pale Order you can start using them immediately
If you want to Solo some difficult content without Ring of the Pale Order you'll have to add Resolving Vigor to your skill setup, but for the easier stuff the healing from Burning Embers will be enough
The weight distribution of the setup from the table is 1 Heavy 5 Medium 1 Light so that you can start leveling up all your armor skill lines. Once you transition to Regular setup you'll be using 6 Medium 1 Light most of the time, switching to 1 Heavy 5 Medium 1 Light only against more difficult fights
You don't need to start with crafted gear, simply pick 2 sets from the Alternative section that are easiest for you to obtain
Gear that is easier to obtain and can be used while you work towards the best gear
Crafted:
All of these are tradable and can be bought from other players
Overland:
All of these are tradable and can be bought from other players
- Mother’s Sorrow (Light) - Deshaan
- Back-Alley Gourmand (Light) - Galen and Y'ffelon
- Dragonguard Elite (Medium) - Southern Elsweyr
Dungeons:
- Tzogvin’s Warband (Medium) - Frostvault
- Pillar of Nirn (Medium) - Falkreath Hold
- Leviathan (Medium) - Crypt of Heart 1 & 2
- Use Training traits if you're still leveling. If you're already max level and have enough Champion Points you can instead use Divines and Reinforced on the chest piece
- For overland content, you don't need as much penetration so you can replace Ice Staff with Inferno Staff
This is my suggested setup for regular content, such as Solo Arenas, World Bosses, Dolmens, Dragons, Volcanic Vents, Harrowstorms, Mirrormoor Incursions and majority of the dungeons.
| Gear Slot | Set | Weight/Type | Trait | Enchantment |
|---|---|---|---|---|
Head |
Slimecraw | Light | Divines | Stamina |
Shoulders |
Essence Thief | Medium | Divines | Stamina |
Chest |
Ansuul's Torment | Medium | Divines | Stamina |
Hands |
Ansuul's Torment | Medium | Divines | Stamina |
Belt |
Ansuul's Torment | Medium | Divines | Stamina |
Legs |
Ansuul's Torment | Medium | Divines | Stamina |
Boots |
Ansuul's Torment | Medium | Divines | Stamina |
Necklace |
Essence Thief | Jewelry | Bloodthirsty | Increase Physical Harm |
Ring |
Essence Thief | Jewelry | Bloodthirsty | Increase Physical Harm |
Ring |
Ring of the Pale Order | Jewelry | Bloodthirsty | Increase Physical Harm |
Frontbar Main Hand |
Essence Thief | Any 1-handed | Charged | Poison |
Frontbar Off Hand |
Essence Thief | Shield | Divines | Stamina |
Backbar Main Hand |
Crushing Wall | Ice Staff | Infused | Weapon Damage |
If you want to switch to a situational set it's best to replace Ansuul’s Torment, especially since most good situational sets also provide Minor Slayer. Essence Thief provides a lot of sustain so replacing it only makes sense in fights where you can't retrieve the Essence Thief pool, like for example in any Dragon fight. Without Essence Thief you can forget about sustaining bash-weaving and you might have to heavy attack once or twice before Standard of Might will replenish your Stamina with Battle Roar
For example, a default setup for trash packs would replace Ansuul's Torment with Sul-Xan’s Torment
Gear that can be stronger than the setup from the table in specific situations or when specific circumstances are present
- Sul-Xan’s Torment - the best set for trash packs and for bosses that regularly spawn smaller adds
- Arms of Relequen - best for easier Single Target fights. Does a lot of Single Target damage, but this damage doesn't heal you through Ring of the Pale Order
- Berserking Warrior - replacement for Essence Thief for fights where you can't retrieve the pool. It's a Heavy set, so your weight distribution will change from 6 Medium 1 Light to 1 Heavy 5 Medium 1 Light. The one body armor piece should ideally be on the Chest gear slot as it provides the most armor. You can also use the Reinforced trait instead of Divines on that chest piece if you want more survivability.
- For overland content, you don't need as much penetration so you can replace Ice Staff with Inferno Staff
This is my suggested setup for soloing extremely difficult fights in dungeons.
| Gear Slot | Set | Weight/Type | Trait | Enchantment |
|---|---|---|---|---|
Head |
Roksa the Warped | Medium | Divines /Well-Fitted | Stamina |
Shoulders |
Roksa the Warped | Medium | Divines /Well-Fitted | Stamina |
Chest |
Armor of the Trainee | Heavy | Reinforced | Stamina |
Hands |
Ansuul's Torment | Medium | Divines /Well-Fitted | Stamina |
Belt |
Vestment of Olorime | Light | Divines /Well-Fitted | Stamina |
Legs |
Ansuul's Torment | Medium | Divines /Well-Fitted | Stamina |
Boots |
Ansuul's Torment | Medium | Divines /Well-Fitted | Stamina |
Necklace |
Vestment of Olorime | Jewelry | Bloodthirsty | Increase Physical Harm |
Ring |
Vestment of Olorime | Jewelry | Bloodthirsty | Increase Physical Harm |
Ring |
Ring of the Pale Order | Jewelry | Bloodthirsty | Increase Physical Harm |
Frontbar Main Hand |
Ansuul's Torment | Any 1-handed | Charged | Poison |
Frontbar Off Hand |
Ansuul's Torment | Shield | Divines | Stamina |
Backbar Main Hand |
Vestment of Olorime | Ice Staff | Infused | Weapon Damage |
Champion Points
Race
For solo you need both damage and survivability, so every race brings something to the table, but these two stand out as the best options for damage and survivability respectively


Mundus


Attributes
For most content you should put all 64 points into Stamina. For difficult content you should devote as many attribute points as necessary to Health - for some content you'll be able to get away with 32 Health 32 Stamina, for the extremely difficult stuff you'll need 64 Health.
Food
Potions
Use the Weapon Power potions (Increase Weapon Power, Weapon Critical, Restore Stamina). They'll greatly improve your sustain and provide Major Brutality and Major Savagery which are crucial.
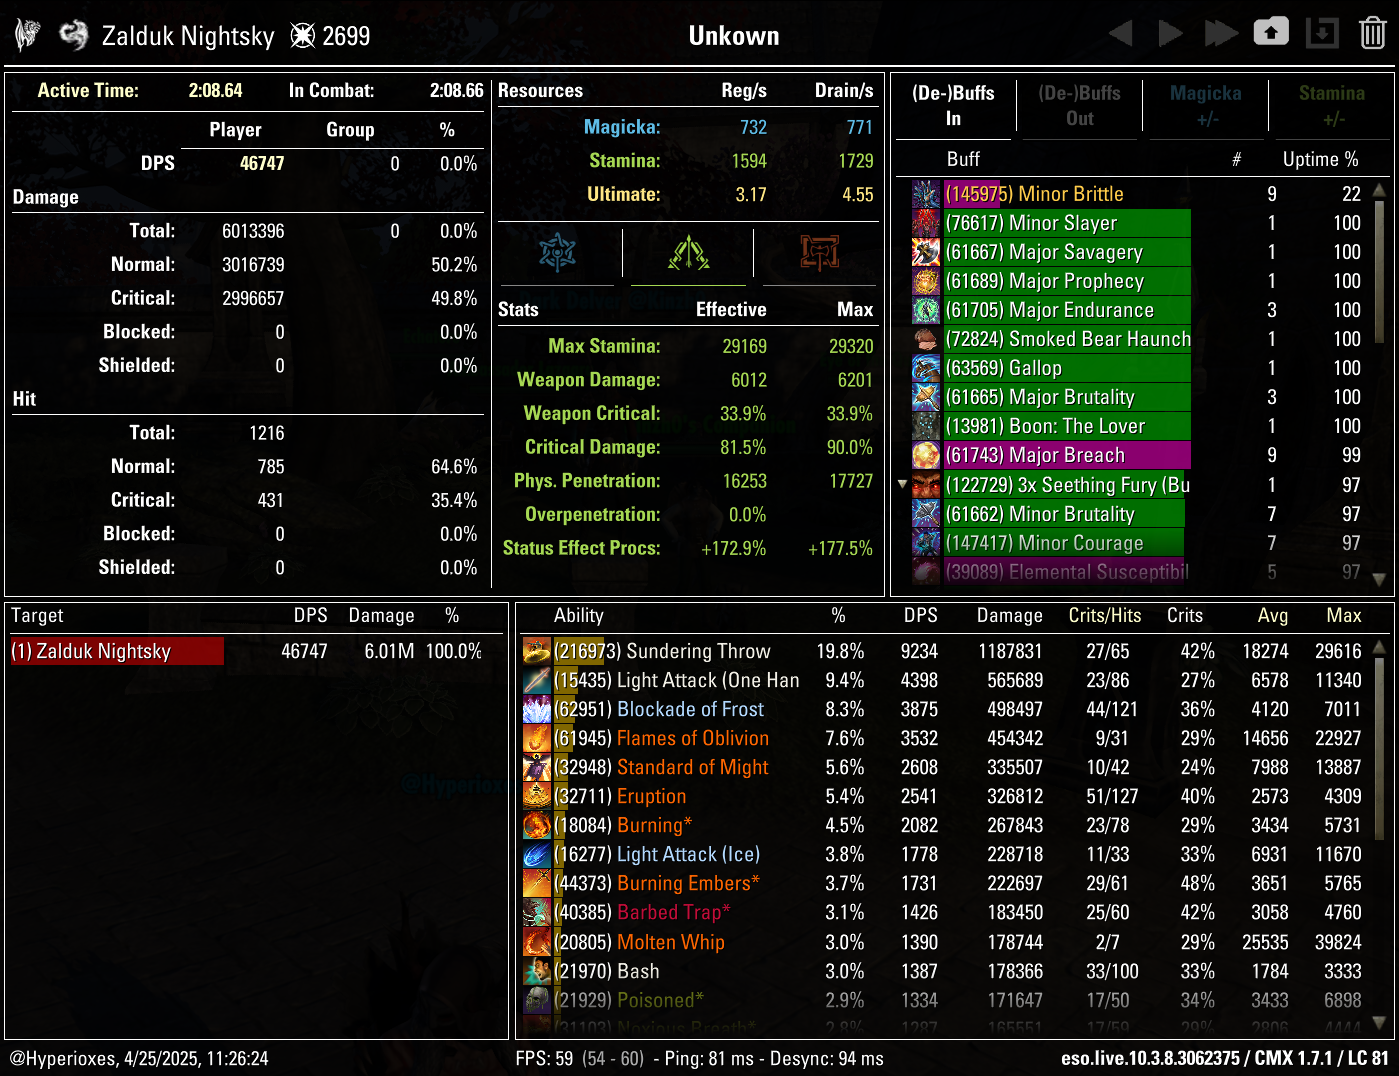
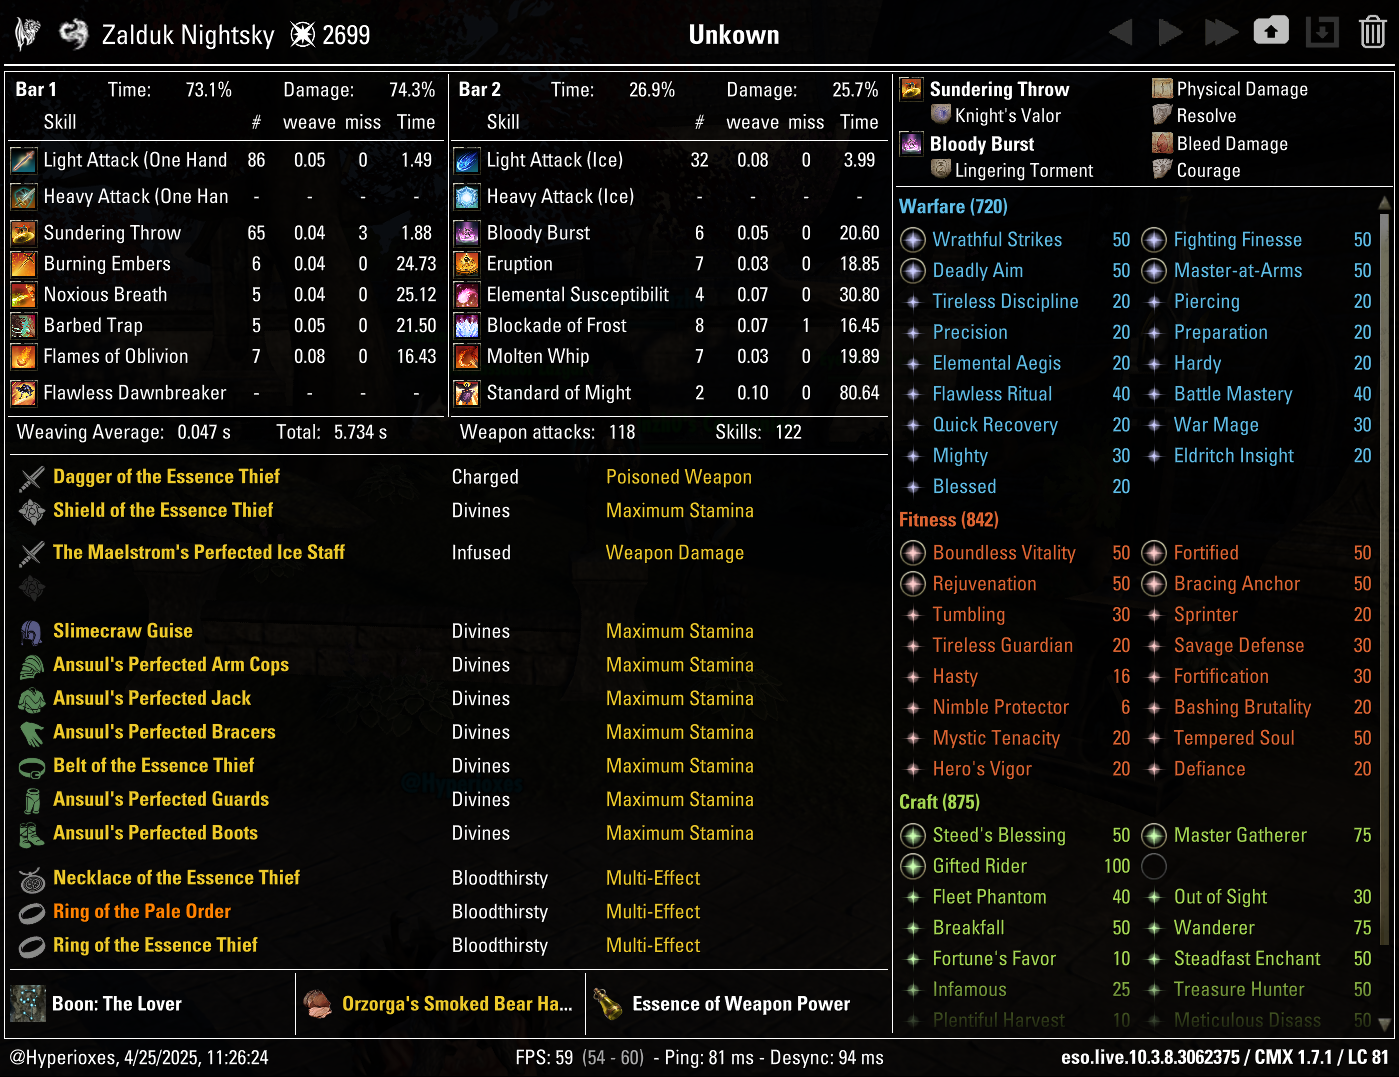
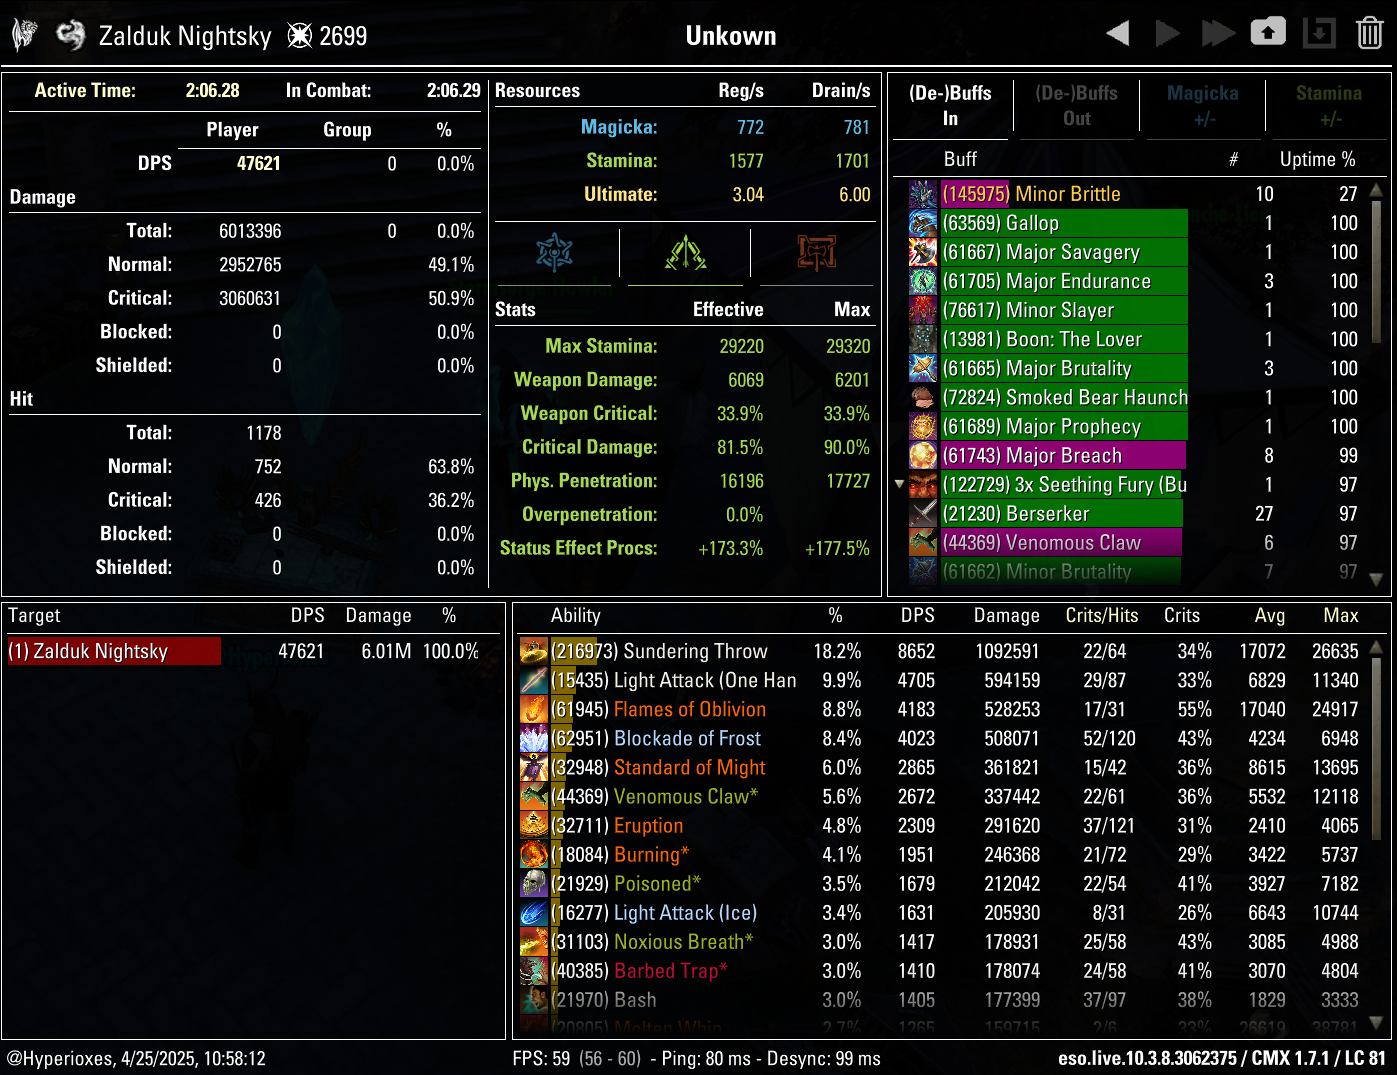
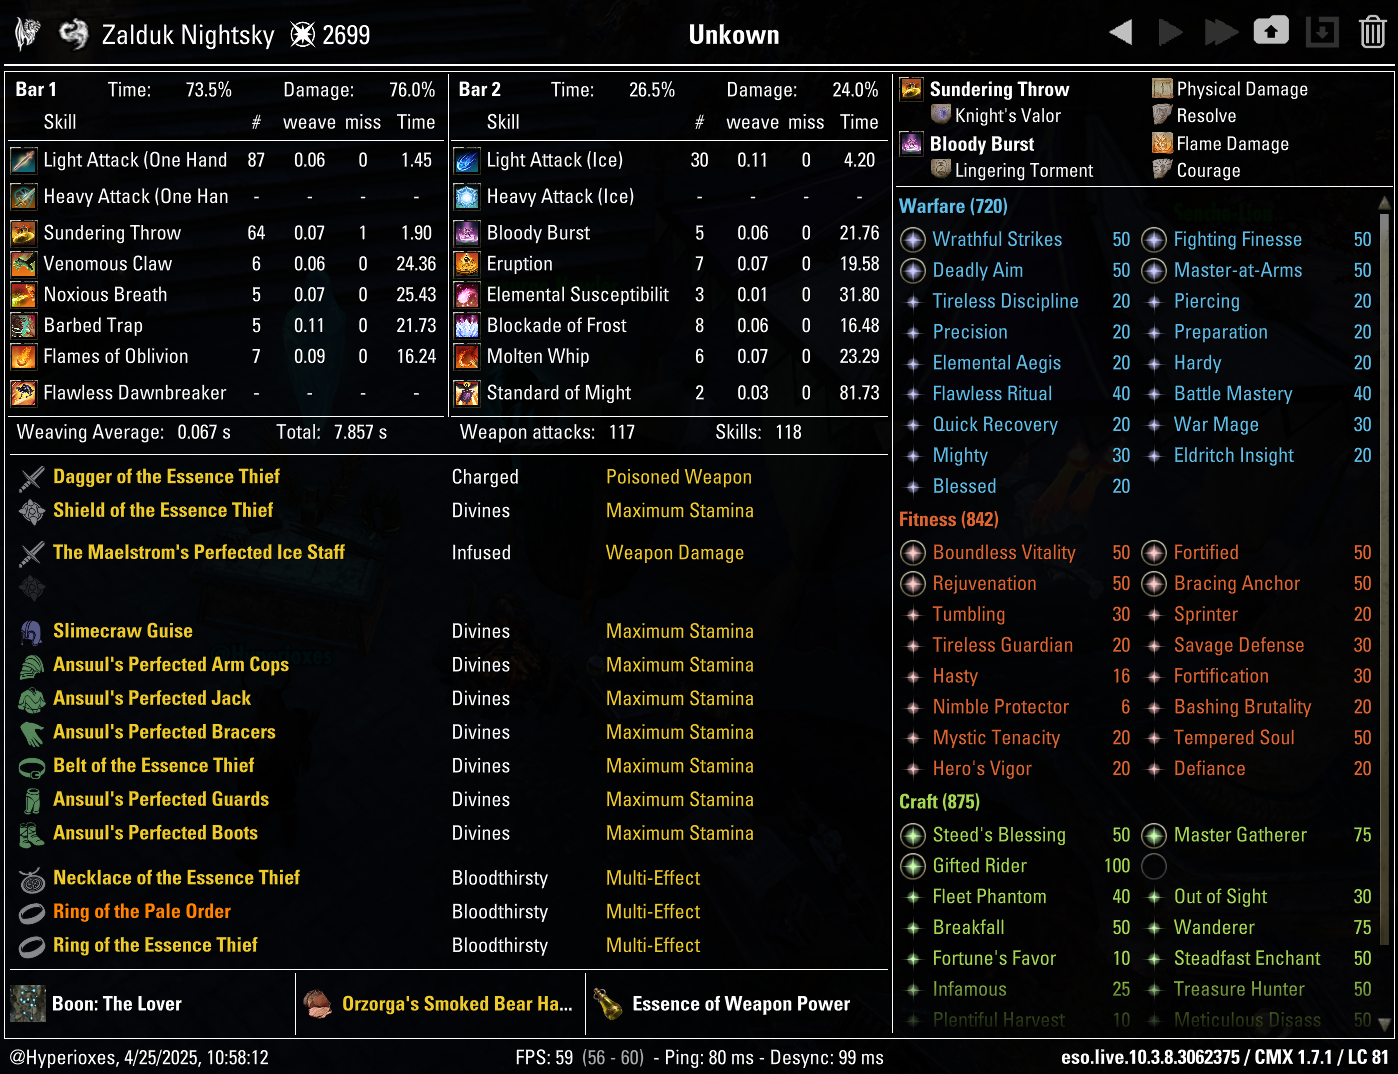
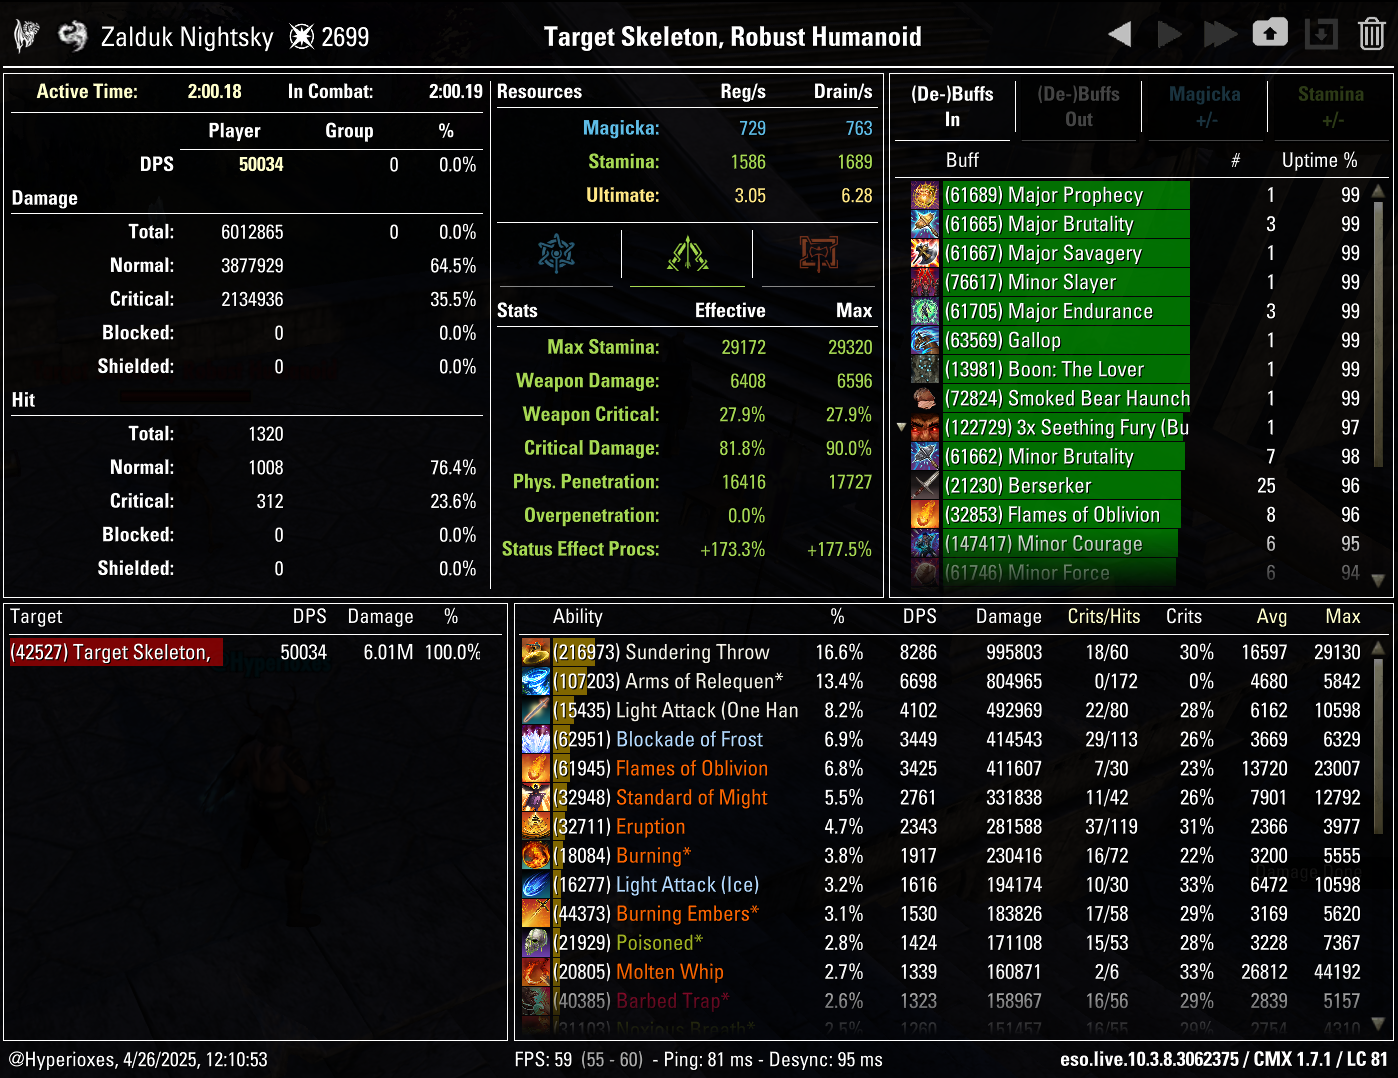
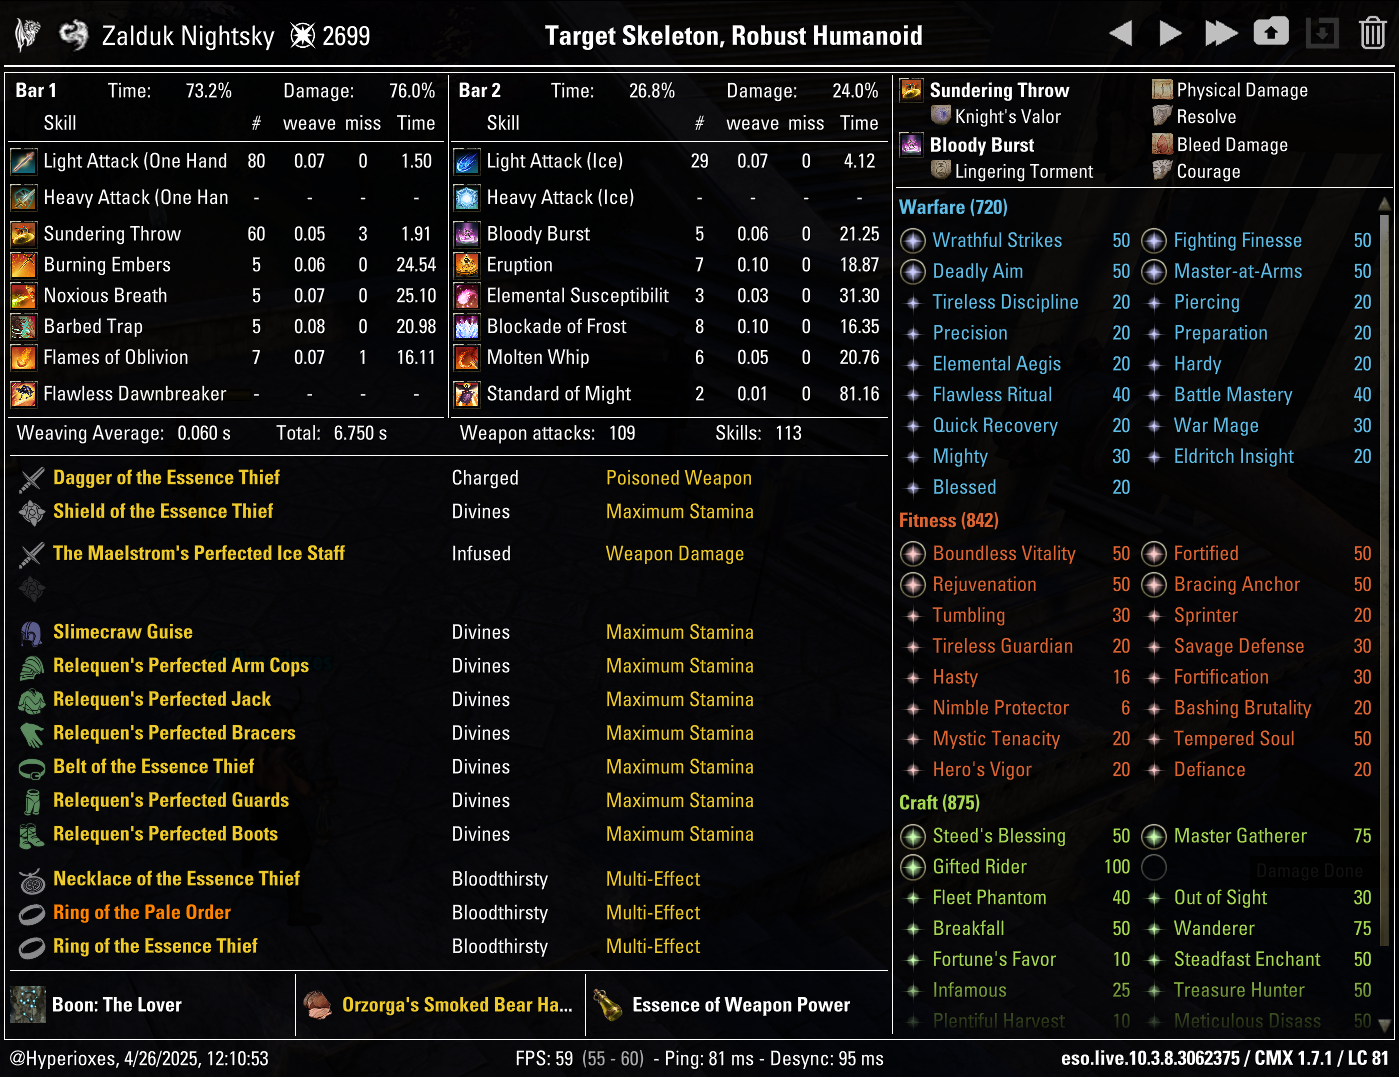
Parses
All parses are recorded on the 6 million Target Dummy

Gameplay
FAQ
No, you don't need a different setup. Use the base skills and Regular gear setup from this archived guide for both Maelstrom Arena and Vateshran Hollows.
THANKS FOR READING

If you've enjoyed this guide and want to support me, you can do so through Patreon. Your support will help me produce more guides.