BLACKROSE PRISON LEVELING GUIDE
Last updated: Update 46 - 21st June 2025
The Blackrose Prison Method is an extremely fast leveling strategy fit for more experienced players. It is not suitable for new characters or inexperienced players, as the difficulty and execution demands are high. However, for seasoned players, it offers unmatched EXP per hour, making it ideal for leveling Champion Points, skill lines, and individual skills. Outside of Writ turn-ins, which effectively convert gold into EXP, this is the fastest EXP farming method in the game.
PROS
- Extremely fast leveling speed
- Low cost once set up
- Only needs to be prepared once per account
CONS
- High difficulty
- Requires setup in advance
- Not accessible to fresh characters
- Requires Murkmire DLC
EXP BREAKDOWN
The Blackrose Prison method yields 26,902 EXP per round. However, clear time varies greatly depending on player skill. For this breakdown, we'll assume an average clear loop (kill adds, die, and respawn) takes 75 seconds. This results in 48 rounds per hour, totaling 1,291,296 base EXP per hour.
With a 3.71 multiplier applied (accounting for XP buffs), this becomes 4,790,708 EXP per hour. Faster clears can push this as high as 5,936,000 EXP per hour.
During a Double EXP event, the multiplier increases to 4.71. This results in 6,082,004 EXP per hour at an average clear speed. With faster execution, this can reach up to 7,536,000 EXP per hour.

Credit
All values were researched by Lucht
PREPARATION
Everything you need to prepare before starting your Blackrose Prison loops, including gear, skills, and consumables, to make sure you get the most EXP with the least downtime.
Exp Modifiers
The biggest EXP boost comes from either EXP Scrolls or Ambrosia. You can't use both at once. Ambrosia is a crafted alternative to scrolls but lasts for less time. Scrolls aren't worth buying, so only use them if you have extras from daily rewards. Otherwise, get Ambrosia.
Base Ambrosia lasts 30 minutes, but the Provisioning skill line's Connoisseur passive can extend it up to 50 minutes. Note that the Rationer CP does not affect Ambrosia duration.
EXP bonuses from these come in 50%, 100%, or 150%. The 150% Ambrosia can be expensive, but the 100% version is cheap and affordable for everyone.
The Training trait on armor and weapons grants 86% bonus EXP from kills when applied to all gear pieces. With the Heartland Conqueror set, this increases to 95%. However, the extra 9% is additive and only raises total EXP from kills from 371% to 380%. This is roughly a 2% increase, making faster killing gear a better choice.
Being in a group grants you a 10% bonus for EXP from kills, and as long as the group doesn't go above 2 people you don't get any EXP penalty from it
The Mora's Whispers Mythic grants a 15% bonus with all lorebooks collected
You get a 10% bonus if you have ESO+ subscription.
There is also a 100% bonus during an active EXP event.
There is also 10% from the Ring of Mara and 1% from the High Elf Highborn racial passive, but these are negligible and impractical, so they are ignored here.
Assuming you use a 150% Ambrosia or scroll, full Training gear without Heartland Conqueror, have active ESO+, have Mora's Whispers and are in a group with no active EXP event, your total EXP modifier from kills is 3.71 times.
With an active EXP event, it increases to 4.71 times.
Skills
Recommended skill setup
| Front Bar | Back Bar |
|---|---|
| Slot 1: Pulsar | Slot 1: Elemental Blockade |
| Slot 2: Free Slot | Slot 2: Razor Caltrops |
| Slot 3: Free Slot | Slot 3: Critical Surge |
| Slot 4: Free Slot | Slot 4: Silver Leash |
| Slot 5: Free Slot | Slot 5: Balance |
| Ultimate: Free Slot | Ultimate: Elemental Rage |
Fill the 4 front bar slots plus your front bar Ultimate slot with the skills you want to level. Having skills equipped from a skill line increases how fast that skill line gains experience.

- Pulsar - a very strong AoE spammable. We'll be using a Lightning Staff and Lightning Pulsar deals increased damage based on number of enemies hit, and we'll be surrounded by lots of enemies
- Elemental Blockade - ground AoE which you'll pre-place before the adds spawn. It will deal a lot of damage thanks to Crushing Wall and trigger your backbar weapon enchantment
- Razor Caltrops - ground AoE which you'll pre-place before the adds spawn. It will debuff enemies' with Major Breach, reducing their armor by 5948
- Critical Surge - ability that heals you whenever you deal Critical Damage. It will proc a lot due to your pre-placed ground AoEs and it will keep you alive. With the 33 second duration it will conveniently run out exactly when you're supposed to die. If you're not using the Storm Calling skill line and don't have access to Critical Surge, you'll have to slot a different healing skill or activate the Healing Sigil each round
- Silver Leash - a chain ability which you'll use to stack adds before killing them with Pulsar
- Balance - a health-costing ability which you'll use to bring your health down at the end of the round, in order to get yourself killed. It will also grant you Major Resolve which will help you survive before that
- Elemental Rage - ground AoE which you'll pre-place before the 2nd wave of adds spawn
Tip
Sometimes the skills you're leveling can be actually useful which can add some variety to the rotation
Gear
Recommended gear setup
| Gear Slot | Set | Weight/Type | Trait | Enchantment |
|---|---|---|---|---|
 Head |
Slimecraw | Light | Training | Stamina /Magicka |
 Shoulders |
Mora's Whispers | Light | Training | Stamina /Magicka |
 Chest |
Pelinal's Wrath | Medium | Training | Stamina /Magicka |
 Hands |
Pelinal's Wrath | Light | Training | Stamina /Magicka |
 Belt |
Pelinal's Wrath | Light | Training | Stamina /Magicka |
 Legs |
Pelinal's Wrath | Light | Training | Stamina /Magicka |
 Boots |
Pelinal's Wrath | Light | Training | Stamina /Magicka |
 Necklace |
Macabre Vintage | Jewelry | Bloodthirsty | Increase Physical Harm /Increase Magical Harm |
 Ring |
Macabre Vintage | Jewelry | Bloodthirsty | Increase Physical Harm /Increase Magical Harm |
 Ring |
Macabre Vintage | Jewelry | Bloodthirsty | Increase Physical Harm /Increase Magical Harm |
 Frontbar Main Hand |
Macabre Vintage | Lightning Staff | Training | Flame |
 Backbar Main Hand |
Crushing Wall | Lightning Staff | Infused | Weapon Damage |

- Pelinal's Wrath - with this set, killing enemies grants you 100 Weapon and Spell Damage, a damage shield and applies an Oblivion DoT to you. This DoT will help us die faster at the end of the round, significantly increasing speed of a full round cycle
- Macabre Vintage - this set will deal a lot of damage to the remaining adds as soon as you kill at least one of then
- Mora’s Whispers - provides a decent amount of Critical Chance and an additional 15% Exp bonus depending on your amount of collected lorebooks

- You can run either Stamina or Magicka enchants on your body, as long as you commit to one type. Do not mix them. Sustain won't be an issue because we'll have infinite sustain from the Sustain Sigil
- Bloodthirsty trait isn't crucial, you can keep your Macabre Vintage jewelry with its default Robust trait with minimal speed loss
- Slimecraw, Crushing Wall and Mora’s Whispers aren't crucial, don't bother farming them specifically for this method if you don't already own them
Champion Points
Recommended Champion Point setup
Warfare
- Master-at-Arms (6% Direct Damage)
- Biting Aura (6% AoE Damage)
- Fighting Finesse (8% Critical Damage and Healing)
- Wrathful Strikes (205 Weapon and Spell Damage added to damaging skills)
Fitness
- Boundless Vitality (1400 Max Health)
- Celerity (10% Movement Speed)
- Thrill of the Hunt (30% Movement Speed on kill)
- Fortified (1731 armor)
Mundus
Use The Lover mundus, which increases armor penetration by 2744
Attributes
Put either 64 points into Stamina or 64 points into Magicka. The Sustain Sigil will take care of our sustain so you can choose either resource, as long as you commit to one of them.
Food
- Bi Stat food (Braised Rabbit with Spring Vegetables /Solitude Salmon-Millet Soup) - Max Health and either Max Stamina or Max Magicka, depending on which resource you already commited to
- One Stat food (Hearty Garlic Corn Chowder /Tomato Garlic Chutney) - Either Max Stamina or Max Magicka, depending on which resource you already committed to. Use it if you're surviving fine and don't need the Max Health from Bi-Stat food
Potions

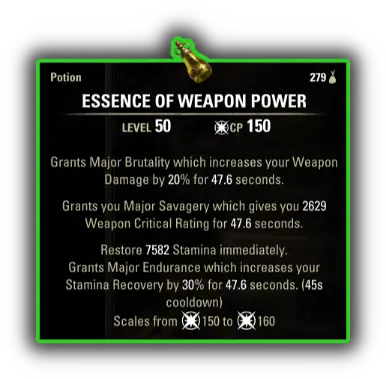
Use the Weapon Power potions (Increase Weapon Power, Weapon Critical, Restore Stamina). They'll provide you with Major Savagery and if you're not using Critical Surge also with Major Brutality. You can craft them by combining Blessed Thistle, Dragonthorn and Wormwood.

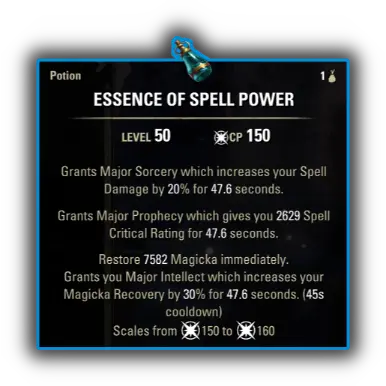
If you're using the Dark Magic skill line, you can get a tiny bit more Critical Chance by using Spell Power potions (Increase Spell Power, Spell Critical, Restore Magicka). They'll provide Major Prophecy instead of Major Savagery, which are usually functionally the same thing, but Major Savagery wouldn't stack with the Minor Prophecy you get from Exploitation passive from the Dark Magic skill line. You can craft them by combining Lady's Smock, Namira's Rot and Corn Flower.
GAMEPLAY
The Blackrose Prison leveling method involves repeatedly resetting the second round of the first arena on Normal difficulty. This round features many low-health enemies that die quickly and grant high experience. You clear all the small enemies but leave the Imperial Dread Knight alive. Once it's the only one left, you spam Balance to lower your health, allowing Pelinal's Wrath to kill you and reset the round. The method is convenient and gives you time during the reset to swap out frontbar skills you're leveling.
List of steps
- Step 1: Start on top of the Sustain Sigil
- Step 2: Cast Critical Surge and Balance before the round starts
- Step 3: Use the Sigil when the round starts
- Step 4: Run to the Fire Mage
- Step 5: Cast Razor Caltrops and Elemental Blockade
- Step 6: Chain the 2 close adds
- Step 7: Wait for the other 2 adds to come within 22 meter range. Block during that time. You can sustain that thanks to the Sustain Sigil. Do not kill the adds which are already stacked, because you'll need them to trigger Macabre Vintage
- Step 8: Chain the other 2 adds
- Step 9: Spam Pulsar until the adds are dead. It should only take 2 Pulsars to trigger Macabre Vintage
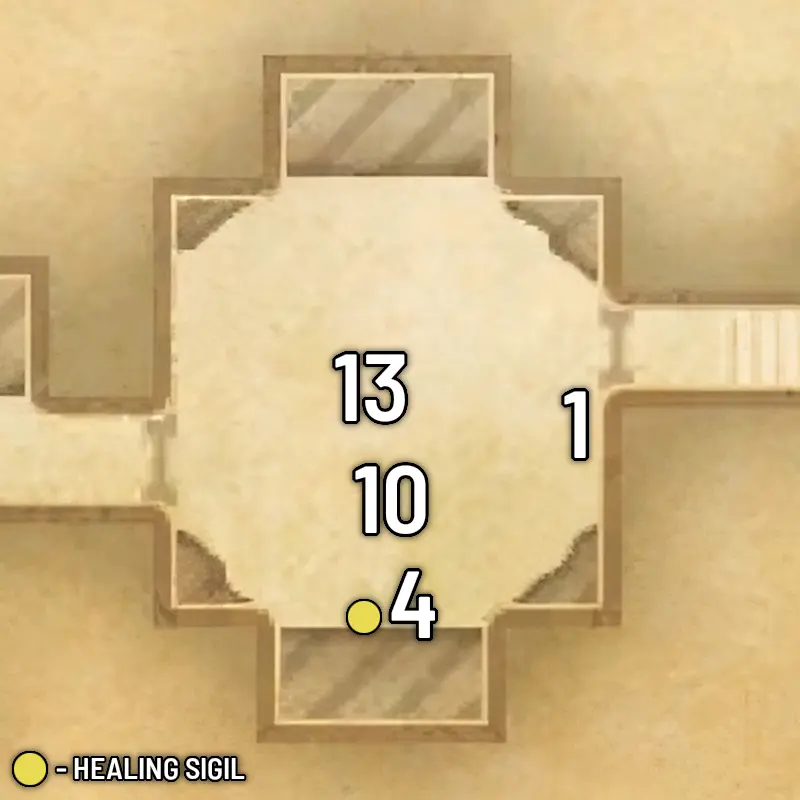
- Step 10: Once the adds are dead, run to the spot shown on the image and cast Elemental Rage, Razor Caltrops and Elemental Blockade
- Step 11: Start chaining the adds, prioritising Archers
- Step 12: Spam Pulsar until the adds are dead. It should only take 2 Pulsars to trigger Macabre Vintage
- Step 13: Run to the middle
- Step 14: Cast Razor Caltrops and Elemental Blockade
- Step 15: Chain the 4 archers
- Step 16: Spam Pulsar until the 4 Archers are dead
- Step 17: Spam Balance until Pelinal's Wrath kills you

Tip
Yellow circle marks the location of the Healing Sigil which you should use if you don't have access to Critical Surge
FAQ

In a group of 2, yes. You gain a 10% bonus to experience from kills. You can complete rounds faster than when solo, without suffering any experience penalty.
In a group of 3 or more, no. While you can finish rounds faster, you'll get hit with an exp penalty.

Yes, although you won't get the 10% bonus from being grouped. You can use it to level your companion. The companion will most likely slow you down by aggroing enemies into weird spots.

Then don't use it. It's not crucial and the leveling method works without it.
THANKS FOR READING

If you've enjoyed this guide and want to support me, you can do so through Patreon. Your support will help me produce more guides.

 The Lover