STRONGEST ONE BAR SUBCLASS SOLO BUILD
Last updated: Update 46 - 18th June 2025
This build is capable of soloing every Veteran dungeon that doesnt have a specific mechanic that requires multiple people. Its also capable of soloing most Hard Mode dungeons, and with some adjustments even the more difficult ones.
In this guide Ill be regularly using the terms Regular and Difficult. Regular refers to content that is intended to be solo-ed (such as Maelstrom Arena or Vateshran Arena) and to any overland content such as World Bosses, Dolmens, Dragons, Volcanic Vents, Harrowstorms, Mirrormoor Incursions, etc. Majority of dungeon fights will also fall under that category. Difficult refers to extremely difficult dungeon fights.
SUBCLASSING
Combination
Warden - Animal Companions
Nightblade - Assassination
Arcanist - Herald of the Tome
Base Class
This build doesn't use any class set or class script so the base class can be either Nightblade, Warden or Arcanist
SKILL SETUPS
Base Setup
A base setup that will work for most situations and which should be your starting point when making situational setups
| Front Bar | Back Bar |
|---|---|
| Slot 1: Cephaliarch's Flail | Slot 1: Inspired Scholarship |
| Slot 2: Pragmatic Fatecarver | Slot 2: Relentless Focus |
| Slot 3: Inspired Scholarship | |
| Slot 4: Deep Fissure | |
| Slot 5: Bull Netch | |
| Ultimate: Soul Harvest | Ultimate: Soul Harvest |


 Cephaliarch’s Flail - an AoE
spammable that generates Crux, heals you if you hit any enemy and increases the damage
enemies take from you by 5%. It will also trigger the
  Splintered Secrets passive,
increasing your penetration by 1240
 Pragmatic Fatecarver -
extremely powerful Crux spender that deals full damage in AoE, has massive range of 22
meters and grants you a big damage shield while you channel it. It will also trigger the
 Splintered Secrets passive,
increasing your penetration by 1240
 Inspired Scholarship - an
ability that deals lots of damage and ensures you'll have at least 1 Crux when your beam
ends. It will also trigger the
  Splintered Secrets passive,
increasing your penetration by 1240. Having it also on the backbar doesn't matter in the
base setup, but it can be useful if you replace the frontbar
  Inspired Scholarship with
another ability
 Deep Fissure - deals a lot of
damage per cast, applies crucial Major and Minor Breach debuffs and provides 5% Critical
Damage through the
  Advanced Species passive
 Bull Netch - provides a lot of Stamina sustain, a 5% damage boost, constantly purges debuffs and provides 5% Critical Damage through the
  Advanced Species passive
 Soul Harvest - a cheap ultimate
that increases target's damage taken from you by 20%. You need it on your frontbar to
trigger passives of the Assassination skill line. Having it slotted will also cause you to
regain 10 Ultimate whenever you deal a final blow against an enemy. Having it also on the
backbar doesn't matter in the base setup, but it can be useful if you replace the frontbar
 Soul Harvest with another
ultimate
 Relentless Focus - an ability
that will passively grant you 400 Weapon and Spell Damage if you're not using
  Oakensoul Ring

![]() Bull Netch is the first skill that
has to go when you need to slot something situational, unless the situational skill specifically
says that it's replacing something else
Bull Netch is the first skill that
has to go when you need to slot something situational, unless the situational skill specifically
says that it's replacing something else
 Revealing Flare - slot it for
more difficult fights where you need more damage mitigation. It's a skill that passively
grants Major Protection, reducing your damage taken by 10%. It will also trigger the
  Magicka Aid passive, which
increases Magicka Recovery by 10%
 Wield Soul - a 10 second DoT
that provides Major Resolve which increases your armor by 5948. Better defensive option than
 Revealing Flare in Single
Target fights. You'll also have better Stamina sustain with this compared to
  Revealing Flare because it's a
Magicka ability that has to be used every 10 seconds. It's mostly useless if you're already
getting Major Resolve from
  Oakensoul Ring
 Resolving Vigor - a strong 5
second Heal over Time. Use it in fights where bosses have immunity phases during which you
can't heal through
  Ring of the Pale Order or
  Reaving Blows
 Precognition - an ultimate that
breaks you out of some otherwise unavoidable stuns, you'll need it to get around some
mechanics which are otherwise impossible or very difficult to solo, like for example
Inferno's Hold in Zaan the Scalecaller fight
 Piercing Mark - replacement for
 Deep Fissure when you're
replacing
  Soul Harvest with
  Precognition. It's a worse
source of Major Breach but you need a Nightblade ability on frontbar to trigger passives of
the Assassination skill line

Priority List
I don't use a static rotation so this is just a list of priorities. Simply recast abilities when they run out and follow this list of priorities when there are multiple things to refresh
- Use
 Deep Fissure
 - Use
 Inspired Scholarship
 - Use
 Bull Netch
 - If not at 3 Crux, use
 Cephaliarch’s Flail
 - Use
 Soul Harvest
 - If at 3 Crux, use
 Pragmatic Fatecarver
Pre-buff
These abilities can be pre-cast before entering combat
Final Setups
A few examples of final setups you could end up with after applying the situational skills to the base setup
A setup with lots of damage mitigation for bosses that hit very hard
| Front Bar | Back Bar |
|---|---|
| Slot 1: Cephaliarch's Flail | Slot 1: Inspired Scholarship |
| Slot 2: Pragmatic Fatecarver | Slot 2: Relentless Focus |
| Slot 3: Inspired Scholarship | |
| Slot 4: Deep Fissure | |
| Slot 5: Revealing Flare | |
| Ultimate: Soul Harvest | Ultimate: Soul Harvest |
EXPLANATION:
 Revealing Flare replaces
  Bull Netch as it provides 10% damage
mitigation. This might cause Stamina sustain issues which you should solve by changing food to
  Orzorga's Tripe Trifle Pocket and/or
slotting
  Bloody Renewal. It shouldn't cause sustain
issues if you have racials that provide Stamina sustain.
PASSIVES
 Class
Class Weapon
 Armor
Armor Guild
Guild Alliance War
 Racial
 Craft
Craft
![]() Class - Animal Companions
Class - Animal Companions
![]() Bond with Nature - Low Priority
Bond with Nature - Low Priority
![]() Savage Beast - Medium Priority
Savage Beast - Medium Priority
![]() Flourish - High Priority
Flourish - High Priority
![]() Advanced Species - High Priority
Advanced Species - High Priority
GEAR
Example of a beginner setup made with just crafted gear.
| Gear Slot | Set | Weight/Type | Trait | Enchantment |
|---|---|---|---|---|
 Head |
Medium | |||
 Shoulders |
Medium | |||
 Chest |
Heavy | |||
 Hands |
Medium | |||
 Belt |
Light | |||
 Legs |
Medium | |||
 Boots |
Medium | |||
 Necklace |
Jewelry | |||
 Ring |
Jewelry | |||
 Ring |
Jewelry | |||
 Frontbar Main Hand |
Dagger | |||
 Frontbar Off Hand |
Mace |
The setup in the table uses only crafted gear, but if you already own parts of the Regular
setup like ![]() Ring of the Pale Order
you can start using them immediately
Ring of the Pale Order
you can start using them immediately
If you want to Solo some difficult content without ![]() Ring of the Pale Order you'll have to
add
Ring of the Pale Order you'll have to
add ![]() Reaving Blows
to your setup, but for the easier stuff the healing from
Reaving Blows
to your setup, but for the easier stuff the healing from ![]() Cephaliarch’s Flail and shielding from
Cephaliarch’s Flail and shielding from ![]() Pragmatic Fatecarver will be enough
Pragmatic Fatecarver will be enough
The weight distribution of the setup from the table is 1 Heavy 5 Medium 1 Light so that you can start leveling up all your armor skill lines. Once you transition to Regular setup you'll be using 6 Medium 1 Light most of the time, switching to 1 Heavy 5 Medium 1 Light only against more difficult fights
You don't need to start with crafted gear, simply pick 2 sets from the Alternative section that are easiest for you to obtain
The strongest gear combination without any trial gear is ![]() Order’s Wrath
combined with
Order’s Wrath
combined with ![]() Tide-Born Wildstalker
Tide-Born Wildstalker

Gear that might be easier to obtain and can be used while you work towards the best gear
Dungeon gear isn't always an upgrade to Crafted/Overland gear. It's listed in case you already own some of it
Crafted:
All of these are tradable and can be bought from other players
Overland:
All of these are tradable and can be bought from other players
 Mother’s Sorrow (Light) - Deshaan
 Back-Alley Gourmand (Light) - Galen
and Y'ffelon
 Dragonguard Elite (Medium) -
Southern Elsweyr
PvP:
All of these are tradable and can be bought from other players
 Deadly Strike (Medium) - Bruma
Elite Gear Vendor
Dungeons:
 Tzogvin’s Warband (Medium) -
Frostvault
 Pillar of Nirn (Medium) - Falkreath
Hold
 Essence Thief (Medium) - White-Gold
Tower
 Leviathan
(Medium) - Crypt of Heart 1 & 2

- Use
 Training traits if you're still
leveling. If you're already max level and have enough Champion Points you can instead use
  Divines
and
  Reinforced
on the chest piece
- For overland content, you don't need as much penetration so you can replace Maces with Daggers
This is my suggested setup for regular content, such as Solo Arenas, World Bosses, Dolmens, Dragons, Volcanic Vents, Harrowstorms, Mirrormoor Incursions and majority of the dungeons.
| Gear Slot | Set | Weight/Type | Trait | Enchantment |
|---|---|---|---|---|
 Head |
Medium | |||
 Shoulders |
Medium | |||
 Chest |
Medium | |||
 Hands |
Medium | |||
 Belt |
Light | |||
 Legs |
Medium | |||
 Boots |
Medium | |||
 Necklace |
Jewelry | |||
 Ring |
Jewelry | |||
 Ring |
Jewelry | |||
 Frontbar Main Hand |
Dagger | |||
 Frontbar Off Hand |
Dagger |
If you want to switch to a situational set it's best to replace ![]() Ansuul’s Torment if the situational set you're
getting has a Minor Slayer line, and replace
Ansuul’s Torment if the situational set you're
getting has a Minor Slayer line, and replace ![]() Tide-Born Wildstalker
otherwise. When replacing
Tide-Born Wildstalker
otherwise. When replacing ![]() Tide-Born Wildstalker
with a Medium armor set, change your
Tide-Born Wildstalker
with a Medium armor set, change your ![]() Slimecraw
head-piece to Light armor type.
Slimecraw
head-piece to Light armor type.
For example, a default setup for trash packs would replace ![]() Ansuul's Torment with
Ansuul's Torment with ![]() Sul-Xan’s Torment
Sul-Xan’s Torment
The strongest gear combination without any trial gear is ![]() Order’s Wrath
combined with
Order’s Wrath
combined with ![]() Tide-Born Wildstalker
Tide-Born Wildstalker

Gear that can be stronger than the setup from the table in specific situations or when specific circumstances are present
 Sul-Xan’s Torment - the best set
for trash packs and for bosses that regularly spawn smaller adds
Setup for maximizing damage in fights that don't hit very hard. It also has better sustain and
damage mitigation so sometimes it can be straight up safer than the ![]() Ring of the Pale Order
setup, especially in fights with lots of adds where
Ring of the Pale Order
setup, especially in fights with lots of adds where ![]() Reaving Blows hitting multiple targets will heal
you enough. To give you an example, it was superior to the Regular
Reaving Blows hitting multiple targets will heal
you enough. To give you an example, it was superior to the Regular ![]() Ring of the Pale Order
setup in the Hard Mode Thurvokuun fight
Ring of the Pale Order
setup in the Hard Mode Thurvokuun fight
| Gear Slot | Set | Weight/Type | Trait | Enchantment |
|---|---|---|---|---|
 Head |
Medium | |||
 Shoulders |
Medium | |||
 Chest |
Medium | |||
 Hands |
Medium | |||
 Belt |
Light | |||
 Legs |
Medium | |||
 Boots |
Medium | |||
 Necklace |
Jewelry | |||
 Ring |
Jewelry | |||
 Ring |
Jewelry | |||
 Frontbar Main Hand |
Dagger | |||
 Frontbar Off Hand |
Dagger |
Since this setup doesn't use ![]() Ring of the Pale Order
it will need
Ring of the Pale Order
it will need ![]() Reaving Blows to survive most fights
Reaving Blows to survive most fights

- In terms of DPS,
 Velothi Ur-Mage’s Amulet is similar
to
  Oakensoul Ring
in Single Target DPS and a decent amount stronger in AoE DPS, but you'd be losing out on the
sustain and mitigation from
  Oakensoul Ring. It's an option for
AoE fights with a DPS check. In the Gameplay section, I've used
  Velothi Ur-Mage’s Amulet
instead of
  Oakensoul Ring against the 2nd boss
of Veteran Fang Lair in order to kill the boss before the Cadaverous Senche-Tiger's Death Grip
mechanic
CHAMPION POINTS
Warfare
 Master-at-Arms (6%
Direct
Damage)
 Biting Aura (6% AoE
Damage)
 Fighting Finesse (8%
Critical Damage and Healing)
 Wrathful Strikes (205
Weapon and Spell Damage added to damaging skills)
Fitness
 Boundless Vitality
(1400
Max Health)
 Bastion (15% stronger
damage shields)
 Rejuvenation (90
Health,
Stamina and Magicka Recovery)
 Fortified (1731 armor)
ADDITIONAL INFO:
- When soloing extremely difficult dungeons you should replace
 Wrathful Strikes and
 Fighting Finesse with 2 of the
4
mitigation CPs (
 Ironclad,
  Duelists Rebuff,
  Enduring Resolve,
  Unassailable)
- When using the Full Damage setup you'll have to replace
 Wrathful Strikes with
 Reaving Blows in most fights
- In fights with lots of adds
 Bloody Renewal can be stronger
than
 Rejuvenation. It can also
replace
 Bastion
if you need lots of sustain
- Use
 Bracing Anchor in fights where
you
have to block a lot attacks and where you don't have to move that much
- Use
 Celerity in fights where you
have
to move a lot
RACE
When it comes to solo PvE, you need both damage and survivability so pretty much all races have useful racials.
The best race for dealing damage is Khajiit. While the Critical Damage from
![]() Feline Ambush can sometimes be
wasted due to Critical Damage being capped at 125%, it will never happen in solo content,
because there will be no tanks or healers providing you with the Major Force buff.
Feline Ambush can sometimes be
wasted due to Critical Damage being capped at 125%, it will never happen in solo content,
because there will be no tanks or healers providing you with the Major Force buff.
The best race for survivability is Nord. The ![]() Rugged racial will provide
around
6% damage mitigation.
Rugged racial will provide
around
6% damage mitigation.
MUNDUS
ATTRIBUTES
HEALTH
0
STAMINA
64
MAGICKA
0
For most content you should put all 64 points into Stamina. For difficult content you should devote as many attribute points as necessary to Health - for some content youll be able to get away with 32 Health 32 Stamina, for the extremely difficult stuff youll need 64 Health.
FOOD
 Braised Rabbit with Spring Vegetables
- Max Health, Max Stamina. Use it as your default food
 Orzorga's Tripe Trifle Pocket
-
Max Health, Stamina Recovery. Use it if you can't sustain the Max Stamina food
POTIONS
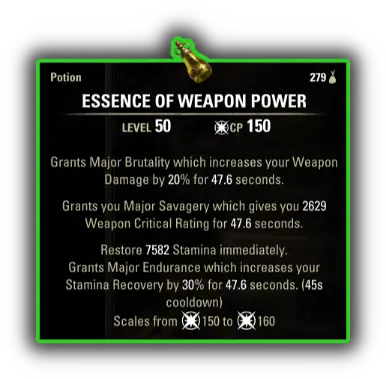
Use the Weapon Power potions (Increase Weapon Power, Weapon Critical, Restore Stamina).
They'll greatly improve your sustain and provide the Major Savagery buff which is
crucial.
You can craft them by combining
![]() Blessed Thistle,
Blessed Thistle,
![]() Dragonthorn
and
Dragonthorn
and
![]() Wormwood.
Wormwood.
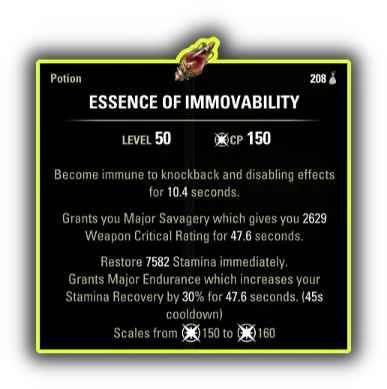
Immovable Stamina potions (Restore Stamina, Weapon Critical, Unstoppable) are much more
expensive than Weapon Power potions, but can provide a very slight edge, as they can
make
you CC immune for a short time. You can craft them by combining
![]() Columbine,
Columbine,
![]() Wormwood
and
Wormwood
and
![]() Mountain's Flower.
Mountain's Flower.
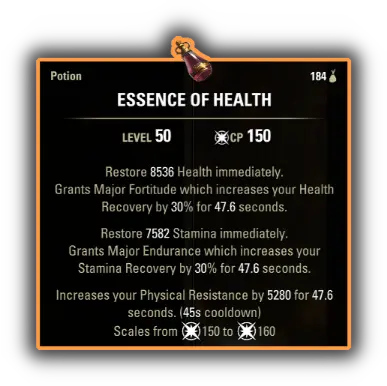
When using the Full Damage setup you should instead use Stamina Armor (Restore Health,
Restore Stamina, Physical Resistance) potions, because ![]() Oakensoul Ring will already
provide Major Savagery. You can craft them by combining
Oakensoul Ring will already
provide Major Savagery. You can craft them by combining
![]() Columbine,
Columbine,
![]() Beetle Scuttle
and
Beetle Scuttle
and
![]() Mountain's Flower.
Mountain's Flower.
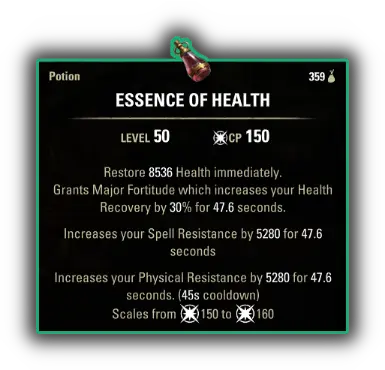
Another option when using ![]() Oakensoul Ring are potions
which provide both resistances (Restore Health, Physical Resistance, Spell Resistance).
You
can use them in fights which deal a decent amount of Magical damage, but you'll most
likely
have to get additional Stamina sustain from another source like food, CP or racial. You
can
craft them by combining
Oakensoul Ring are potions
which provide both resistances (Restore Health, Physical Resistance, Spell Resistance).
You
can use them in fights which deal a decent amount of Magical damage, but you'll most
likely
have to get additional Stamina sustain from another source like food, CP or racial. You
can
craft them by combining ![]() Bugloss,
Bugloss, ![]() Mountain's Flower
and
Mountain's Flower
and
![]() Mudcrab Chitin.
Mudcrab Chitin.
PARSE
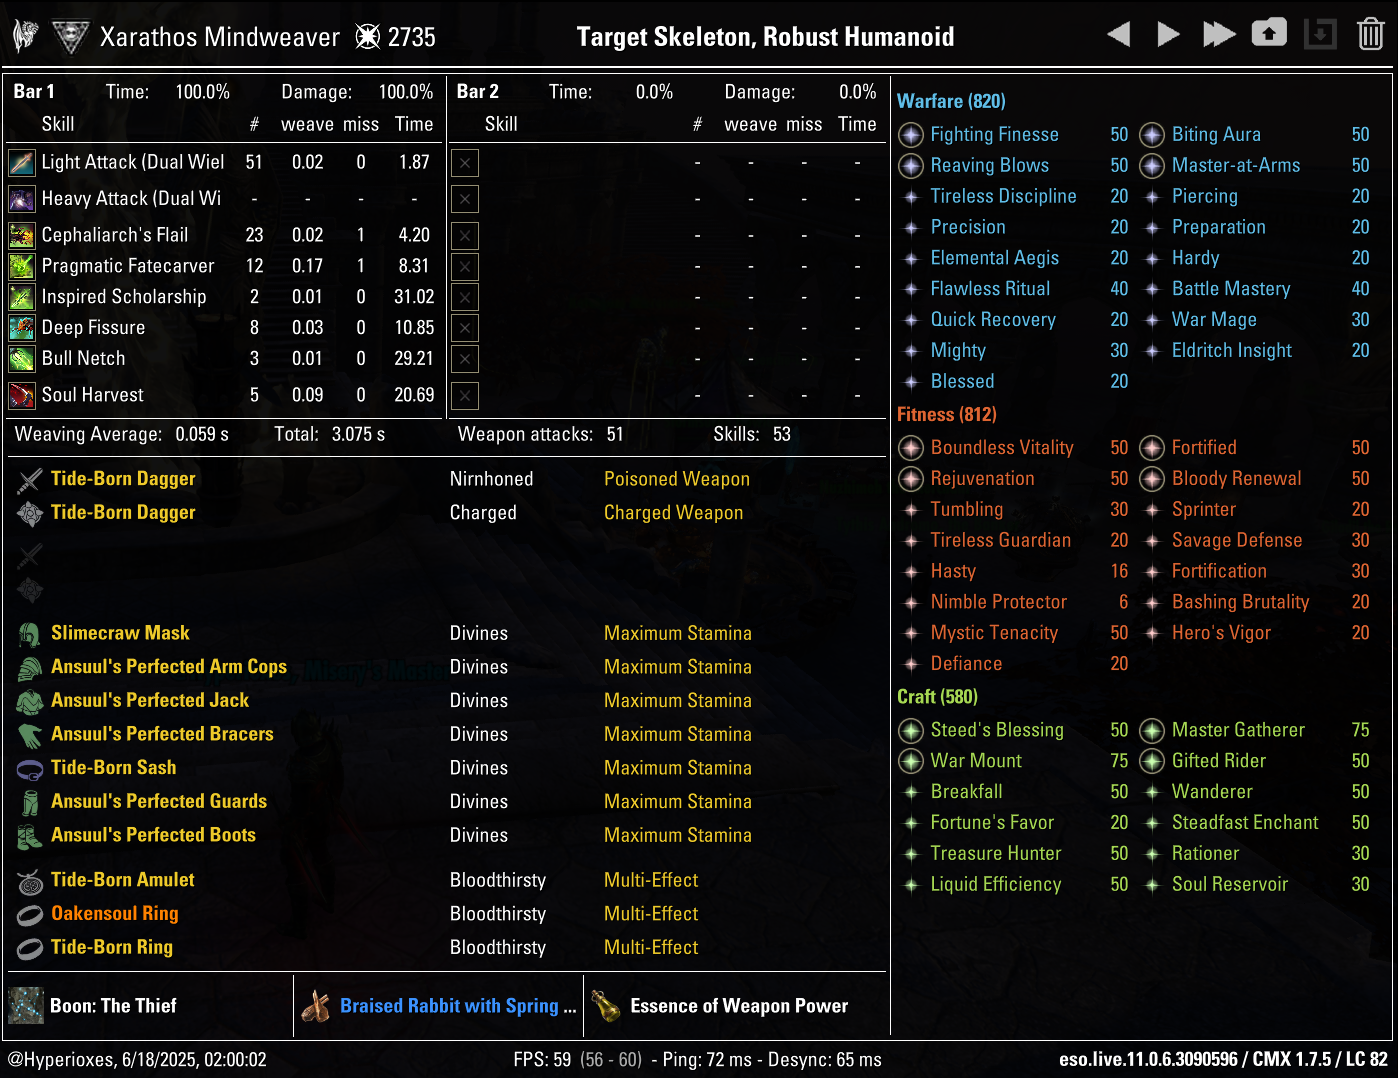
58k on the 6mil dummy using Regular setup
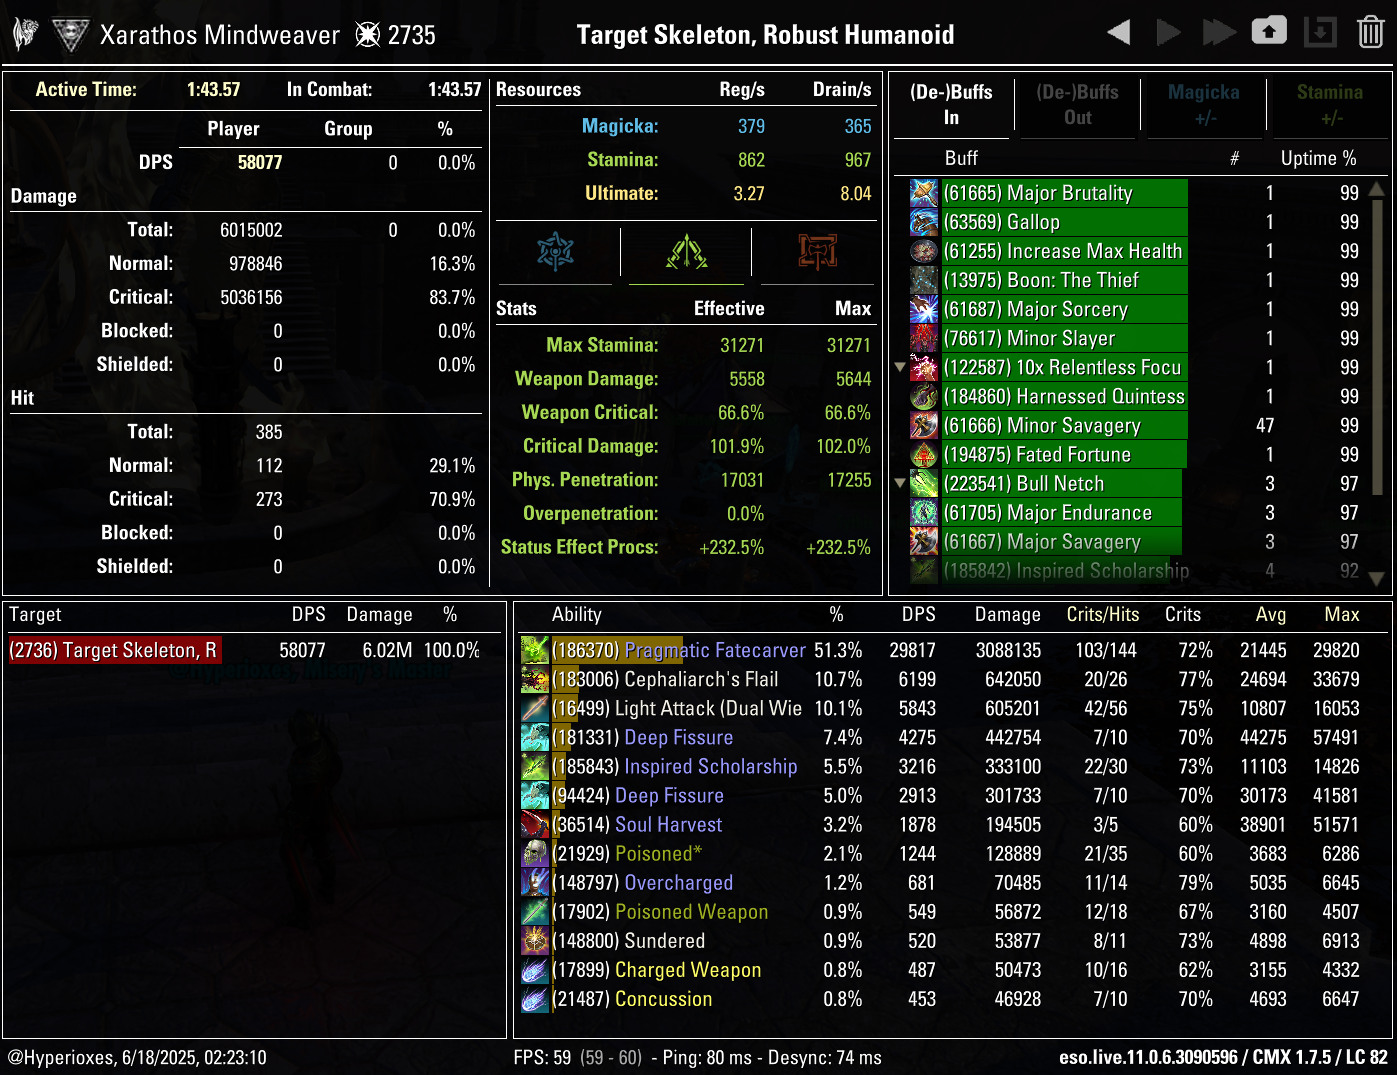
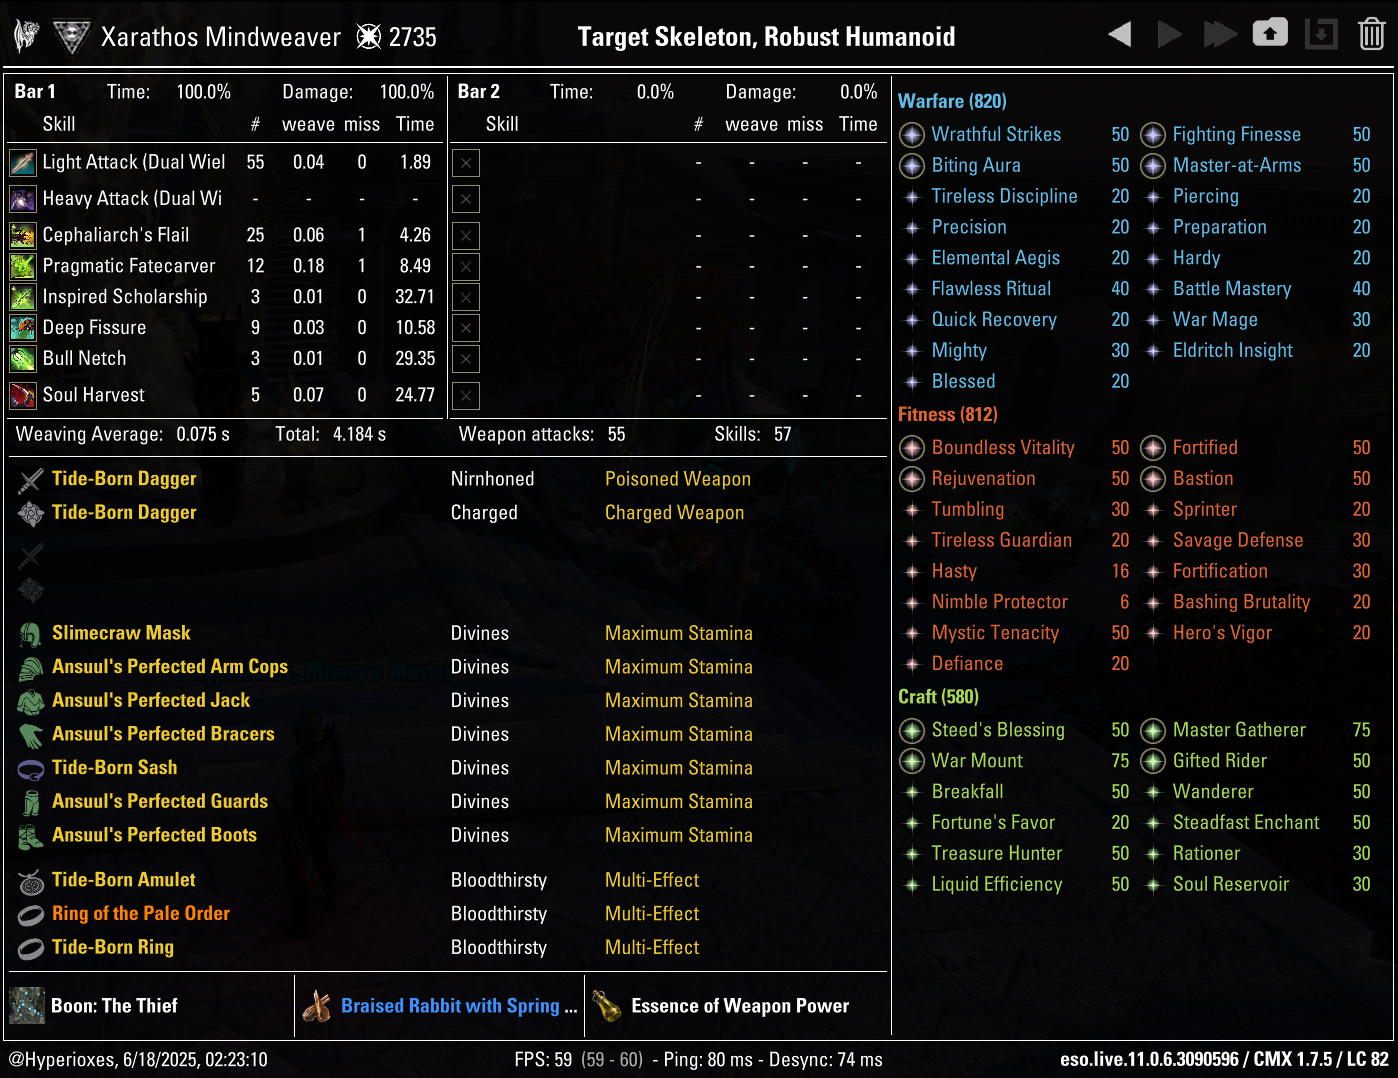
Recording of the 58k parse
OTHER PARSES
GAMEPLAY
Here you can see this build tackling Veteran dungeons
THANKS FOR READING

If you've enjoyed this guide and want to support me, you can do so through Patreon. Your support will help me produce more guides.


