HEAVY ATTACK SORCERER SUBCLASS PVE DPS BUILD
Last updated: Update 48 - 26th December 2025
This build focuses on amplifying Heavy Attacks with the ![]() Sergeants Mail item set,
Sergeants Mail item set, ![]() Rakkhats Voidmantle Mythic and the Empower buff sourced from the
Rakkhats Voidmantle Mythic and the Empower buff sourced from the ![]() Might of the Guild passive, procced by constantly using
Might of the Guild passive, procced by constantly using ![]() Ulfsild's Contingency.
Ulfsild's Contingency.
SUBCLASSING
Combination
Sorcerer - Storm Calling
Sorcerer - Daedric Summoning
Nightblade - Assassination
Base Class
This build uses 2 Sorcerer skill lines so the base class has to be Sorcerer.
SKILL SETUPS
Base Setup
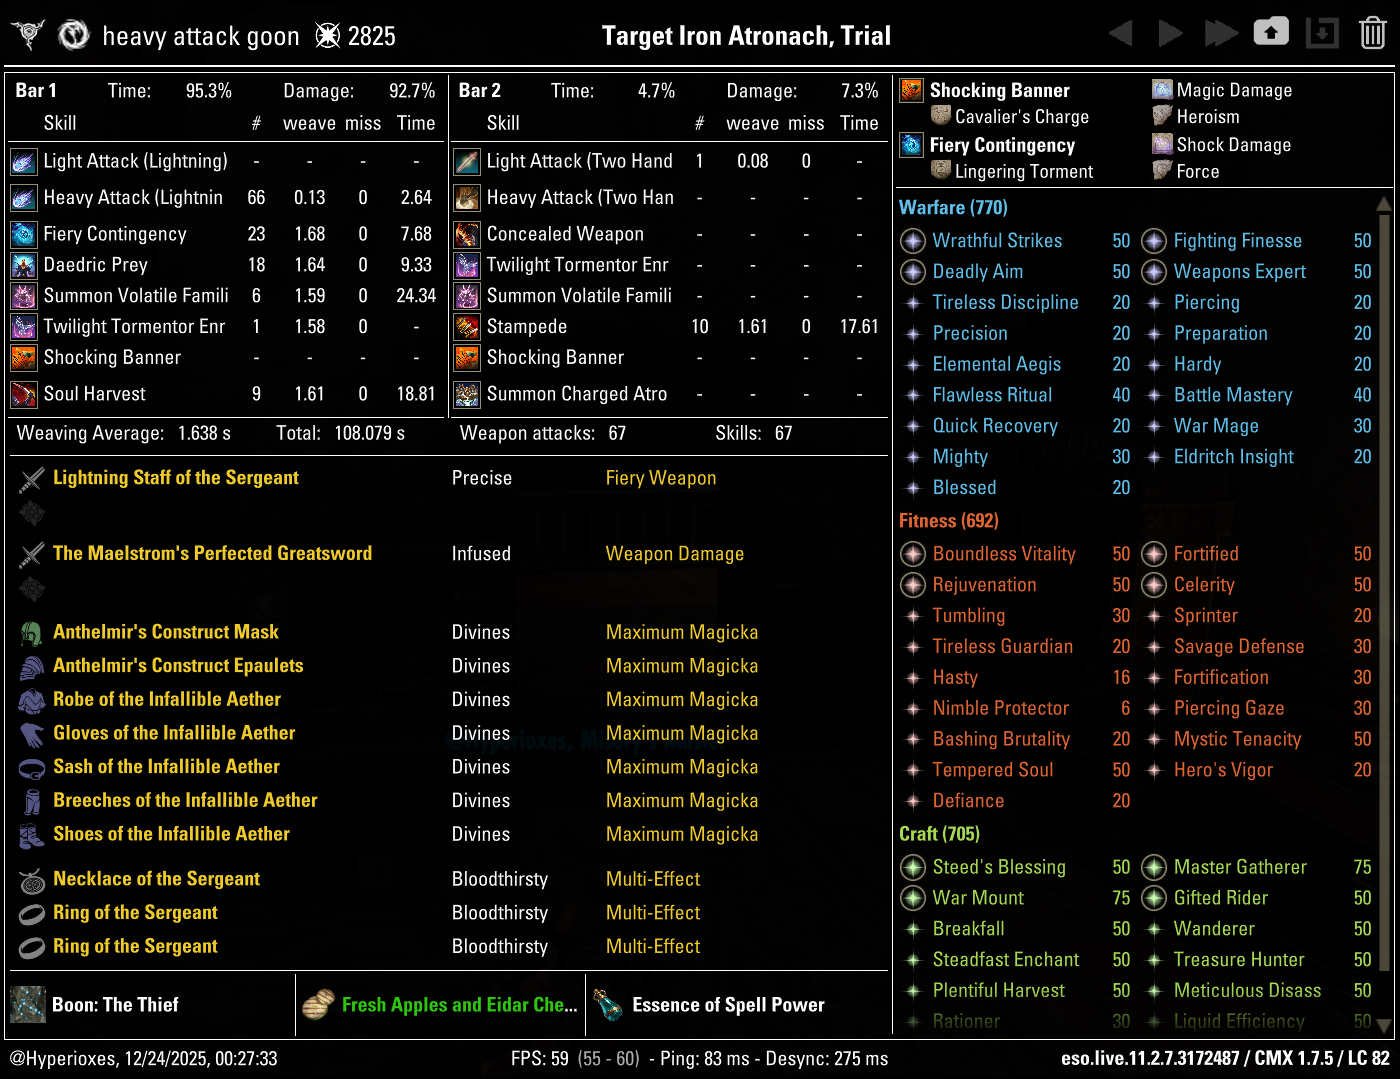
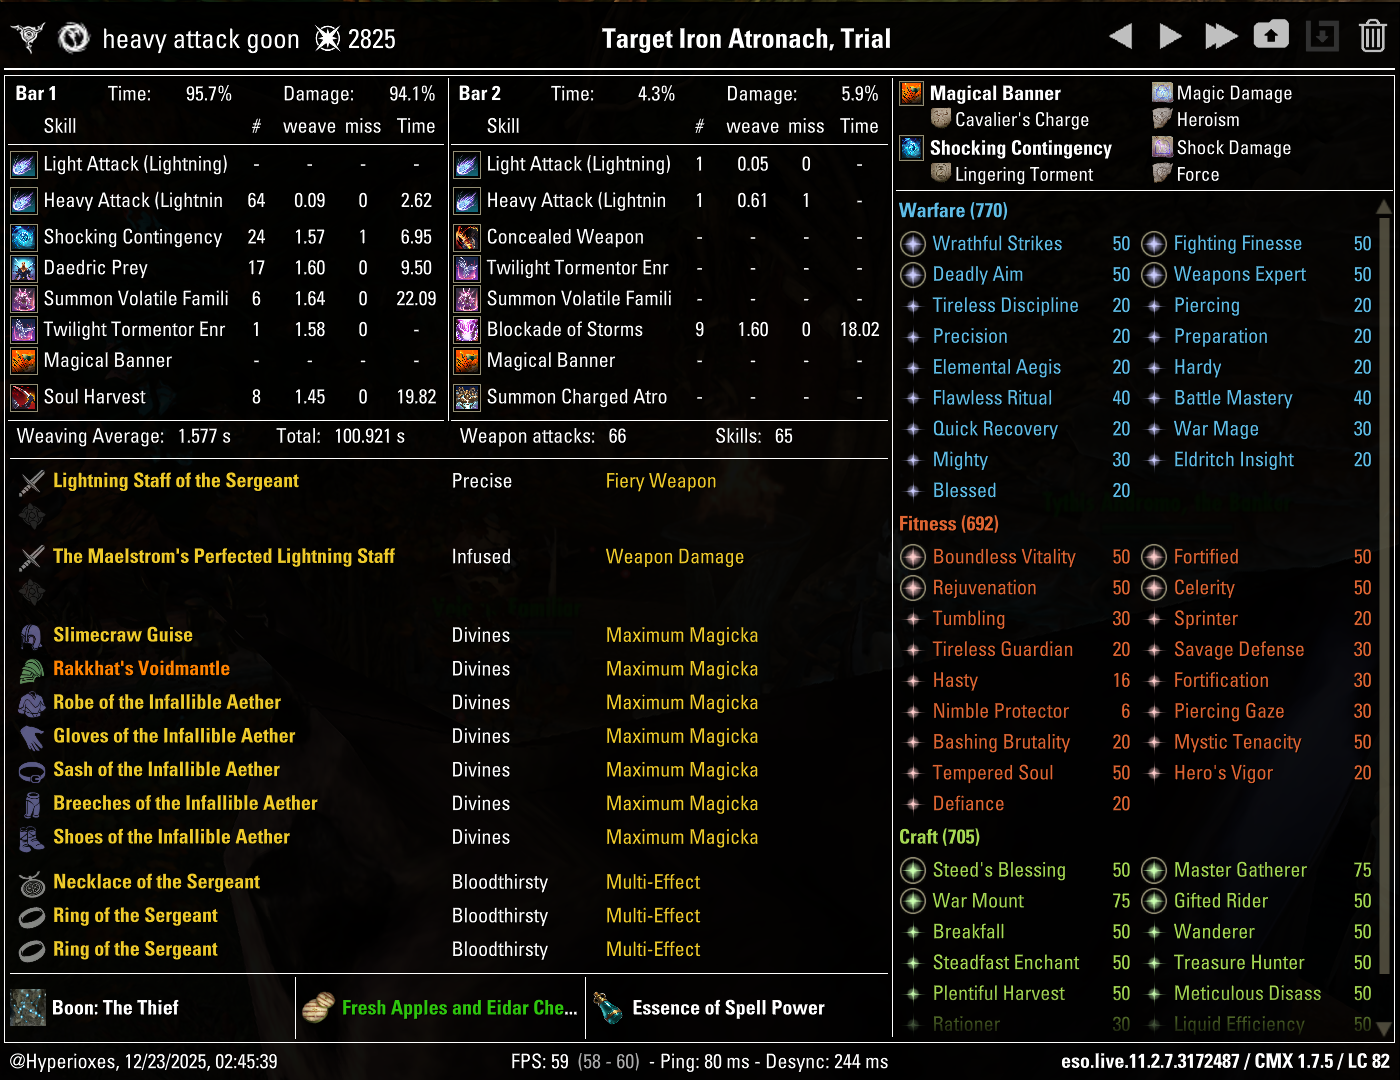
A base setup that will work for most situations and which should be your starting point when making situational setups
| Front Bar | Back Bar |
|---|---|
| Slot 1: Ulfsild's Contingency | Slot 1: Concealed Weapon |
| Slot 2: Daedric Prey | Slot 2: Elemental Blockade |
| Slot 3: Summon Volatile Familiar | Slot 3: Summon Volatile Familiar |
| Slot 4: Summon Twilight Matriarch | Slot 4: Summon Twilight Matriarch |
| Slot 5: Banner Bearer | Slot 5: Banner Bearer |
| Ultimate: Soul Harvest | Ultimate: Summon Charged Atronach |

 Ulfsild's Contingency (
 Shock,
  Lingering Torment,
  Force) - your source of crucial Empower buff, which increases damage done by Heavy Attacks by 70%. Since
  Ulfsild's Contingency is a Mages Guild skill, it will trigger the
  Might of the Guild passive, which grants you Empower for 10 seconds. It also deals decent damage in an AoE and grants you Minor Force buff, increasing your Critical Damage by 10%.
  Ulfsild's Contingency is delayed until the next skill cast but whenever it's needed you can activate it early by bashing your enemy. If you cast this ability as you're finishing your Heavy Attack, the Empower you gain from it will start working just in time to boost the final tick of that Heavy Attack you just finished
 Daedric Prey - increases damage done by your pets by 50% and deals AoE damage at the end
 Summon Volatile Familiar - an ability that summons a pet, which can be reactivated to deal damage in an AoE around this pet over 20 seconds
 Summon Twilight Matriarch - an ability that summons a pet, which can be reactivated to heal 2 friendly targets
 Banner Bearer (
 Magic,
  Cavalier's Charge,
  Berserk) - increases your Magical damage done by 6%, grants Weapon Damage based on your movement speed and grants Minor Berserk, increasing your damage done by 5%. You can change the
  Berserk script to
  Heroism if Minor Berserk is being provided by your supports
 Soul Harvest - a cheap ultimate that increases target's damage taken from you by 20%. You need it on your frontbar to trigger passives of the Assassination skill line. Having it slotted will also cause you to regain 10 Ultimate whenever you deal a final blow against an enemy
 Concealed Weapon - an ability that will passively grant us 15% movement speed, which will grant us 90 Weapon and Spell Damage thanks to the
  Cavalier's Charge script on
  Banner Bearer
 Elemental Blockade - a ground DoT that will constantly re-apply your backbar weapon enchantment. It will also deal increased damage thanks to the
  Crushing Wall set and proc Off Balance if your supports aren't already doing it
 Summon Charged Atronach - a powerful AoE Ultimate which gets boosted by
  Daedric Prey. It will also keep proccing Concussed status effect. An ally can also activate the Charged Lightning synergy which grants all nearby allies (including you) Major Berserk for 10 seconds, which increases damage done by 10%

- Whenever you need to slot situational skills, replace
 Concealed Weapon
  Elemental Susceptibility - use it as your source of Major Breach whenever you're assigned to mechanics that separate you from your group, like for example portal in the Nahviintaas fight, Reef Hearts in the Reef Guardian fight, bridge in the Taleria fight, etc.
 Summon Twilight Tormentor - this morph deals a bit more damage than the
  Summon Twilight Matriarch morph but you lose the access to the heal. It is an option depending on what you're trying to achieve, use it if you don't mind sacrificing a backup heal for a bit more damage. Expect a 4% damage increase compared to the healing morph
 Stampede - a replacement for
  Elemental Blockade, which also involves swapping
  Crushing Wall to
  Merciless Charge. It's a 1.3% damage increase, but it makes you reliant on Healers to keep up their own Lightning
  Elemental Blockade for Off Balance. Don't use it in PUG groups.
 Bound Aegis - passively provides Minor Resolve and Minor Protection which grant you roughly 10% damage mitigation (the actual number varies due to armor's increasing returns). This means you lose out on 15% movement speed from
  Concealed Weapon which the
  Cavalier's Charge script would convert into 90 Weapon and Spell Damage, but it's worth it depending on the situation. Keep in mind that both Minor Resolve and Minor Protection can be provided by your supports in good groups.
 Critical Surge - a more active defensive option compared to
  Bound Aegis. Provides a lot of healing which is usually more effective than the mitigation from
  Bound Aegis, but it has to be actively used instead of being passive
 Trample (
 Magic,
  Cavalier's Charge,
  Off Balance) - your source of Off Balance for trash packs. You can start channeling it as you're running into trash packs.
 Proximity Detonation - extremely good ability for trash packs, you can pre-buff it a few seconds before entering combat
 Hurricane - good ability for trash packs, since it can be prebuffed without a target. It also provides the same movement speed buff as
  Concealed Weapon
 Reaper’s mark - good ability for trash packs, since it can be prebuffed without starting combat. Pre-casting it on some low HP add allows you to benefit from Major Berserk

If you're tracking the Off Balance debuff, you should cancel your Heavy Attack when there's around 1-2 seconds left on the Off Balance Immunity. This way the next Heavy Attack you start will finish its channel during Off Balance and you'll be able to fit 3 Heavy Attacks during a single Off Balance window
The best way to weave backbar abilities into your rotation is by swapping to backbar right after your Heavy Attack finished, casting the ability and then immediately going back to frontbar to start channeling the next Heavy Attack. This is however impossible with high ping
Priority List
I don't use a static rotation so this is just a list of priorities. Simply recast abilities when they run out and follow this list of priorities when there are multiple things to refresh
- Use
 Ulfsild's Contingency if your Empower is out or if it's going to run out by the end of the Heavy Attack you're channeling
 - Use
 Elemental Blockade/
 Stampede
 - Use
 Daedric Prey
 - Use
 Soul Harvest if it's obvious you won't get enough Ultimate for another
  Summon Charged Atronach before the fight ends
 - Use
 Summon Charged Atronach if it's ready
 - Use
 Summon Volatile Familiar
 - If enemy is above 50% HP, use
 Summon Twilight Tormentor (only if you're using the Tormentor morph)
 - Use
 Ulfsild's Contingency as a filler
Pre-buff
These abilities can be pre-cast before entering combat
Final Setups
A few examples of final setups you could end up with after applying the situational skills to the base setup
Example of a setup for trash packs
| Front Bar | Back Bar |
|---|---|
| Slot 1: Ulfsild's Contingency | Slot 1: Bound Aegis |
| Slot 2: Daedric Prey | Slot 2: Elemental Blockade |
| Slot 3: Trample | Slot 3: Proximity Detonation |
| Slot 4: Hurricane | Slot 4: Reaper's Mark |
| Slot 5: Banner Bearer | Slot 5: Banner Bearer |
| Ultimate: Soul Harvest | Ultimate: Summon Charged Atronach |
EXPLANATION:
- Pets are bad for trash packs so they're replaced with
 Trample,
  Hurricane,
  Proximity Detonation and
  Reaper’s mark, all of which can be pre-cast before you enter combat
  Bound Aegis replaces
  Concealed Weapon since
  Hurricane already provides Minor Expedition
Example of a setup with slightly better damage mitigation
| Front Bar | Back Bar |
|---|---|
| Slot 1: Ulfsild's Contingency | Slot 1: Bound Aegis |
| Slot 2: Daedric Prey | Slot 2: Elemental Blockade |
| Slot 3: Summon Volatile Familiar | Slot 3: Summon Volatile Familiar |
| Slot 4: Summon Twilight Matriarch | Slot 4: Summon Twilight Matriarch |
| Slot 5: Banner Bearer | Slot 5: Banner Bearer |
| Ultimate: Soul Harvest | Ultimate: Summon Charged Atronach |
EXPLANATION:
 Bound Aegis replaces
  Concealed Weapon. This means you lose out on 15% movement speed which the
  Cavalier's Charge script would convert into 90 Weapon and Spell Damage, but you're gaining passive Minor Resolve and Minor Protection. Keep in mind that both of these buffs can be provided by your supports in good groups.
- Another good defensive option would be putting
 Critical Surge in the slot where
  Bound Aegis is. The healing would provide a lot more survivability, but it has to be actively used.
Example of a setup with best damage which sacrifices survivability and assumes certain debuffs are provided by supports
| Front Bar | Back Bar |
|---|---|
| Slot 1: Ulfsild's Contingency | Slot 1: Concealed Weapon |
| Slot 2: Daedric Prey | Slot 2: Stampede |
| Slot 3: Summon Volatile Familiar | Slot 3: Summon Volatile Familiar |
| Slot 4: Summon Twilight Tormentor | Slot 4: Summon Twilight Tormentor |
| Slot 5: Banner Bearer | Slot 5: Banner Bearer |
| Ultimate: Soul Harvest | Ultimate: Summon Charged Atronach |
EXPLANATION:
 Stampede replaces
  Elemental Blockade and
  Merciless Charge replaces
  Crushing Wall. This is roughly a 1.3% damage increase but makes you reliant on Healers for Off Balance
 Summon Twilight Tormentor replaces
  Summon Twilight Matriarch. You lose the heal but gain roughly 4% damage.
 Summon Twilight Tormentor and
  Stampede aren't tied to each other in any way, I'm just showing them both on the same example
PASSIVES
There are no passives you need to skip with this build
 Class
Class Weapon
 Armor
Armor Guild
Guild Alliance War
 Racial
 Craft
Craft
![]() Class - Daedric Summoning
Class - Daedric Summoning
![]() Rebate - Low Priority
Rebate - Low Priority
![]() Power Stone - High Priority
Power Stone - High Priority
![]() Daedric Protection - Low Priority
Daedric Protection - Low Priority
![]() Expert Summoner - Medium Priority
Expert Summoner - Medium Priority
GEAR
Base Setup
A base setup that will work for most situations and which should be your starting point when making situational setups
Switching gear for trash packs isn't worth it unless you're using gear-swap addons
Default setup
| Gear Slot | Set | Weight/Type | Trait | Enchantment |
|---|---|---|---|---|
 Head |
Light | |||
 Shoulders |
Medium | |||
 Chest |
Light | |||
 Hands |
Light | |||
 Belt |
Light | |||
 Legs |
Light | |||
 Boots |
Light | |||
 Necklace |
Jewelry | |||
 Ring |
Jewelry | |||
 Ring |
Jewelry | |||
 Frontbar Main Hand |
Lightning Staff | |||
 Backbar Main Hand |
Lightning Staff |
When choosing different situational sets you can only replace ![]() Infallible Mage.
Infallible Mage. ![]() Sergeant’s Mail and
Sergeant’s Mail and ![]() Rakkhat’s Voidmantle are too strong and too crucial for this build to ever be replaced. If you want to use a Medium Armor set, you have to make sure your group is providing enough penetration
Rakkhat’s Voidmantle are too strong and too crucial for this build to ever be replaced. If you want to use a Medium Armor set, you have to make sure your group is providing enough penetration
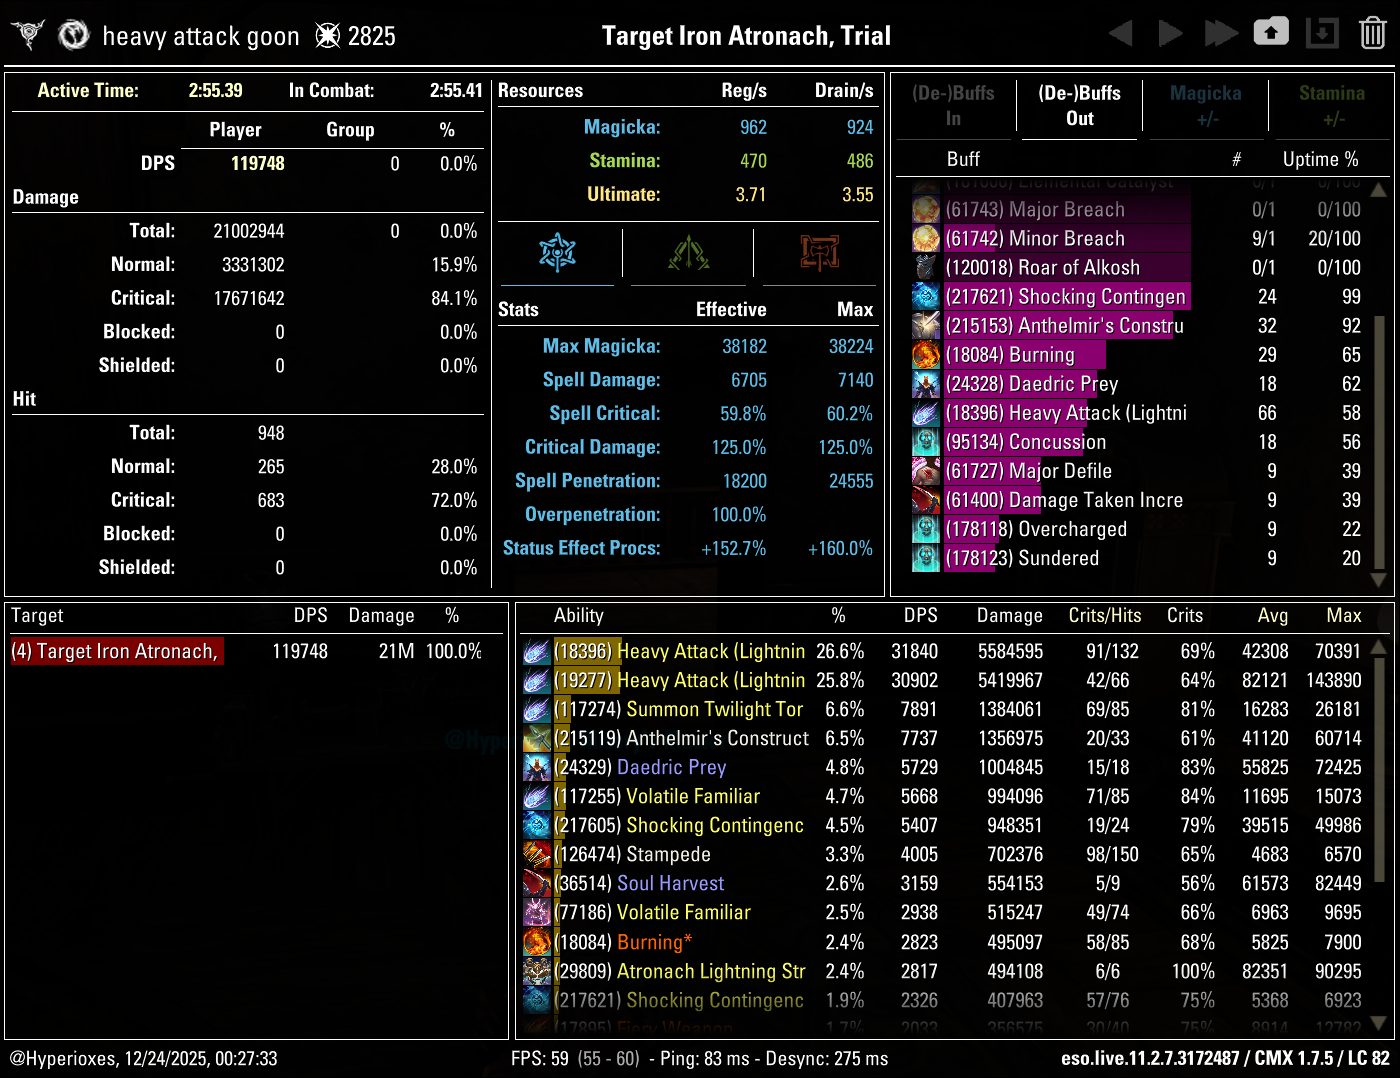
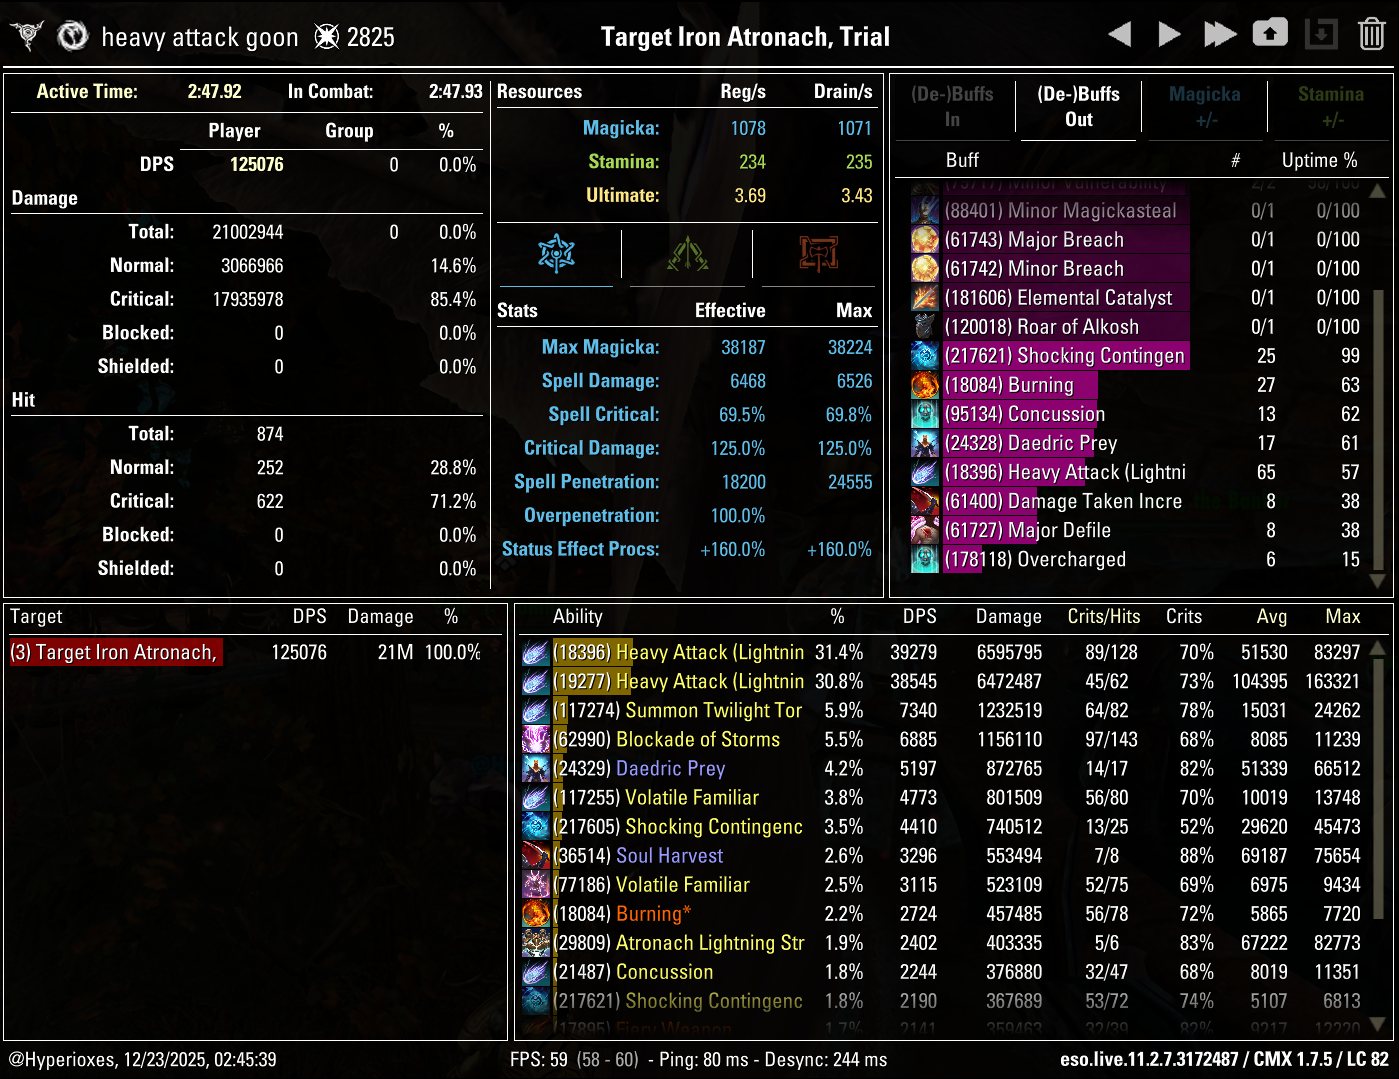
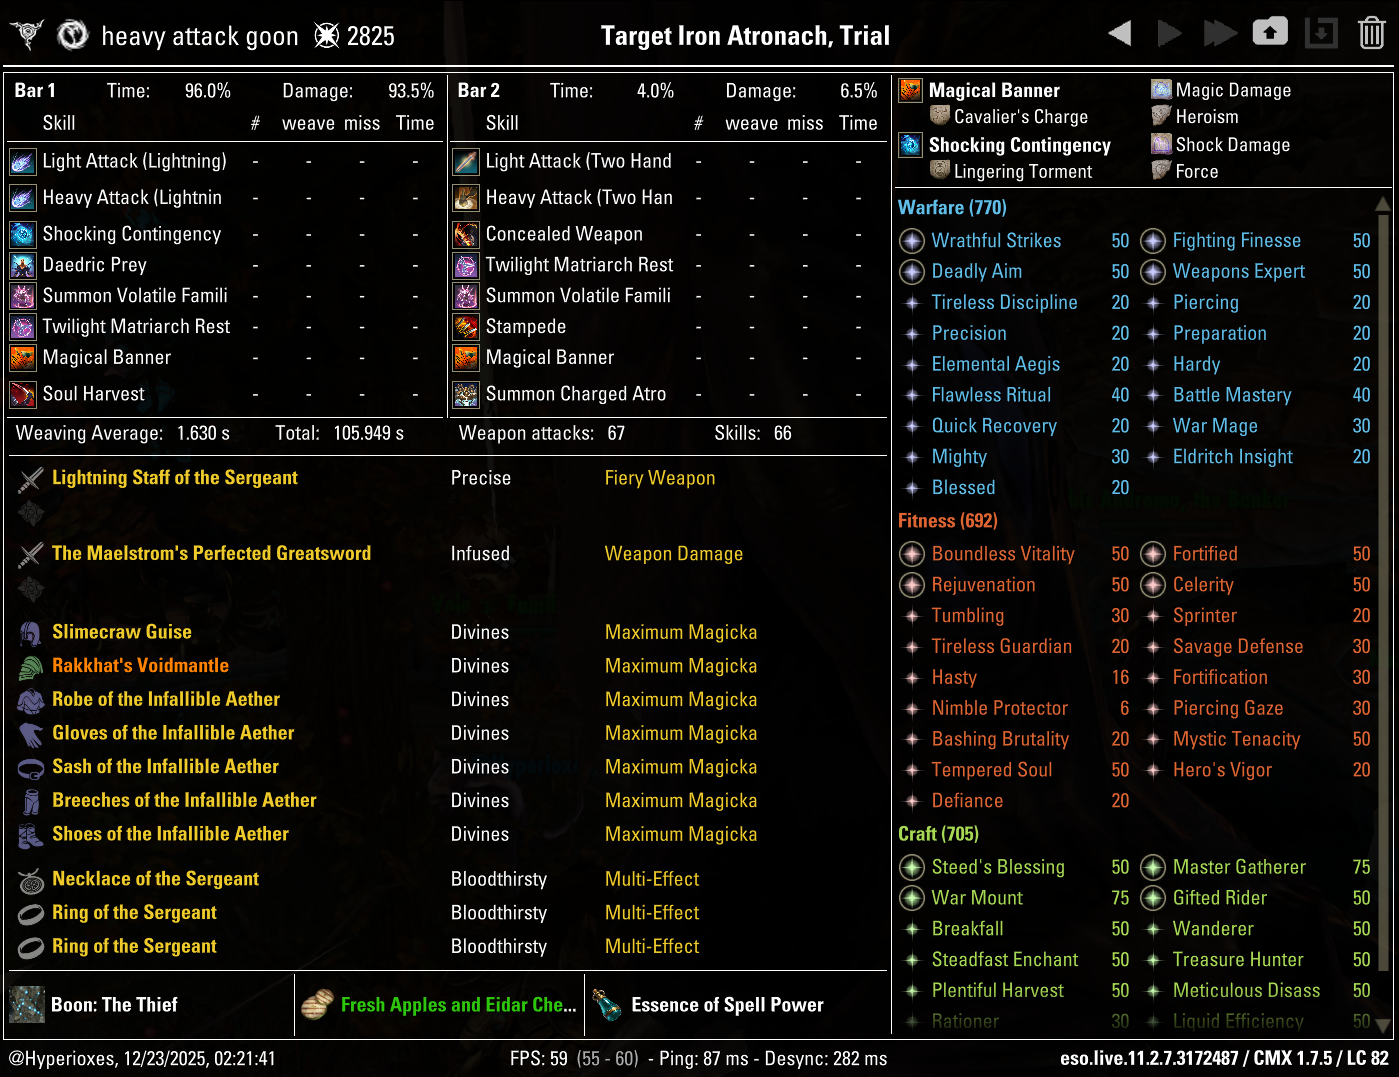
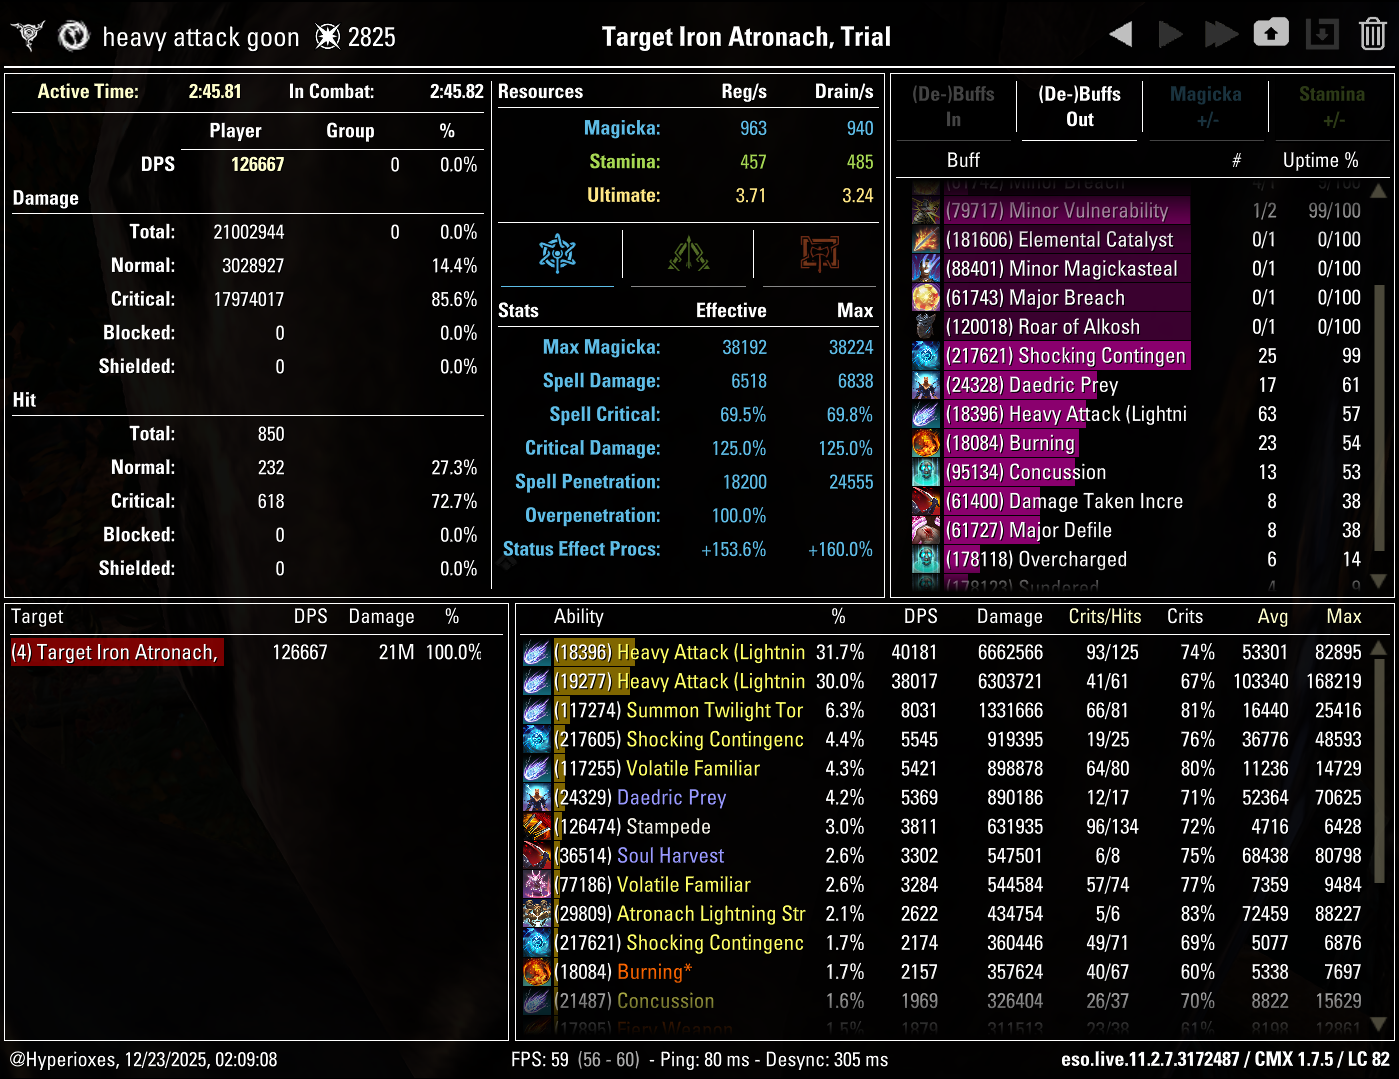
![]() Infallible Mage parses 126.6k DPS which is 9k lower than the top setup which is
Infallible Mage parses 126.6k DPS which is 9k lower than the top setup which is ![]() Slivers of Null Arca, but
Slivers of Null Arca, but ![]() Slivers of Null Arca is focused on Single Target damage and it's a Medium set so when using it, you have to make sure your supports are providing you with enough penetration. Because of that,
Slivers of Null Arca is focused on Single Target damage and it's a Medium set so when using it, you have to make sure your supports are providing you with enough penetration. Because of that, ![]() Infallible Mage is the most practical set.
Infallible Mage is the most practical set.

Gear that can be stronger than the setup from the table in specific situations or when specific circumstances are present
 Sul-Xan’s Torment - the best set for trash packs and for bosses that regularly spawn smaller adds
 Slivers of Null Arca - the best set for Single Target damage
 Merciless Charge - replacement for
  Crushing Wall when your Healers are providing Off Balance

Gear that is easier to obtain and can be used while you work towards the best gear
Crafted:
All of these are tradable and can be bought from other players
Dungeons:
PvP:
All of these are tradable and can be bought from other players
Final Setups
A few examples of final setups you could end up with after applying situational rules to the base setup
This is the crafted gear setup you can start with
| Gear Slot | Set | Weight/Type | Trait | Enchantment |
|---|---|---|---|---|
 Head |
Light | |||
 Shoulders |
Light | |||
 Chest |
Medium | |||
 Hands |
Light | |||
 Belt |
Light | |||
 Legs |
Light | |||
 Boots |
Light | |||
 Necklace |
Jewelry | |||
 Ring |
Jewelry | |||
 Ring |
Jewelry | |||
 Frontbar Main Hand |
Lightning Staff | |||
 Backbar Main Hand |
Lightning Staff |
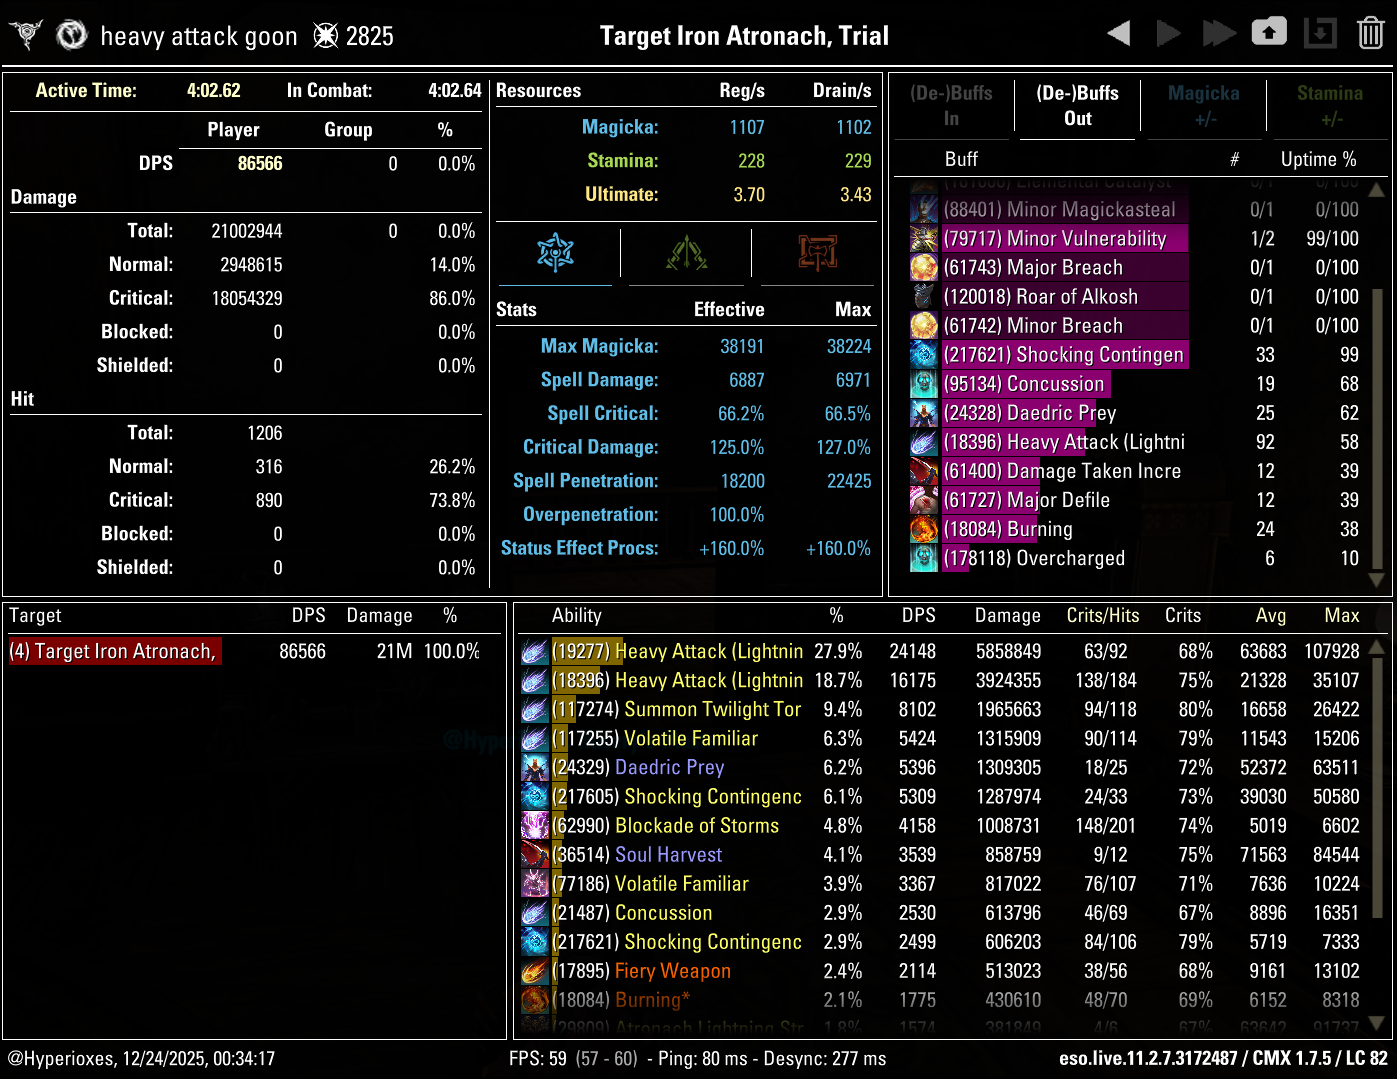
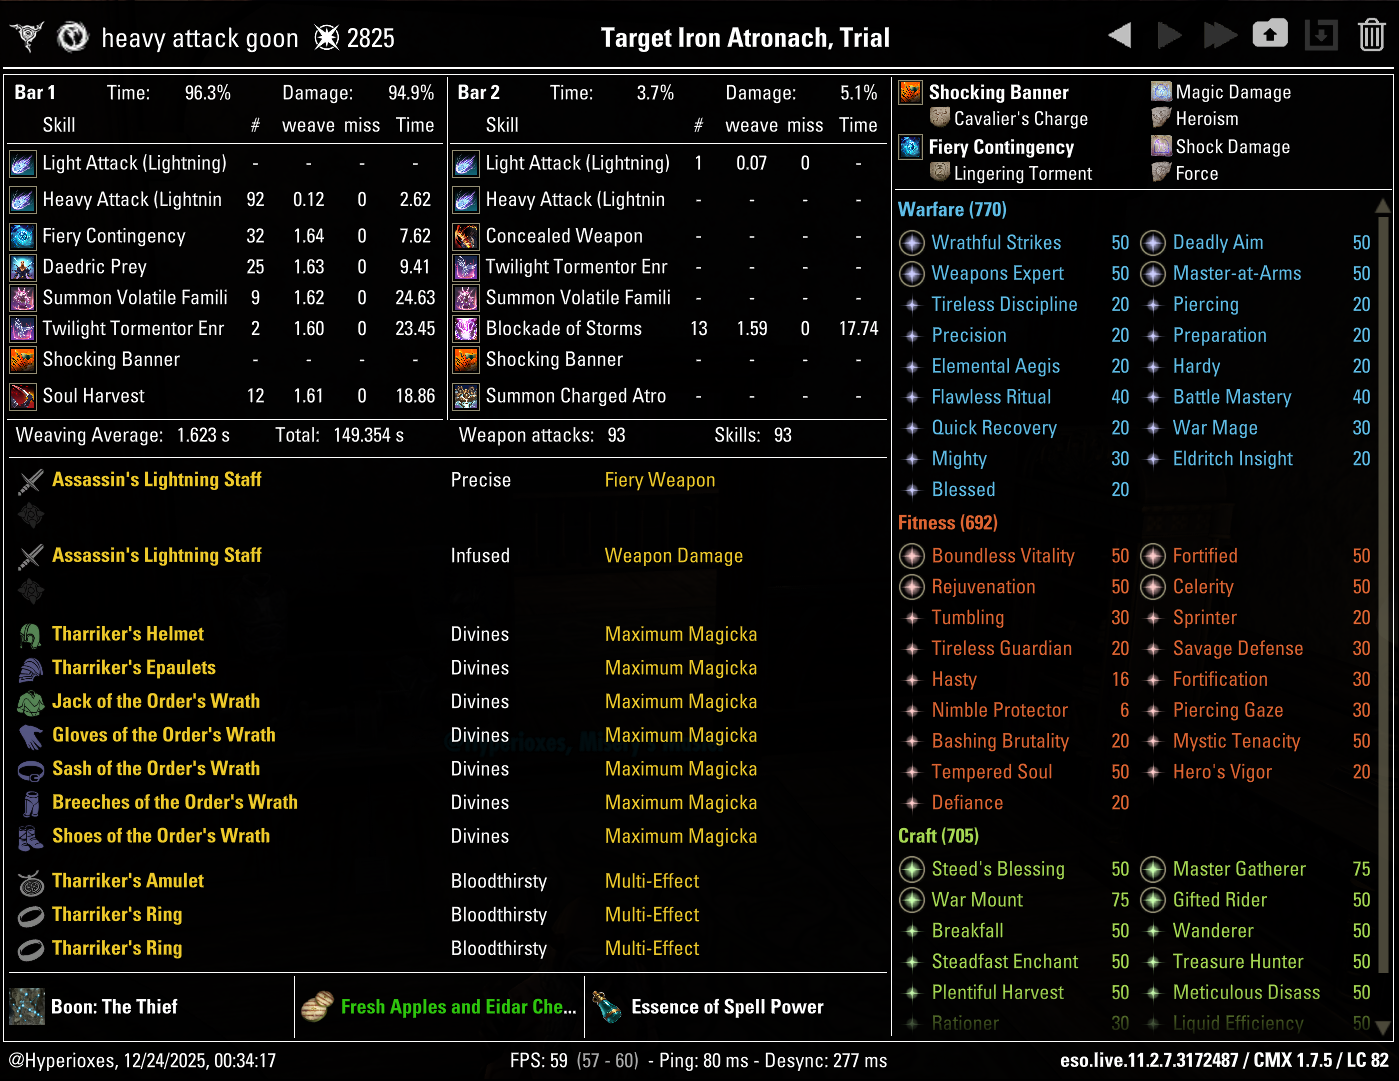
The crafted setup parses 86.5k DPS, although a huge majority of this DPS loss stems from lack of ![]() Sergeant’s Mail
Sergeant’s Mail
This is a setup you should use if you don't have access to any Trial gear
| Gear Slot | Set | Weight/Type | Trait | Enchantment |
|---|---|---|---|---|
 Head |
Light | |||
 Shoulders |
Medium | |||
 Chest |
Light | |||
 Hands |
Light | |||
 Belt |
Light | |||
 Legs |
Light | |||
 Boots |
Light | |||
 Necklace |
Jewelry | |||
 Ring |
Jewelry | |||
 Ring |
Jewelry | |||
 Frontbar Main Hand |
Lightning Staff | |||
 Backbar Main Hand |
Lightning Staff |
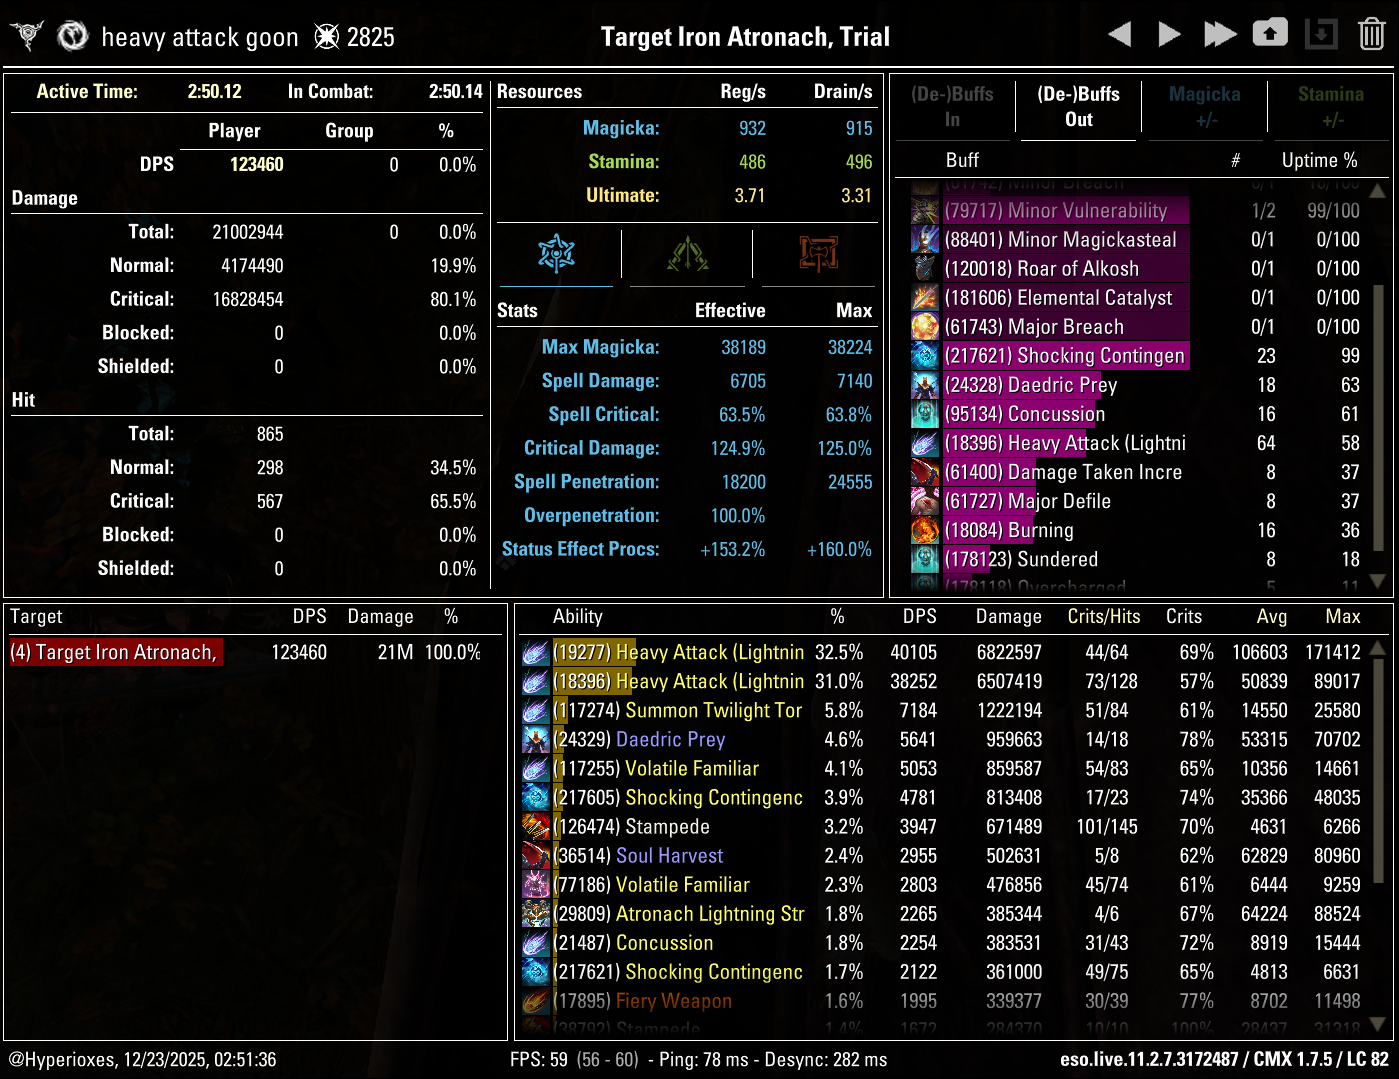
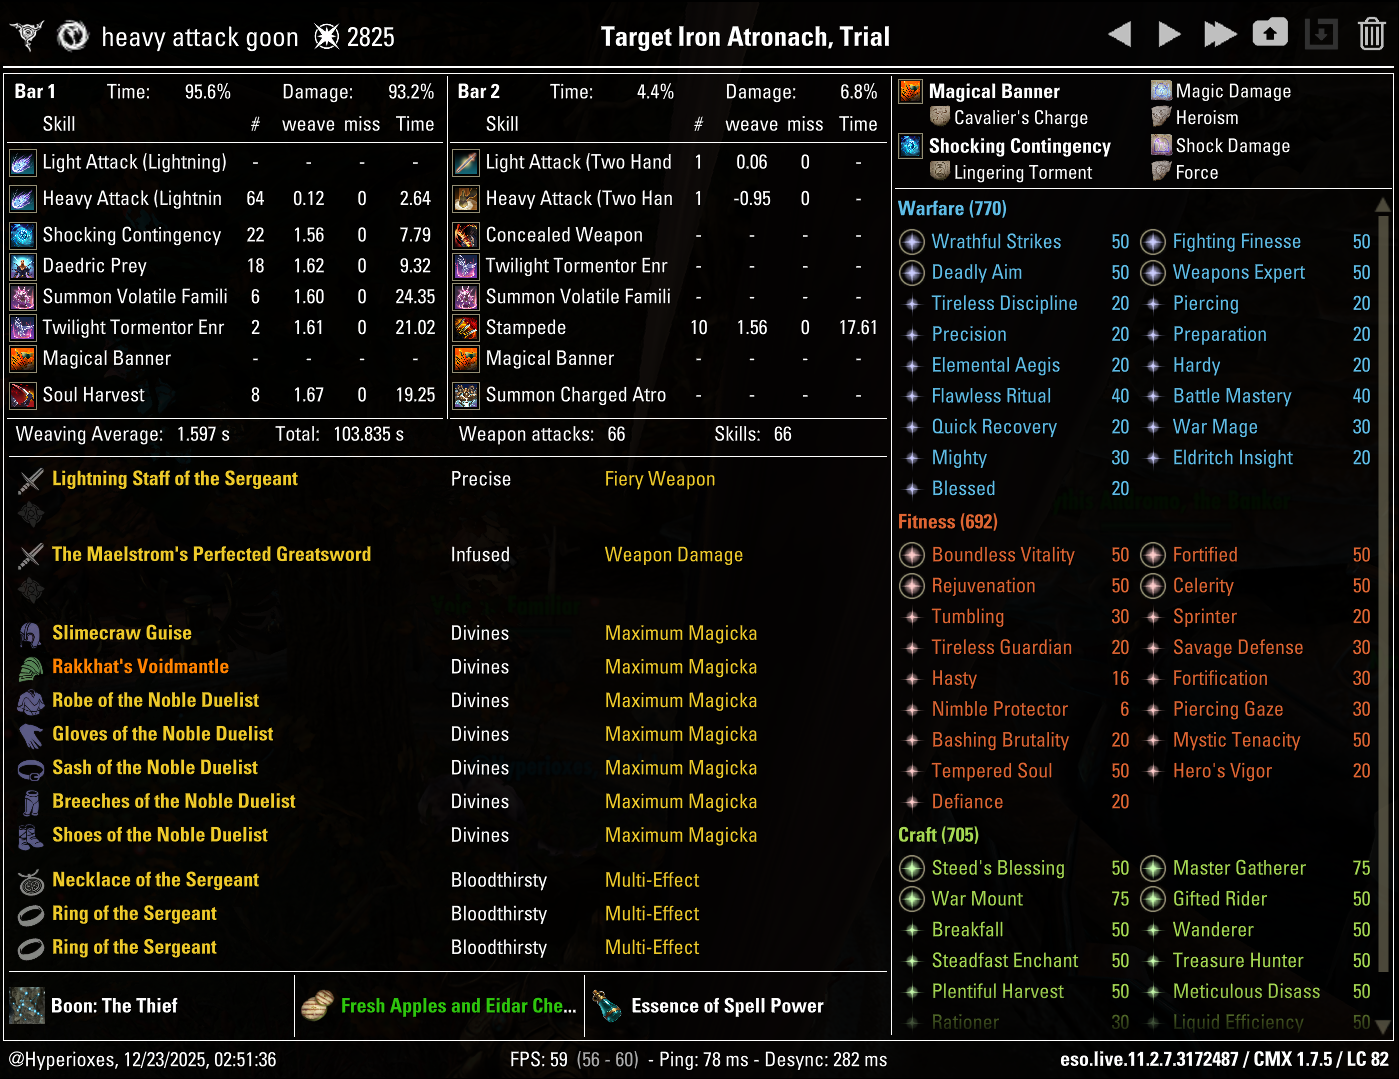
This setup parses 123.4k DPS
ADDITIONAL INFO:
 Noble Duelist replaces
  Infallible Mage
This is a setup you should use if you don't have access to Rakkhat's Voidmantle Mythic
| Gear Slot | Set | Weight/Type | Trait | Enchantment |
|---|---|---|---|---|
 Head |
Medium | |||
 Shoulders |
Medium | |||
 Chest |
Light | |||
 Hands |
Light | |||
 Belt |
Light | |||
 Legs |
Light | |||
 Boots |
Light | |||
 Necklace |
Jewelry | |||
 Ring |
Jewelry | |||
 Ring |
Jewelry | |||
 Frontbar Main Hand |
Lightning Staff | |||
 Backbar Main Hand |
Lightning Staff |
This setup parses 119.7k DPS
ADDITIONAL INFO:
 Anthelmir’s Construct replaces
  Rakkhat’s Voidmantle and
  Slimecraw
The best setup for Single Target damage
| Gear Slot | Set | Weight/Type | Trait | Enchantment |
|---|---|---|---|---|
 Head |
Light | |||
 Shoulders |
Medium | |||
 Chest |
Medium | |||
 Hands |
Medium | |||
 Belt |
Medium | |||
 Legs |
Medium | |||
 Boots |
Medium | |||
 Necklace |
Jewelry | |||
 Ring |
Jewelry | |||
 Ring |
Jewelry | |||
 Frontbar Main Hand |
Lightning Staff | |||
 Backbar Main Hand |
Lightning Staff |
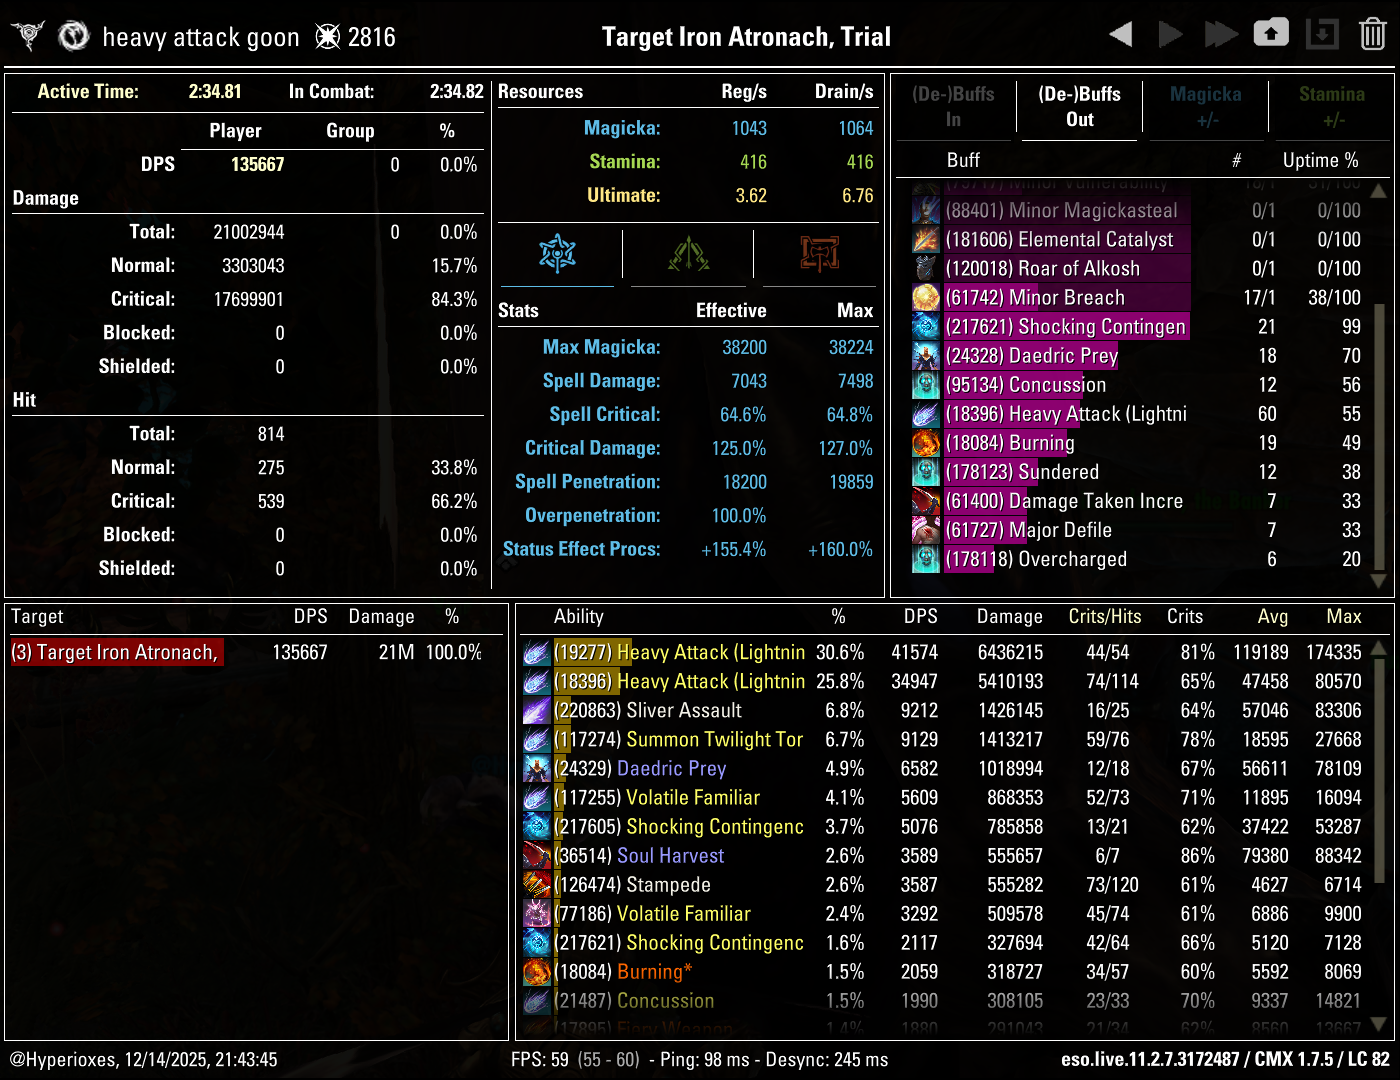
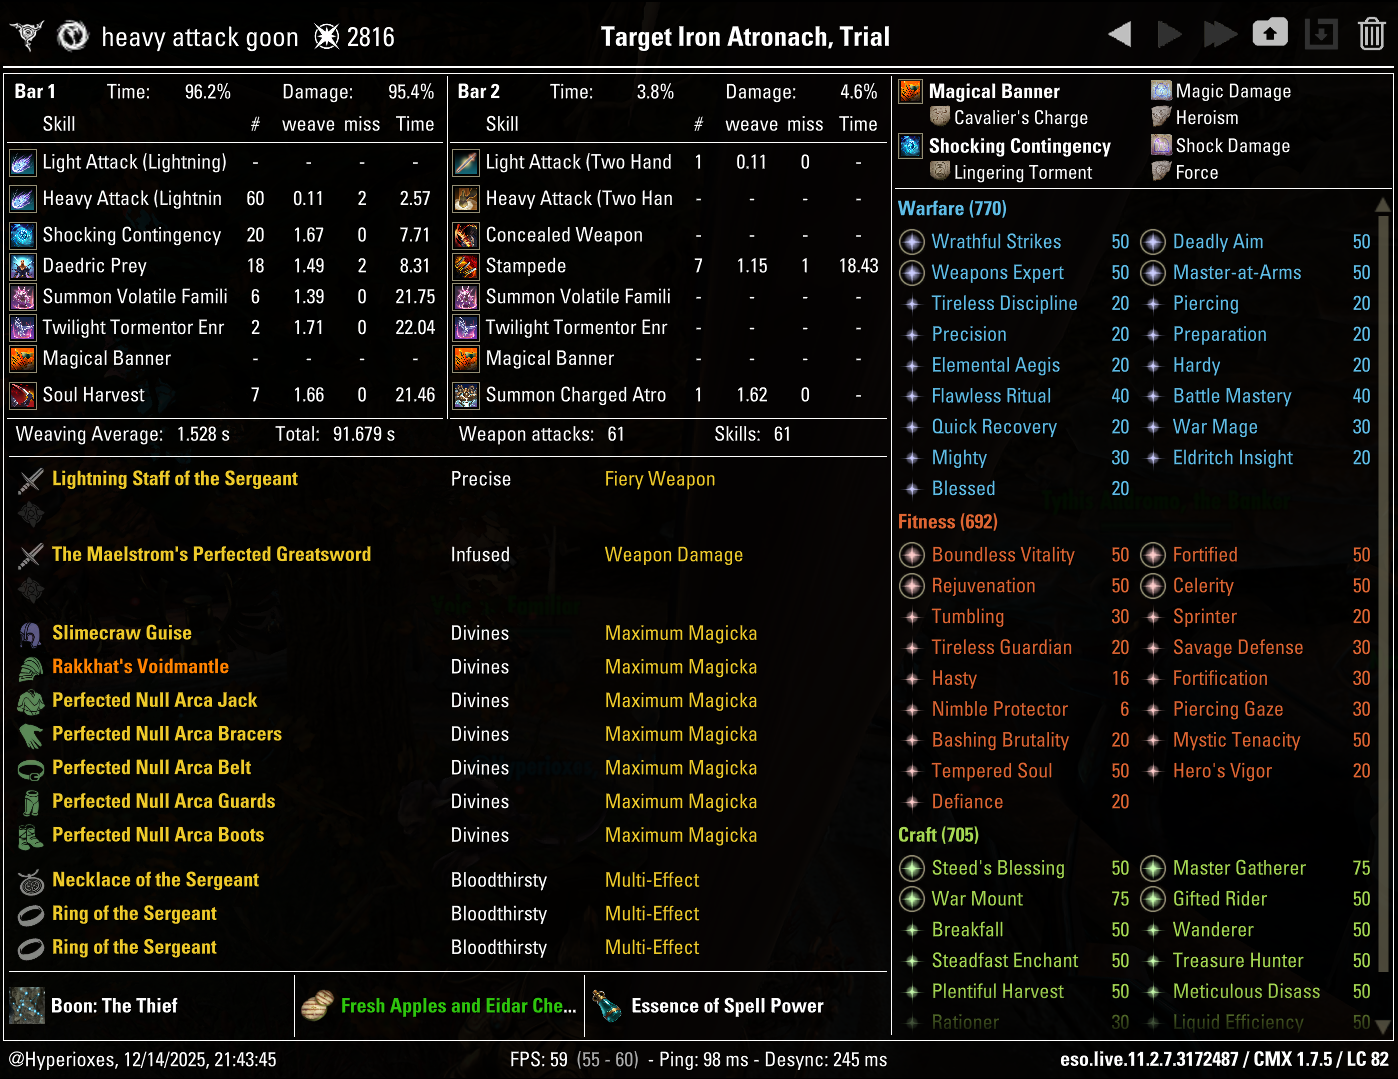
This setup parsed 135.6k. Keep in mind you have to make sure your supports are providing enough penetration if you want to use this setup, because ![]() Slivers of Null Arca is a Medium Armor set.
Slivers of Null Arca is a Medium Armor set.
ADDITIONAL INFO:
 Slivers of Null Arca replaces
  Infallible Mage
CHAMPION POINTS
Warfare
 Weapons Expert (20% Light and Heavy Attack Damage)
 Deadly Aim (6% Single Target Damage)
 Wrathful-Strikes (205 Weapon and Spell Damage)
 Fighting Finesse (8% Critical Damage and Healing)
Fitness
 Boundless Vitality (1400 Max Health)
 Fortified (1731 armor)
 Celerity (10% Movement Speed)
 Rejuvenation (90 Health, Stamina and Magicka Recovery)
ADDITIONAL INFO:
- Replace
 Fighting Finesse with
  Master-at-Arms if your supports are providing enough Critical Damage for you to reach the 125% cap without
  Fighting Finesse
 - Replace
 Deadly Aim with
  Biting Aura in AoE fights
RACE
The difference between best and worst race is about 5% of DPS and there is no content in the entire game that you'd be blocked from completing because of choosing a bad race.
Best race for 12-man content - High Elf, Dark Elf
Best race for 4-man content - Khajiit
Other decent options: Orc, Breton
MUNDUS
ATTRIBUTES
HEALTH
0
STAMINA
0
MAGICKA
64
You should always put all 64 attribute points into Magicka
FOOD
 Artaeum Pickled Fish Bowl - Max Health, Max Magicka. Use it for most of regular content.
  Solitude Salmon-Millet Soup is a cheaper alternative
 Tomato Garlic Chutney - Max Magicka. Use it for practice dummy parsing
POTIONS
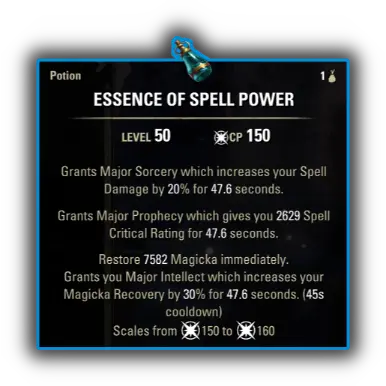
Use the Spell Power potions (Increase Spell Power, Spell Critical, Restore Magicka). They'll provide Major Sorcery and Major Prophecy which are crucial buffs. You can craft them by combining![]() Lady's Smock,
Lady's Smock,![]() Namira's Rot and
Namira's Rot and![]() Corn Flower.
Corn Flower.
PARSE
Combat Metrics screenshot of the 135.6k parse
Recording of the 135.6k parse
OTHER PARSES
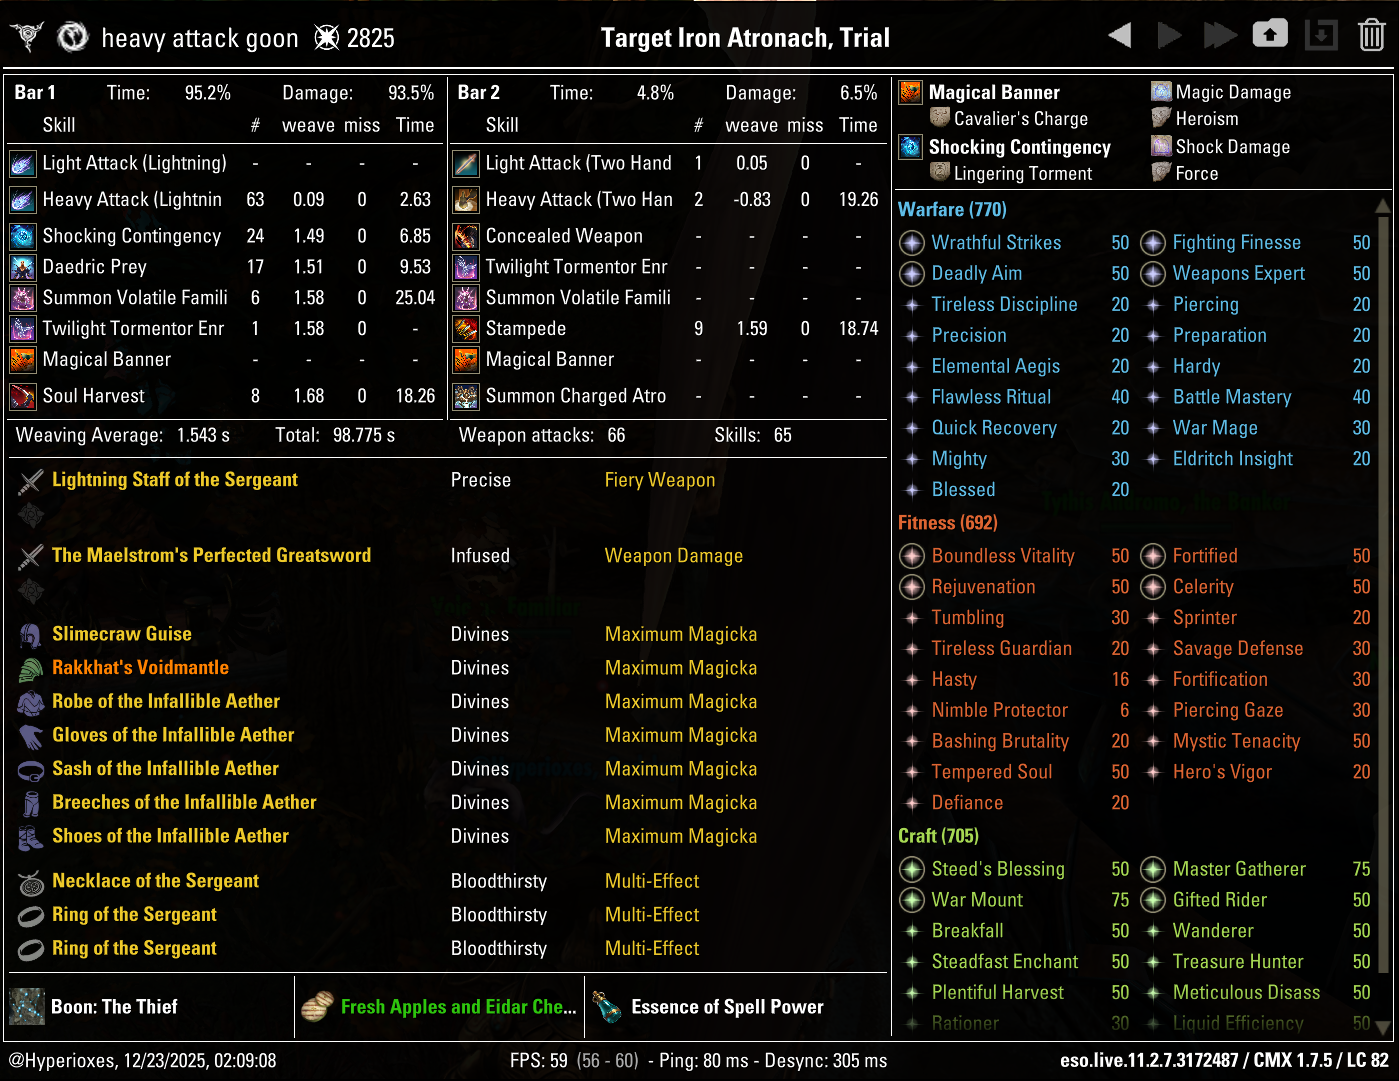
Infallible Aether (Regular setup) - 126.6k DPS
GAMEPLAY
Logs of Veteran Trials and Dungeons I've finished using this build
Trials
Veteran Lucent Citadel - https://www.esologs.com/reports/6V94YdwNnL7AbFzq
Veteran Kyne's Aegis - https://www.esologs.com/reports/YL3N6hPTJK71zGCD
Dungeons
Veteran Hard Mode Black Gem Foundry - https://www.esologs.com/reports/BNVd9X4Y2MjfkZCb
Veteran Hard Mode Naj-Caldeesh - https://www.esologs.com/reports/XgaHBGTmcYnZ1kbh
THANKS FOR READING

If you've enjoyed this guide and want to support me, you can do so through Patreon. Your support will help me produce more guides.


