

Heavy Attack Subclass Solo Build - ESO Guide
This build is capable of soloing every Veteran dungeon that doesn't have a specific mechanic that requires multiple people. It's also capable of soloing most Hard Mode dungeons, and with some adjustments even the more difficult ones.
In this guide I'll be regularly using the terms Regular and Difficult. Regular refers to content that is intended to be solo-ed (such as Maelstrom Arena or Vateshran Arena) and to any overland content such as World Bosses, Dolmens, Dragons, Volcanic Vents, Harrowstorms, Mirrormoor Incursions, etc. Majority of dungeon fights will also fall under that category. Difficult refers to extremely difficult dungeon fights.
Subclassing
Base Class
This build can used by any class. The strongest combination can be used by characters who have either Sorcerer, Necromancer or Nightblade as their base class, but as a Necromancer you can utilize the Necromancer Class Mastery script on Banner Bearer which grants increased Maximum Resources, making it the best base class, though by a very small margin. In fact, DPS wise the Necromancer Class Mastery is equal to Cavalier's Charge , which is what other base classes are going to use, it's only better because it provides Maximum Resources which improve your survivability.
Strongest Combination


This combination can be used when you have either Sorcerer, Necromancer or Nightblade as your base class.
Templar base class variant

Use this combination when your base class is Templar
Warden base class variant

Use this combination when your base class is Warden
Dragonknight base class variant

Use this combination when your base class is Dragonknight
Arcanist base class variant

Use this combination when your base class is Arcanist
Skill Setups
Base Setup
A base setup that will work for most situations and which should be your starting point when making situational setups
| Front Bar | Back Bar |
|---|---|
| Slot 1: Ulfsild's Contingency | Slot 1: Grave Lord's Sacrifice |
| Slot 2: Hurricane | Slot 2: Soul Burst |
| Slot 3: Critical Surge | Slot 3: Elemental Susceptibility |
| Slot 4: Detonating Siphon | Slot 4: Elemental Blockade |
| Slot 5: Banner Bearer | Slot 5: Banner Bearer |
| Ultimate: Soul Harvest | Ultimate: Shooting Star |
- Ulfsild's Contingency - your source of crucial Empower buff, which increases damage done by Heavy Attack by 70%. Since Ulfsild's Contingency is a Mages Guild skill, it will trigger the Might of the Guild passive, which grants you Empower for 10 seconds. It also deals decent damage in an AoE and grants you Minor Force buff, increasing your Critical Damage by 10%. Ulfsild's Contingency is delayed until the next skill cast but whenever it's needed you can activate it early by bashing your enemy. If you cast this ability as you're finishing your Heavy Attack, the Empower you gain from it will start working just in time to boost the final tick of that Heavy Attack you just finished. Use Gladiator's Tenacity instead of Lingering Torment when you need more damage mitigation
- Hurricane - an ability which provides a crucial Major Resolve buff which provides 5948 armor and it deals very good damage. It also grants you a 15% movement speed buff during its duration
- Critical Surge - your source of Major Brutality and Sorcery that will also heal you for 3300 whenever you deal critical damage, up to once every second. The heal itself can also be a critical heal
- Detonating Siphon - your source of Major Savagery and Major Prophecy which also deals decent damage and increases your damage done by 3% while slotted. You need it slotted on your frontbar to trigger passives of the Grave Lord skill line. You need a corpse to activate it but you'll get it from Grave Lord's Sacrifice
- Banner Bearer ( Magic , Class Mastery , Berserk ) - increases your Magical damage done by 6%, provides either Weapon and Spell Damage or maximum resources depending on your 2nd script and provides Minor Berserk, increasing your damage done by 5%. It also severely decreases your sustain but it's not an issue on a Heavy Attack build. Use Mitigation instead of Magic when you need more damage mitigation. Use Cavalier's Charge instead of Class Mastery if your base class isn't Necromancer. Use Warmage's Defense instead of Class Mastery if your base class isn't Necromancer and it's a more difficult fight
- Soul Harvest - a cheap ultimate that increases target's damage taken from you by 20%. This is the ultimate you should use in Single Target fights. You need it on your frontbar to trigger passives of the Assassination skill line. Having it slotted will also cause you to regain 10 Ultimate whenever you deal a final blow against an enemy
- Grave Lord's Sacrifice - this ability will provide a 15% bonus to the channeled part of your Heavy Attack. It will also generate the corpse you'll need for Detonating Siphon
- Soul Burst ( Shock , Lingering Torment , Courage ) - an AoE DoT which grants you Minor Courage, increasing your Weapon and Spell Damage by 215
- Elemental Susceptibility - an extremely loaded ability that does a multitude of things. It's completely free to cast so it'll help you sustain. It applies Major Breach, which reduces enemies' armor by 5948 which is a massive damage increase. It also applies Burning, Chilled and Concussed status effects at the beginning and then every 7.5 seconds. All of these Status Effects deal decent damage, but Concussed will also apply Minor Vulnerability for 4 seconds, increasing enemies' damage taken by 5%. Chilled will also apply Minor Maim for 4 seconds, reducing enemies' damage done by 5%. The Concussed proc will also synergise with our Elemental Blockade
- Elemental Blockade - this ability will constantly apply your Weapon Damage enchantment. It will also constantly apply Off Balance to enemies who are Concussed, and they'll be Concussed thanks to Elemental Susceptibility. Enemies who are Off Balance take 70% increased damage from Heavy Attacks
- Shooting Star - a powerful ultimate that deals damage in an AoE and grants you Ultimate for each enemy hit with the initial blast. Use it in AoE fights or when you start fights with high amount of Ultimate stored up
When you want to slot something situational you have to remove Detonating Siphon, move Grave Lord's Sacrifice to frontbar and then change the Berserk script on your Banner Bearer to Savagery and Prophecy
- Resolving Vigor - use it for more difficult fights where the pressure is constant and thus you need the Minor Resolve. It can also be used as your main source of healing before you obtain the Ring of the Pale Order Mythic or in fights with invulnerability phases where you can't heal with Ring of the Pale Order
- Silver Leash - a chain ability that you can slot in trash packs to stack enemies and get through them faster
- Mystic Siphon - other morph of Detonating Siphon which increases your recoveries, use it in fights where you need more sustain. Due to Shock damage bonuses from Magic Banner Bearer and Energized passive it's only slightly behind Detonating Siphon in damage
- Revealing Flare - slot it for more difficult fights where you need more damage mitigation. It's a skill that passively grants Major Protection, reducing your damage taken by 10%. It will also trigger the Magicka Aid passive, which increases Magicka Recovery by 10%
- Wield Soul ( Damage Shield , Druid's Resurgence , Vitality ) - a strong damage shield that restores your Stamina and grants you Major Vitality, increasing your healing received and strength of damage shields by 12%
- Precognition - an ultimate that breaks you out of some otherwise unavoidable stuns, you'll need it to get around some mechanics which are otherwise impossible or very difficult to solo, like for example Inferno's Hold in Zaan the Scalecaller fight
- Ball of Lightning - an ability that teleports you forward. Use it in fights where you need more mobility or in fights where this teleport allows you to invalidate some mechanic
Priority List
This is just a list of priorities. Simply recast abilities when they run out and follow this list of priorities when there are multiple things to refresh
- 1. Use Ulfsild's Contingency if your Empower is out or if it's going to run out by the end of the Heavy Attack you're channeling
- 2. Use Critical Surge (you can recast this early)
- 3. Use Elemental Susceptibility
- 4. Use Elemental Blockade
- 5. Use Soul Burst
- 6. If it's an AoE fight or you're starting at or close to 200 Ultimate, use Shooting Star
- 7. If it's a Single Target fight, use Soul Harvest
- 8. Use Grave Lord's Sacrifice
- 9. Use Detonating Siphon, keep in mind that the corpse from Grave Lord's Sacrifice will only stay on the ground for 5 seconds
- 10. Use Hurricane
Pre-buff
These abilities can be pre-cast before entering combat
Final Setups
A few examples of final setups you could end up with after applying the situational skills to the base setup
A setup with lots of damage mitigation for bosses that hit very hard
| Front Bar | Back Bar |
|---|---|
| Slot 1: Ulfsild's Contingency | Slot 1: Critical Surge |
| Slot 2: Revealing Flare | Slot 2: Soul Burst |
| Slot 3: Wield Soul | Slot 3: Elemental Susceptibility |
| Slot 4: Grave Lord's Sacrifice | Slot 4: Elemental Blockade |
| Slot 5: Banner Bearer | Slot 5: Banner Bearer |
| Ultimate: Soul Harvest | Ultimate: Shooting Star |
What Changes
Changes compared to the Base Setup
- Revealing Flare replaces Detonating Siphon. You need a Grave Lord ability on your frontbar to trigger the passives of that skill line so Grave Lord's Sacrifice switches places with Critical Surge
- Wield Soul replaces Hurricane
- Banner Bearer changes the Magic script to Mitigation and Berserk to Savagery and Prophecy , because Detonating Siphon is gone. If you're not a Necromancer you should also change Cavalier's Charge to Warmage's Defense
- This setup requires you to wear Mighty Chudan, as it doesn't get Major Resolve from a skill anymore
A setup you should use as a Templar
| Front Bar | Back Bar |
|---|---|
| Slot 1: Ulfsild's Contingency | Slot 1: Grave Lord's Sacrifice |
| Slot 2: Hurricane | Slot 2: Critical Surge |
| Slot 3: Blazing Spear | Slot 3: Elemental Susceptibility |
| Slot 4: Detonating Siphon | Slot 4: Elemental Blockade |
| Slot 5: Banner Bearer | Slot 5: Banner Bearer |
| Ultimate: Energy Overload | Ultimate: Shooting Star |
What Changes
Changes compared to the Base Setup
- Blazing Spear replaces Soul Burst and then swaps places with Critical Surge so you can benefit from Piercing Spear passive
- Energy Overload replaces Soul Harvest. It will passively grant you Weapon Damage from Expert Mage passive and it can be used to restore resources in emergencies
A setup you should use as a Warden
| Front Bar | Back Bar |
|---|---|
| Slot 1: Ulfsild's Contingency | Slot 1: Grave Lord's Sacrifice |
| Slot 2: Hurricane | Slot 2: Critical Surge |
| Slot 3: Bird of Prey | Slot 3: Elemental Susceptibility |
| Slot 4: Detonating Siphon | Slot 4: Elemental Blockade |
| Slot 5: Banner Bearer | Slot 5: Banner Bearer |
| Ultimate: Wild Guardian | Ultimate: Wild Guardian |
What Changes
Changes compared to the Base Setup
- Bird of Prey replaces Soul Burst and then swaps places with Critical Surge
- Wild Guardian replaces both Soul Harvest and Shooting Star
- Banner Bearer changes the Berserk script to Courage , because Bird of Prey already provides it
A setup you should use as a Dragonknight
| Front Bar | Back Bar |
|---|---|
| Slot 1: Ulfsild's Contingency | Slot 1: Grave Lord's Sacrifice |
| Slot 2: Hurricane | Slot 2: Flames of Oblivion |
| Slot 3: Critical Surge | Slot 3: Elemental Susceptibility |
| Slot 4: Detonating Siphon | Slot 4: Elemental Blockade |
| Slot 5: Banner Bearer | Slot 5: Banner Bearer |
| Ultimate: Energy Overload | Ultimate: Standard of Might |
What Changes
Changes compared to the Base Setup
- Flames of Oblivion replaces Soul Burst
- Energy Overload replaces Soul Harvest. It will passively grant you Weapon Damage from Expert Mage passive and it can be used to restore resources in emergencies
- Standard of Might replaces Shooting Star
A setup you should use as an Arcanist
| Front Bar | Back Bar |
|---|---|
| Slot 1: Ulfsild's Contingency | Slot 1: Grave Lord's Sacrifice |
| Slot 2: Hurricane | Slot 2: Critical Surge |
| Slot 3: Tentacular Dread | Slot 3: Elemental Susceptibility |
| Slot 4: Detonating Siphon | Slot 4: Elemental Blockade |
| Slot 5: Banner Bearer | Slot 5: Banner Bearer |
| Ultimate: Energy Overload | Ultimate: The Languid Eye |
What Changes
Changes compared to the Base Setup
- Tentacular Dread replaces Soul Burst and then swaps places with Critical Surge
- Energy Overload replaces Soul Harvest. It will passively grant you Weapon Damage from Expert Mage passive and it can be used to restore resources in emergencies
- The Languid Eye replaces Shooting Star
- Ulfsild's Contingency changes the Lingering Torment script to Class Mastery
A setup I've used when fighting Arkasis the Mad Scientist in the Stone Garden dungeon
| Front Bar | Back Bar |
|---|---|
| Slot 1: Ulfsild's Contingency | Slot 1: Grave Lord's Sacrifice |
| Slot 2: Hurricane | Slot 2: Soul Burst |
| Slot 3: Critical Surge | Slot 3: Elemental Susceptibility |
| Slot 4: Mystic Siphon | Slot 4: Elemental Blockade |
| Slot 5: Banner Bearer | Slot 5: Banner Bearer |
| Ultimate: Soul Harvest | Ultimate: Shooting Star |
What Changes
Changes compared to the Base Setup
- Detonating Siphon changes to Mystic Siphon to help with sustaining dodge rolling
A setup I've used when fighting Talen-Lah and Bar-Sakka in the Naj-Caldeesh dungeon
| Front Bar | Back Bar |
|---|---|
| Slot 1: Ulfsild's Contingency | Slot 1: Critical Surge |
| Slot 2: Revealing Flare | Slot 2: Resolving Vigor |
| Slot 3: Wield Soul | Slot 3: Elemental Susceptibility |
| Slot 4: Grave Lord's Sacrifice | Slot 4: Elemental Blockade |
| Slot 5: Camouflaged Hunter | Slot 5: Bull Netch |
| Ultimate: Wild Guardian | Ultimate: Shooting Star |
What Changes
Changes compared to the Base Setup
- This fight requires a purge and a lot of Stamina sustain, so Animal Companions skill line is straight up superior to Assassination
- Banner Bearer gets replaced by Camouflaged Hunter and Bull Netch to help with Stamina sustain and to purge Bar-Sakka's DoT
- Resolving Vigor replaces Soul Burst because Minor Resolve is no longer provided by Banner Bearer
- Despite this setup having access to Wild Guardian, this setup still uses Shooting Star becuse this fight has lots of adds, allowing you to recover a lot of Ultimate with each use of Shooting Star. Wild Guardian is still front-barred for the 5% Critical Damage bonus from Advanced Species
Passives
 Class
Class
 Weapon
 Armor
Armor
 Guild
Guild
 Alliance War
 Racial
 Craft
Craft
Class - Storm Calling
![]() Capacitor - Medium Priority
Capacitor - Medium Priority
![]() Energized - High Priority
Energized - High Priority
![]() Amplitude - High Priority
Amplitude - High Priority
![]() Expert Mage - High Priority
Expert Mage - High Priority
Class - Assassination
![]() Master Assassin - High Priority
Master Assassin - High Priority
![]() Executioner - High Priority
Executioner - High Priority
![]() Pressure Points - High Priority
Pressure Points - High Priority
![]() Hemorrhage - High Priority
Hemorrhage - High Priority
Class - Grave Lord
![]() Reusable Parts - Low Priority
Reusable Parts - Low Priority
![]() Death Knell - High Priority
Death Knell - High Priority
![]() Dismember - High Priority
Dismember - High Priority
![]() Rapid Rot - High Priority
Rapid Rot - High Priority
Weapon - Destruction Staff
![]() Tri Focus - High Priority
Tri Focus - High Priority
![]() Penetrating Magic - High Priority
Penetrating Magic - High Priority
![]() Elemental Force - Medium Priority
Elemental Force - Medium Priority
![]() Ancient Knowledge - High Priority
Ancient Knowledge - High Priority
![]() Destruction Expert - Low Priority
Destruction Expert - Low Priority
Armor - Light Armor
![]() Grace - Low Priority
Grace - Low Priority
![]() Evocation - Low Priority
Evocation - Low Priority
![]() Spell Warding - Low Priority
Spell Warding - Low Priority
![]() Prodigy - High Priority
Prodigy - High Priority
![]() Concentration - High Priority
Concentration - High Priority
Armor - Medium Armor
![]() Dexterity - High Priority
Dexterity - High Priority
![]() Wind Walker - Low Priority
Wind Walker - Low Priority
![]() Improved Sneak - Not needed
Improved Sneak - Not needed
![]() Agility - High Priority
Agility - High Priority
![]() Athletics - Low Priority
Athletics - Low Priority
Armor - Heavy Armor
![]() Resolve - Medium Priority
Resolve - Medium Priority
![]() Constitution - Low Priority
Constitution - Low Priority
![]() Juggernaut - Medium Priority
Juggernaut - Medium Priority
![]() Revitalize - Low Priority
Revitalize - Low Priority
![]() Rapid Mending - Low Priority
Rapid Mending - Low Priority
Guild - Fighters Guild
![]() Intimidating Presence - Medium Priority
Intimidating Presence - Medium Priority
![]() Slayer - High Priority
Slayer - High Priority
![]() Banish the Wicked - Medium Priority
Banish the Wicked - Medium Priority
![]() Skilled Tracker - Medium Priority
Skilled Tracker - Medium Priority
![]() Bounty Hunter - Not needed
Bounty Hunter - Not needed
Guild - Mages Guild
![]() Persuasive Will - Not needed
Persuasive Will - Not needed
![]() Mage Adept - Low Priority
Mage Adept - Low Priority
![]() Everlasting Magic - Medium Priority
Everlasting Magic - Medium Priority
![]() Magicka Controller - High Priority
Magicka Controller - High Priority
![]() Might of the Guild - High Priority
Might of the Guild - High Priority
Guild - Psijic Order
![]() Clairvoyance - Low Priority
Clairvoyance - Low Priority
![]() Spell Orb - Not needed
Spell Orb - Not needed
![]() Concentrated Barrier - Low Priority
Concentrated Barrier - Low Priority
![]() Deliberation - Not needed
Deliberation - Not needed
Alliance War - Support
![]() Magicka Aid - Medium Priority
Magicka Aid - Medium Priority
![]() Combat Medic - Not needed
Combat Medic - Not needed
![]() Battle Resurrection - Not needed
Battle Resurrection - Not needed
Race - Your race
Get all of your racials, no matter which race you are
Craft - Alchemy
![]() Solvent Proficiency - Not needed
Solvent Proficiency - Not needed
![]() Keen Eye: Reagents - Not needed
Keen Eye: Reagents - Not needed
![]() Medicinal Use - High Priority
Medicinal Use - High Priority
![]() Chemistry - Not needed
Chemistry - Not needed
![]() Laboratory Use - Not needed
Laboratory Use - Not needed
![]() Snakeblood - Not needed
Snakeblood - Not needed
Gear
Regular Setup
This is my suggested setup for regular content, such as Solo Arenas, World Bosses, Dolmens, Dragons, Volcanic Vents, Harrowstorms, Mirrormoor Incursions and majority of the dungeons.
| Gear Slot | Set | Weight/Type | Trait | Enchantment |
|---|---|---|---|---|
 Head |
Anthelmir's Construct | Medium | Divines | Magicka |
 Shoulders |
Anthelmir's Construct | Medium | Divines | Magicka |
 Chest |
Sergeant's Mail | Heavy | Reinforced | Magicka |
 Hands |
Noble Duelist | Light | Divines | Magicka |
 Belt |
Noble Duelist | Light | Divines | Magicka |
 Legs |
Armor of the Trainee | Medium | Divines | Magicka |
 Boots |
Noble Duelist | Light | Divines | Magicka |
 Necklace |
Sergeant's Mail | Jewelry | Bloodthirsty | Increase Physical Harm |
 Ring |
Sergeant's Mail | Jewelry | Bloodthirsty | Increase Physical Harm |
Ring |
Ring of the Pale Order | Jewelry | Bloodthirsty | Increase Physical Harm |
 Frontbar Main Hand |
Sergeant's Mail | Lightning Staff | Precise | Absorb Stamina |
Backbar Main Hand |
Noble Duelist | Lightning Staff | Infused | Weapon Damage |
- Replace Anthelmir's Construct with Mighty Chudan when you need an additional skill slot
Final Setups
Example of a beginner setup made with just crafted gear.
| Gear Slot | Set | Weight/Type | Trait | Enchantment |
|---|---|---|---|---|
Head |
New Moon Acolyte | Medium | Training/ Divines | Magicka |
Shoulders |
New Moon Acolyte | Medium | Training/ Divines | Magicka |
Chest |
Order's Wrath | Heavy | Training/ Reinforced | Magicka |
Hands |
Order's Wrath | Light | Training/ Divines | Magicka |
Belt |
Order's Wrath | Light | Training/ Divines | Magicka |
Legs |
Order's Wrath | Medium | Training/ Divines | Magicka |
Boots |
Order's Wrath | Light | Training/ Divines | Magicka |
Necklace |
New Moon Acolyte | Jewelry | Bloodthirsty | Increase Physical Harm |
Ring |
New Moon Acolyte | Jewelry | Bloodthirsty | Increase Physical Harm |
Ring |
New Moon Acolyte | Jewelry | Bloodthirsty | Increase Physical Harm |
Frontbar Main Hand |
Assassin's Guile | Lightning Staff | Precise | Absorb Stamina |
Backbar Main Hand |
Assassin's Guile | Lightning Staff | Infused | Weapon Damage |
The setup in the table uses only crafted gear, but if you already own parts of the Regular setup like Ring of the Pale Order you can start using them immediately
You don't need to start with crafted gear, simply pick 2 sets from the Alternative section that are easiest for you to obtain
Gear that might be easier to obtain and can be used while you work towards the best gear
Dungeon gear isn't always an upgrade to Crafted/Overland gear. It's listed in case you already own some of it
Crafted:
All of these are tradable and can be bought from other players
Overland:
All of these are tradable and can be bought from other players
- Mother's Sorrow (Light) - Deshaan
- Back-Alley Gourmand (Light) - Galen and Y'ffelon
- Dragonguard Elite (Medium) - Southern Elsweyr
PvP:
All of these are tradable and can be bought from other players
- Deadly Strike (Medium) - Bruma Elite Gear Vendor
Dungeons:
- Sergeant's Mail (Heavy) - Wayrest Sewers 1 & 2
- Noble Duelist's Silks (Light) - Blessed Crucible
- Storm Master (Medium) - Tempest Island
- Undaunted Infiltrator (Medium) - Arx Corinium
- Undaunted Unweaver (Light) - Blackheart Haven
- Tzogvin's Warband (Medium) - Frostvault
- Use Training traits if you're still leveling. If you're already max level and have enough Champion Points you can instead use Divines and Reinforced on the chest piece
Setup for maximizing damage in fights that don't hit very hard
| Gear Slot | Set | Weight/Type | Trait | Enchantment |
|---|---|---|---|---|
Head |
Slimecraw | Light | Divines | Magicka |
Shoulders |
Rakkhat's Voidmantle | Medium | Divines | Magicka |
Chest |
Ansuul's Torment | Medium | Divines | Magicka |
Hands |
Ansuul's Torment | Medium | Divines | Magicka |
Belt |
Ansuul's Torment | Medium | Divines | Magicka |
Legs |
Ansuul's Torment | Medium | Divines | Magicka |
Boots |
Ansuul's Torment | Medium | Divines | Magicka |
Necklace |
Sergeant's Mail | Jewelry | Bloodthirsty | Increase Physical Harm |
Ring |
Sergeant's Mail | Jewelry | Bloodthirsty | Increase Physical Harm |
Ring |
Sergeant's Mail | Jewelry | Bloodthirsty | Increase Physical Harm |
Frontbar Main Hand |
Sergeant's Mail | Lightning Staff | Precise | Absorb Stamina |
Backbar Main Hand |
Crushing Wall | Lightning Staff | Infused | Weapon Damage |
In order to sustain Rakkhat's Voidmantle you'll have to change your food to Orzorga's Red Frothgar and change your potions to either Tri-Stats or Heroism instead of Armor
- For overland content (where you won't benefit from Ansuul 's Minor Slayer and penetration lines) Deadly Strike is better than Ansuul's Torment
This is my suggested setup for soloing extremely difficult fights in dungeons.
| Gear Slot | Set | Weight/Type | Trait | Enchantment |
|---|---|---|---|---|
Head |
Anthelmir's Construct | Medium | Divines/ Well-Fitted | Magicka |
Shoulders |
Anthelmir's Construct | Medium | Divines/ Well-Fitted | Magicka |
Chest |
Sergeant's Mail | Heavy | Reinforced | Magicka |
Hands |
Vestment of Olorime | Light | Divines/ Well-Fitted | Magicka |
Belt |
Vestment of Olorime | Light | Divines/ Well-Fitted | Magicka |
Legs |
Armor of the Trainee | Medium | Divines/ Well-Fitted | Magicka |
Boots |
Vestment of Olorime | Light | Divines/ Well-Fitted | Magicka |
Necklace |
Sergeant's Mail | Jewelry | Bloodthirsty | Increase Physical Harm |
Ring |
Sergeant's Mail | Jewelry | Bloodthirsty | Increase Physical Harm |
Ring |
Ring of the Pale Order | Jewelry | Bloodthirsty | Increase Physical Harm |
Frontbar Main Hand |
Sergeant's Mail | Lightning Staff | Precise | Absorb Stamina |
Backbar Main Hand |
Vestment of Olorime | Lightning Staff | Infused | Weapon Damage |
- You can change some (or all) of the Magicka enchants to Health ones for extremely hard hitting bosses
- Replace Anthelmir's Construct with Mighty Chudan when you need an additional skill slot
Champion Points
Race
For solo you need both damage and survivability, so every race brings something to the table, but these two stand out as the best options for damage and survivability respectively


Mundus
-
 Default
The Thief
5.53% Critical Chance(9.04% with 7 Divines)Use most of the time. It increases your Critical Chance -
 Difficult Content
The Lady
2744 Armor(4489 with 7 Divines)Consider switching for extremely difficult dungeons. It increases your Armor
Attributes
For most content you should put all 64 points into Magicka. For difficult content you should devote as many attribute points as necessary to Health - for some content you'll be able to get away with 32 Health 32 Magicka, for the extremely difficult stuff you'll need 64 Health.
Food
-
 Default
Artaeum Pickled Fish Bowl
Max Health +5,414 Max Magicka +4,938The default option.Cheaper alternative Solitude Salmon-Millet SoupDifference Max Health +5,395 −19 Max Magicka +4,936 −2 -
 Rakkhat's Voidmantle
Orzorga's Red Frothgar
Max Health +5,395 Magicka Recovery +493Provides Magicka Recovery at the cost of Maximum Magicka. You'll need it to sustain Rakkhat's Voidmantle . -
 Sustain
Orzorga's Tripe Trifle Pocket
Max Health +5,395 Stamina Recovery +493Provides Stamina Recovery at the cost of Maximum Magicka. It will lower your damage, but it's very useful for fights where you have to dodge roll a lot. -
 Wield Soul
Orzorga's Smoked Bear Haunch
Max Health +4,312 Health Recovery +406 Stamina Recovery +369 Magicka Recovery +369Provides Magicka and Stamina Recovery at the cost of Maximum Magicka. It will lower your damage, but it's very useful for fights where you have to both dodge roll a lot and spam your Wield Soul damage shield.
Potions
-
Default
Armor Potion
Restore Health Spell Resistance Physical ResistanceSince your sustain is being taken care of by the fact that Heavy Attacks restore resources, you can instead use the Armor potions, which will increase your armor by 5280. -
Situational
Tri-Stat Potion
Restore Health Restore Stamina Restore MagickaIn fights where you need to dodge roll a lot or when you're using Rakkhat's Voidmantle you should use Tri-Stat potions instead. -
Expensive
Heroism Potion
Restore Magicka Restore Stamina Minor HeroismHeroism potions are an expensive alternative to Tri-Stat potions. They provide Minor Heroism on top of the sustain.
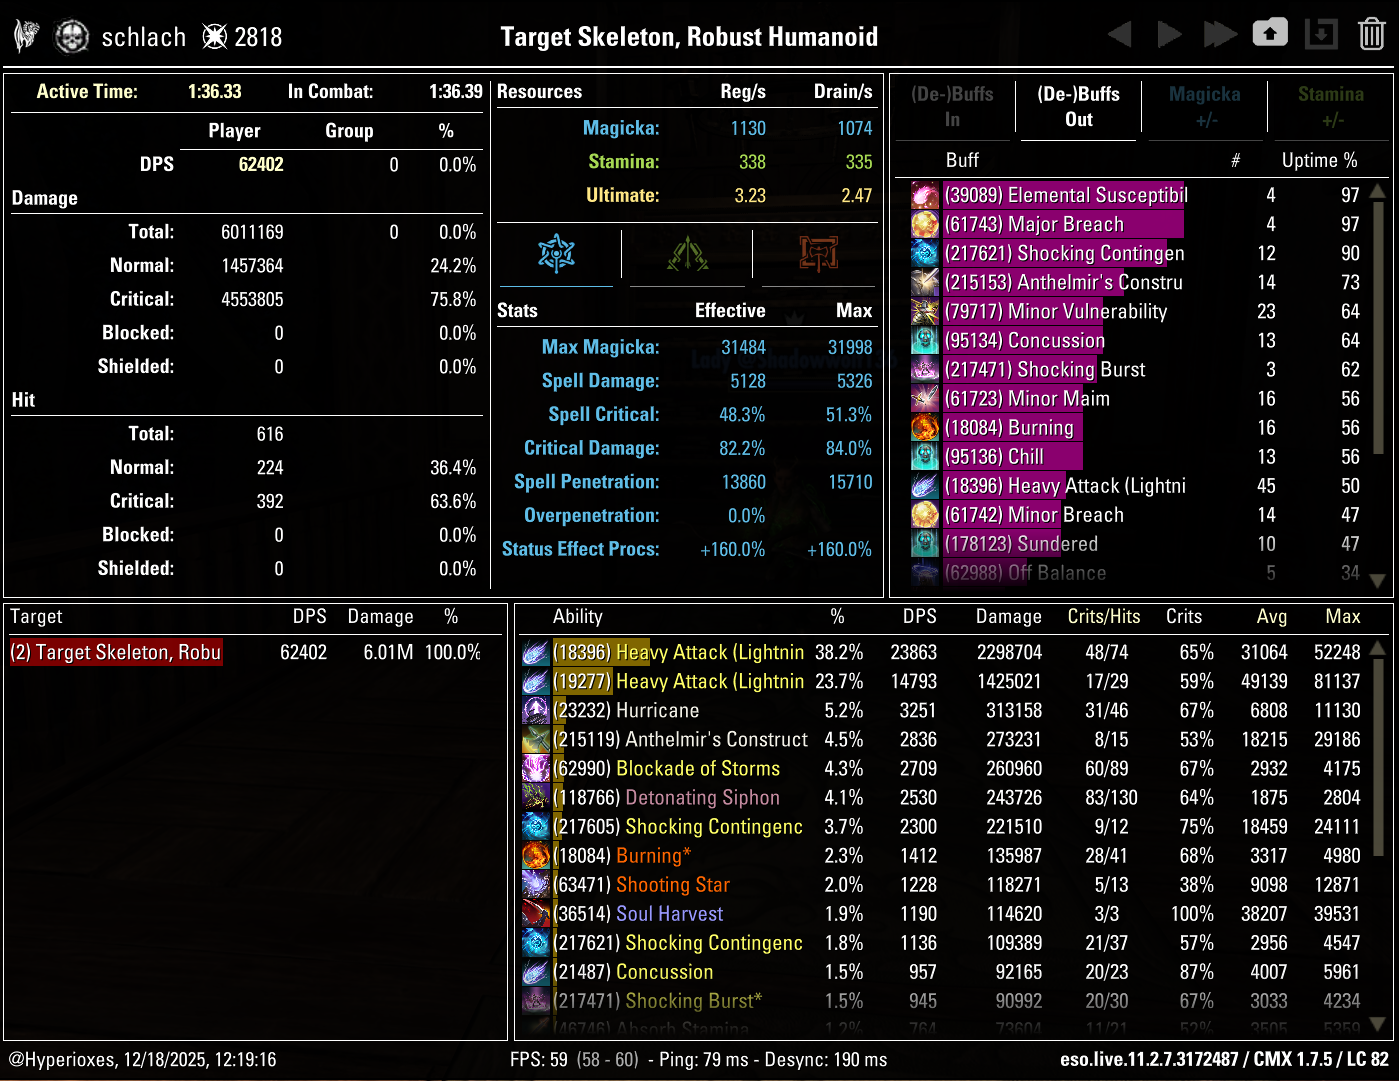
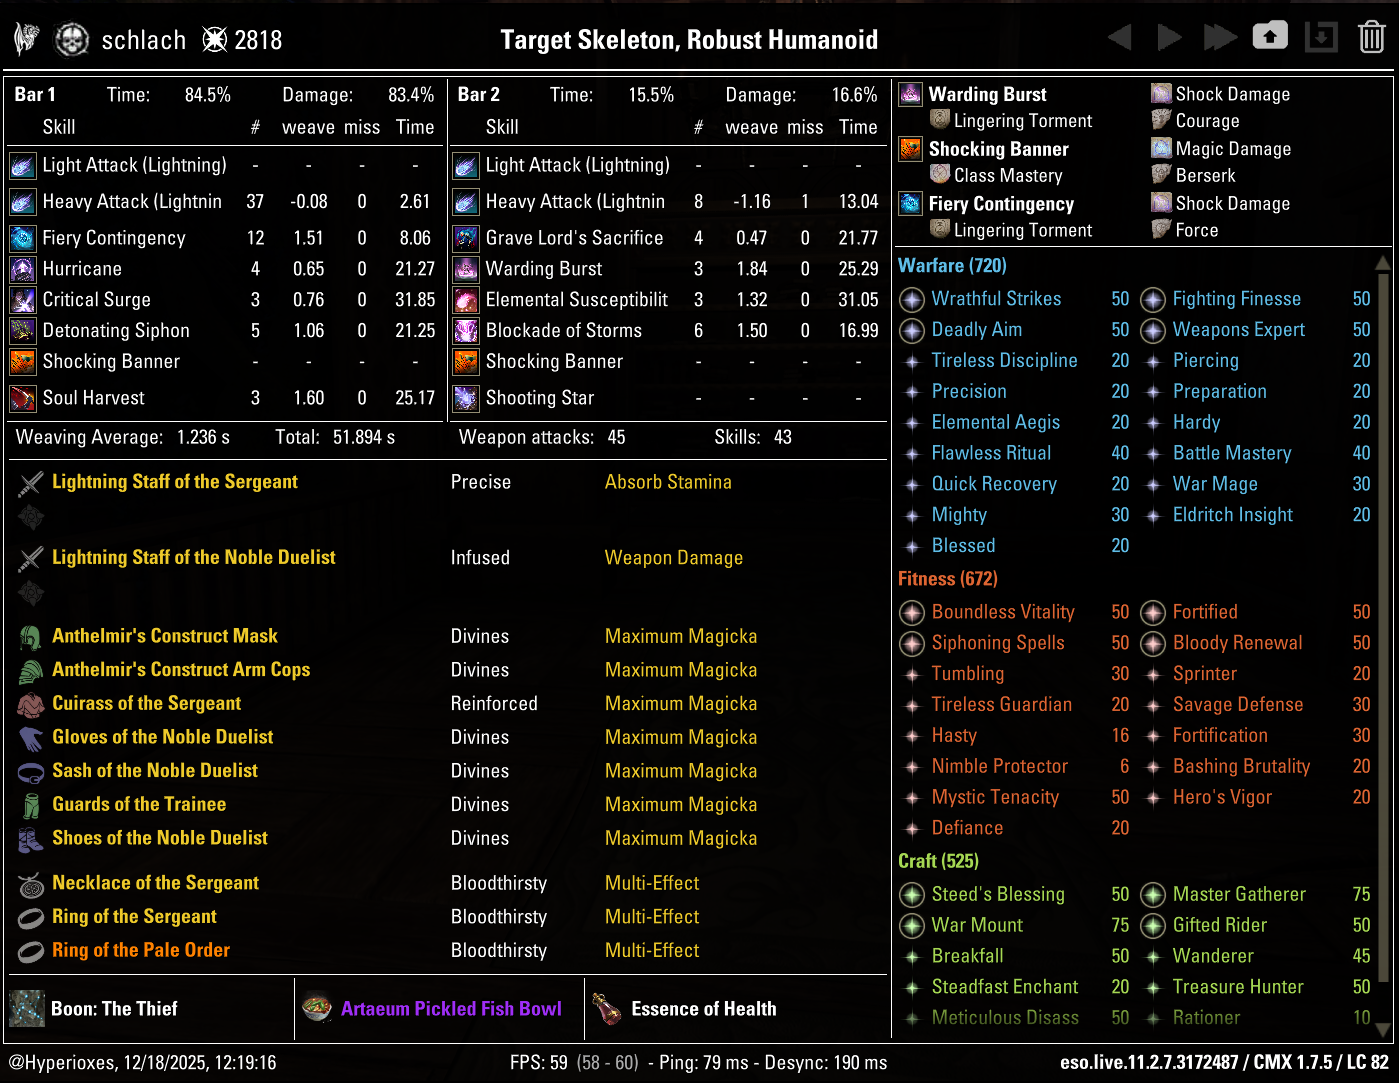
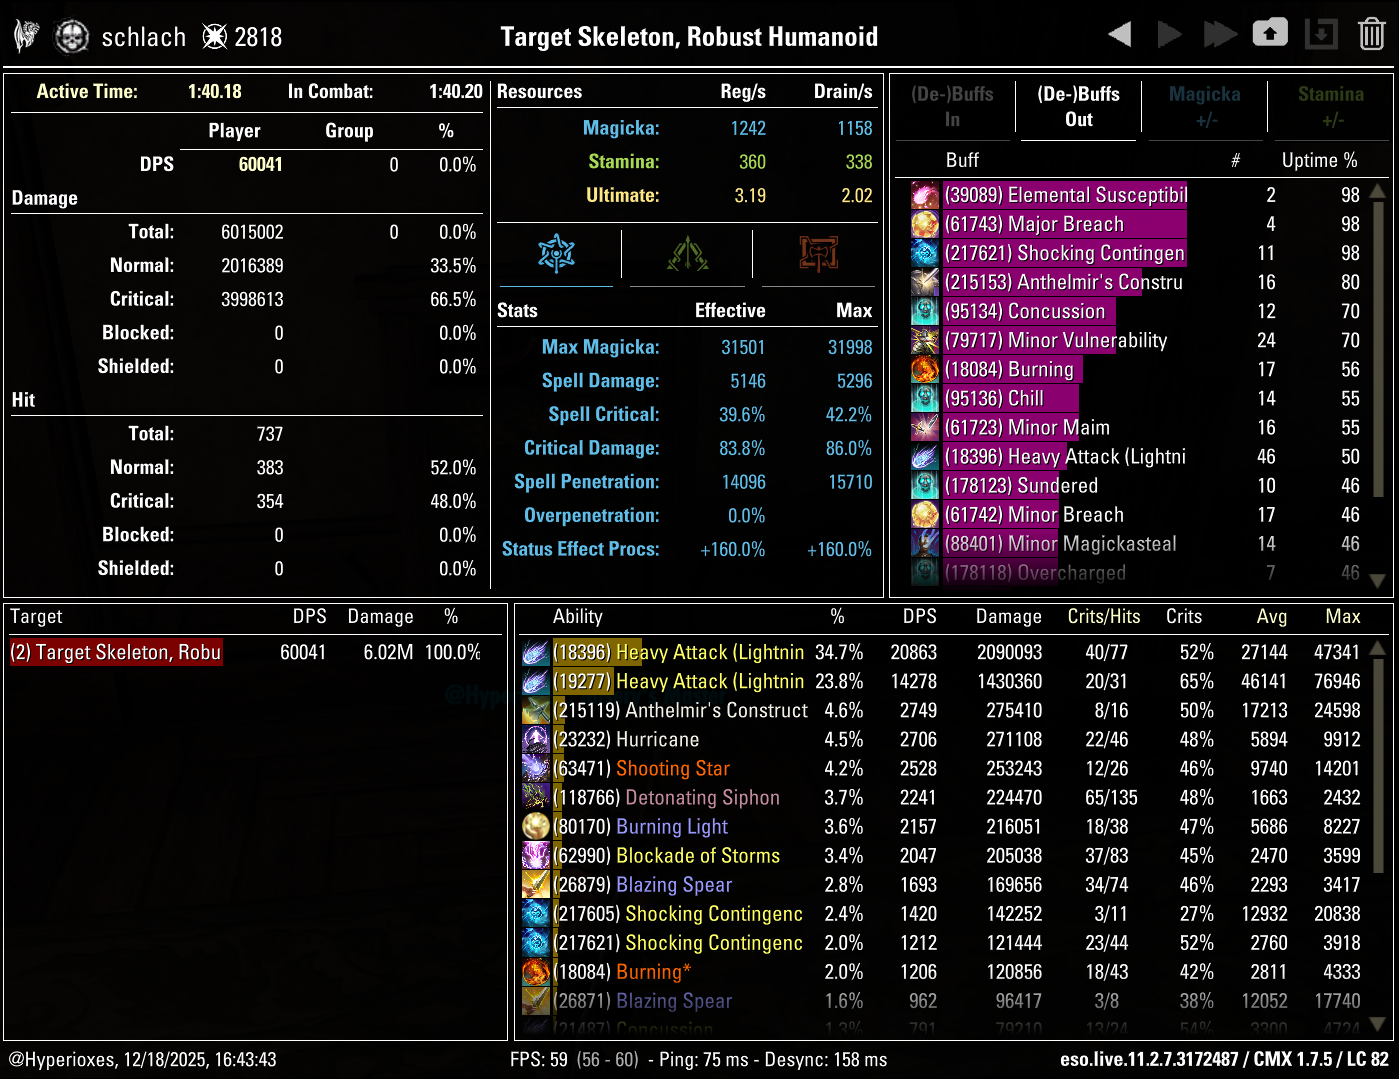
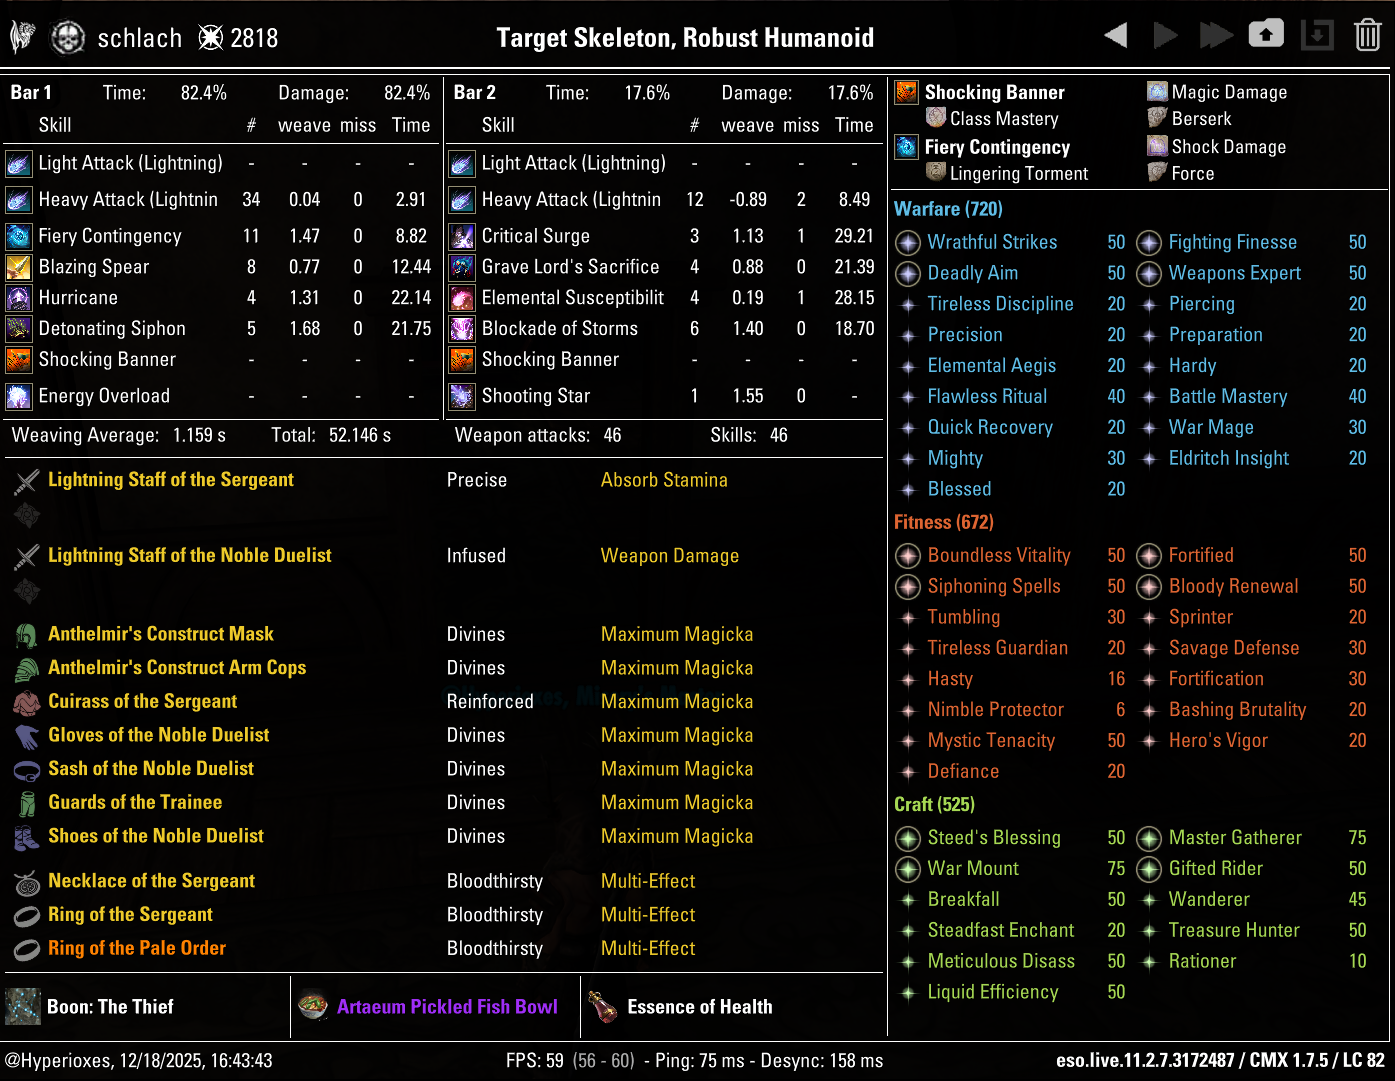
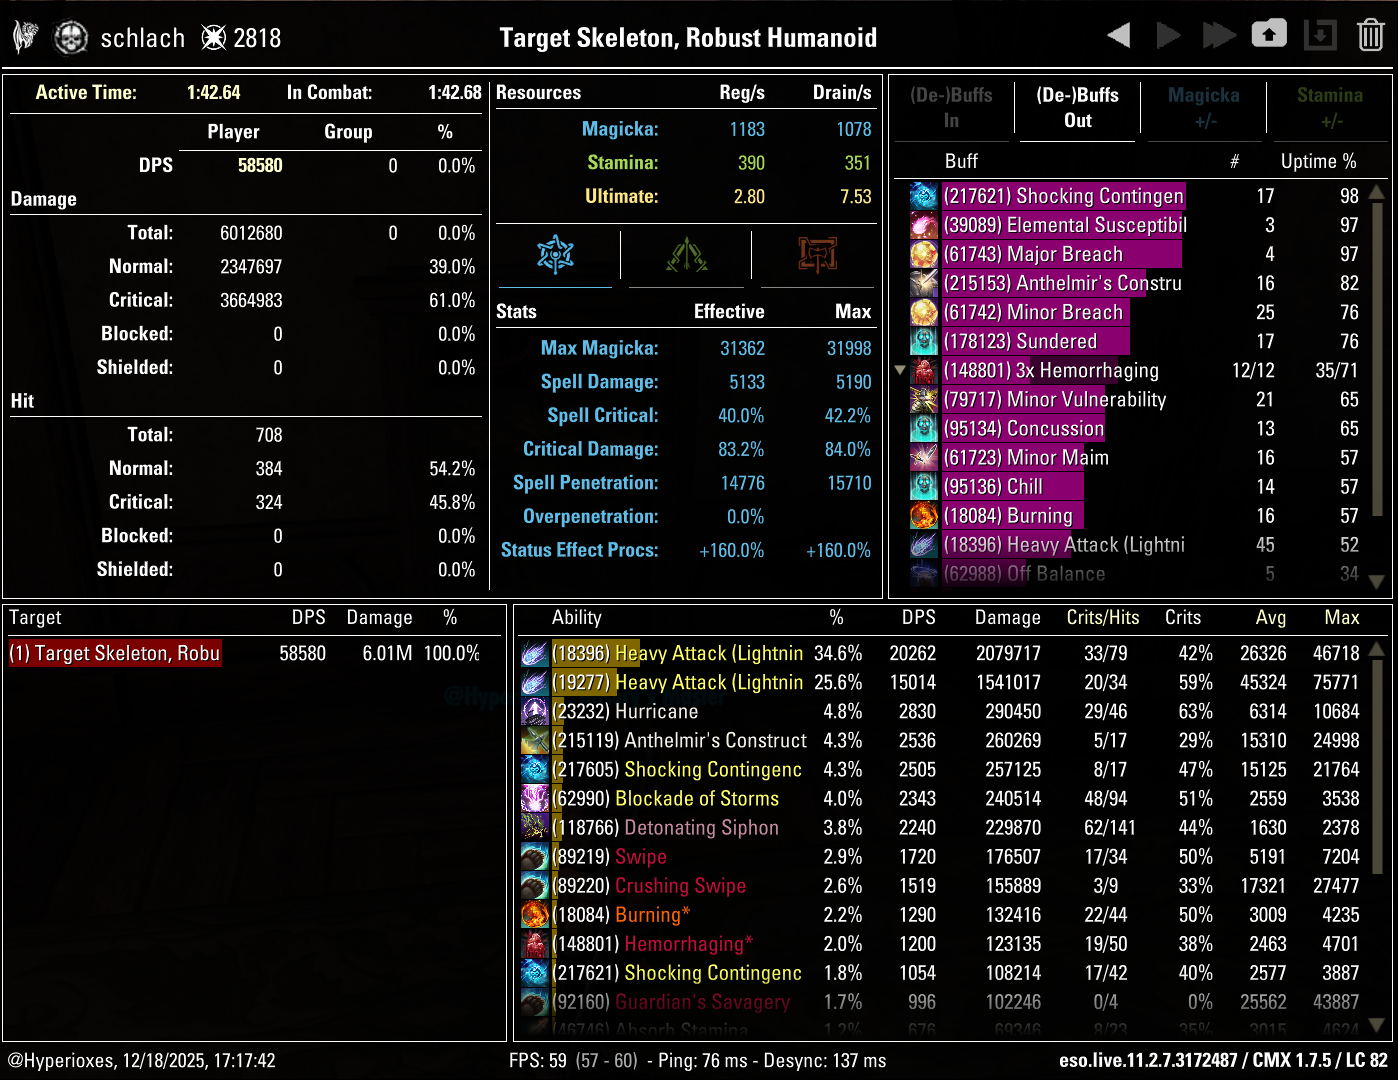
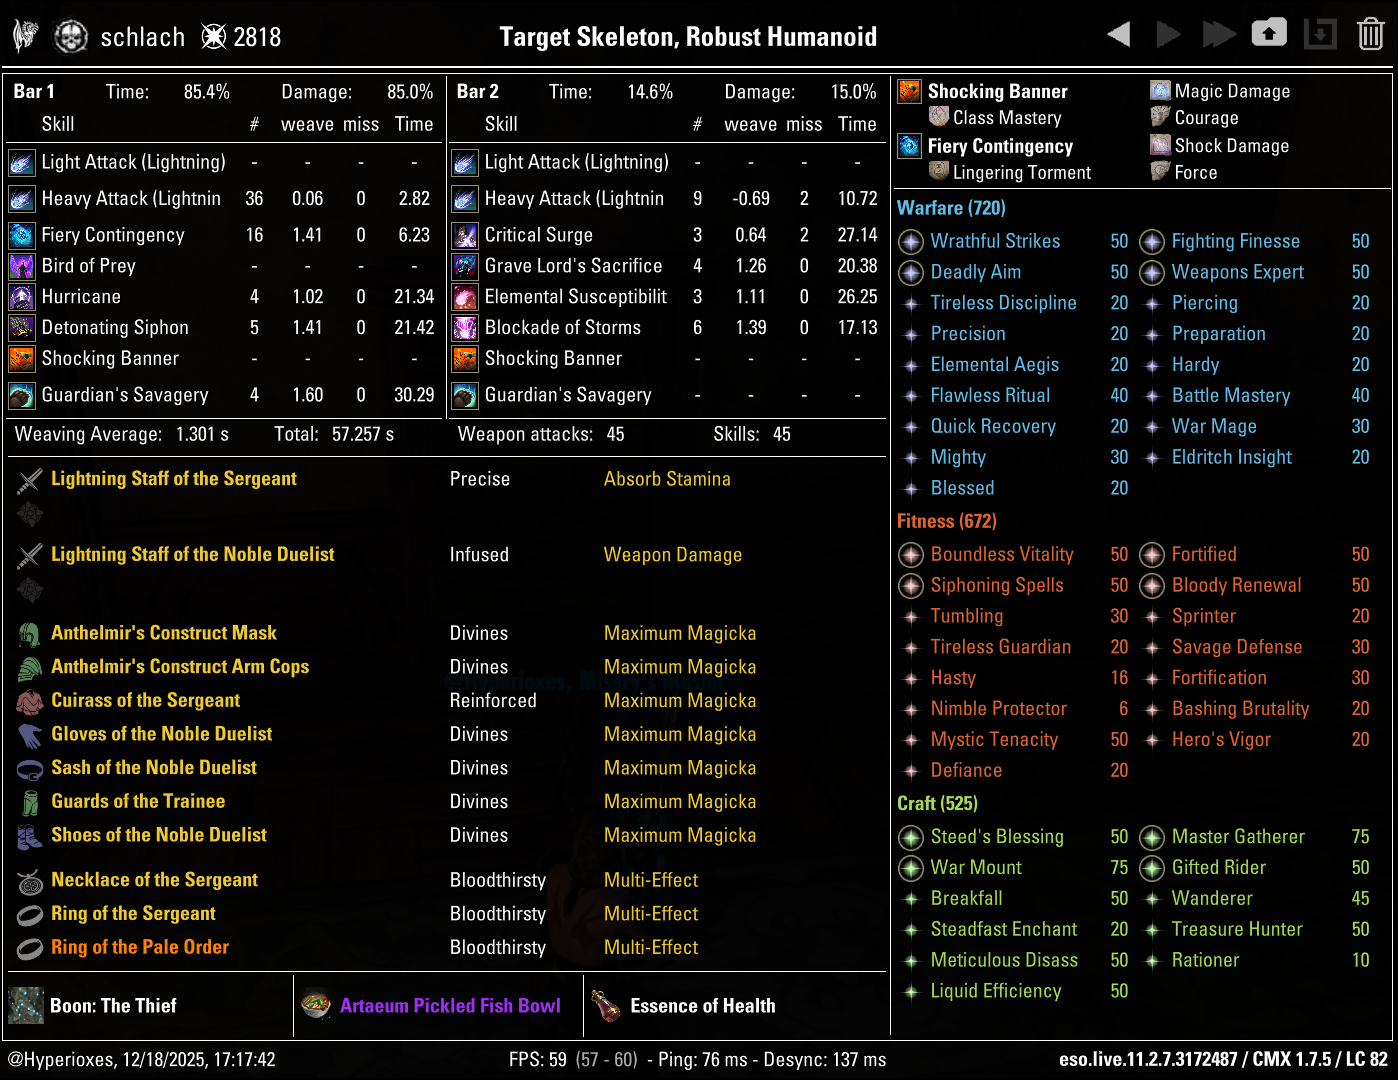
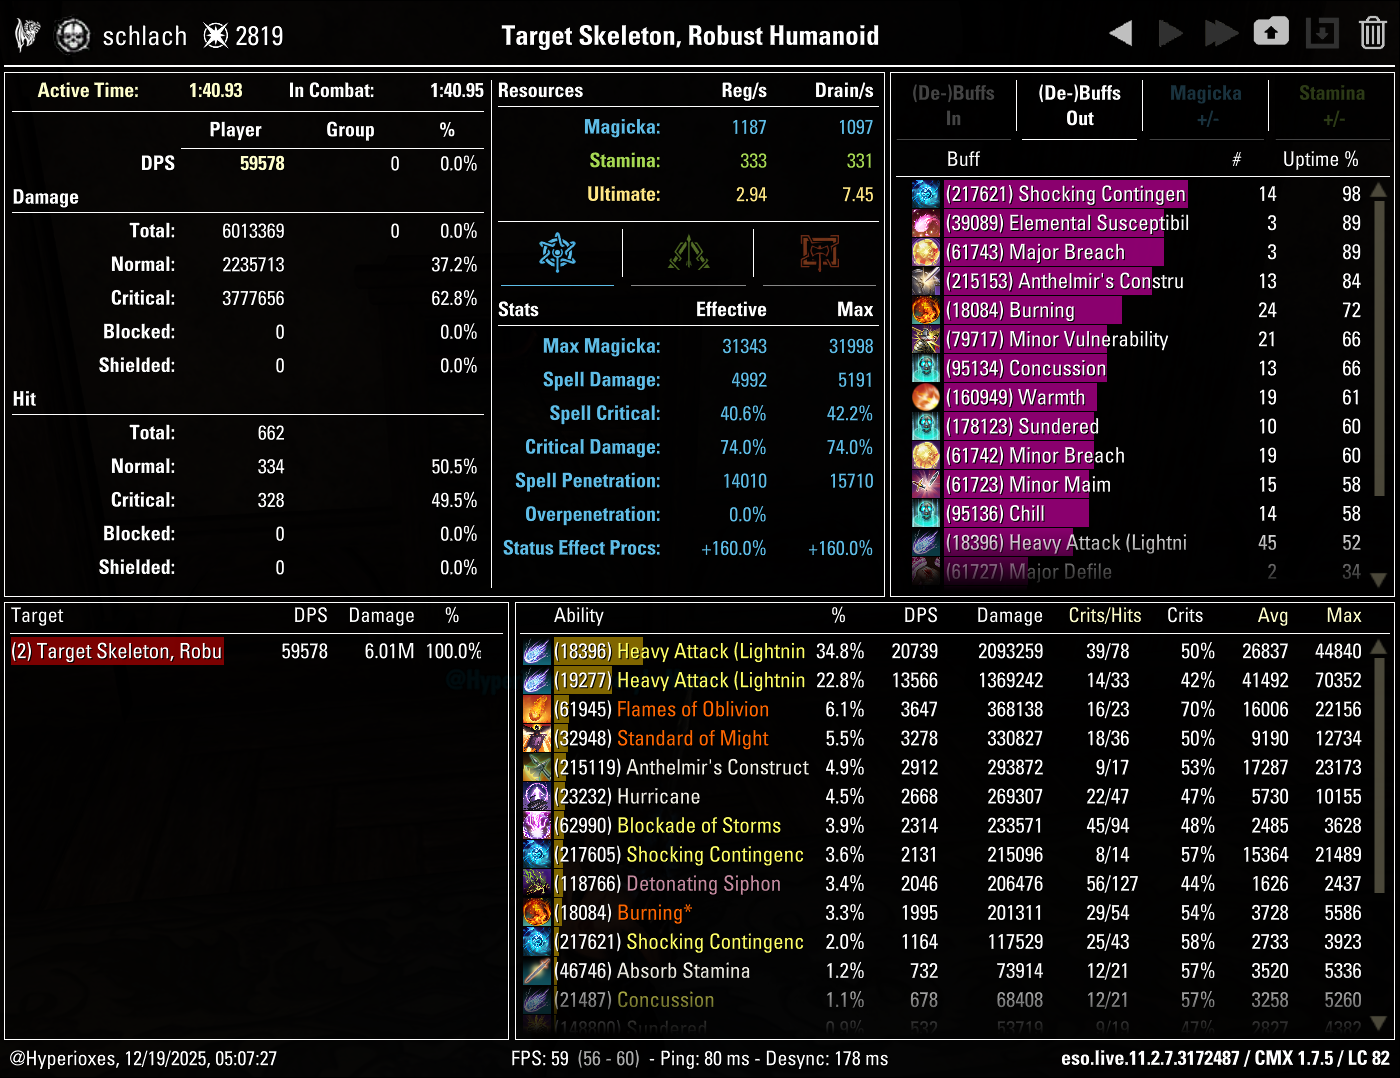
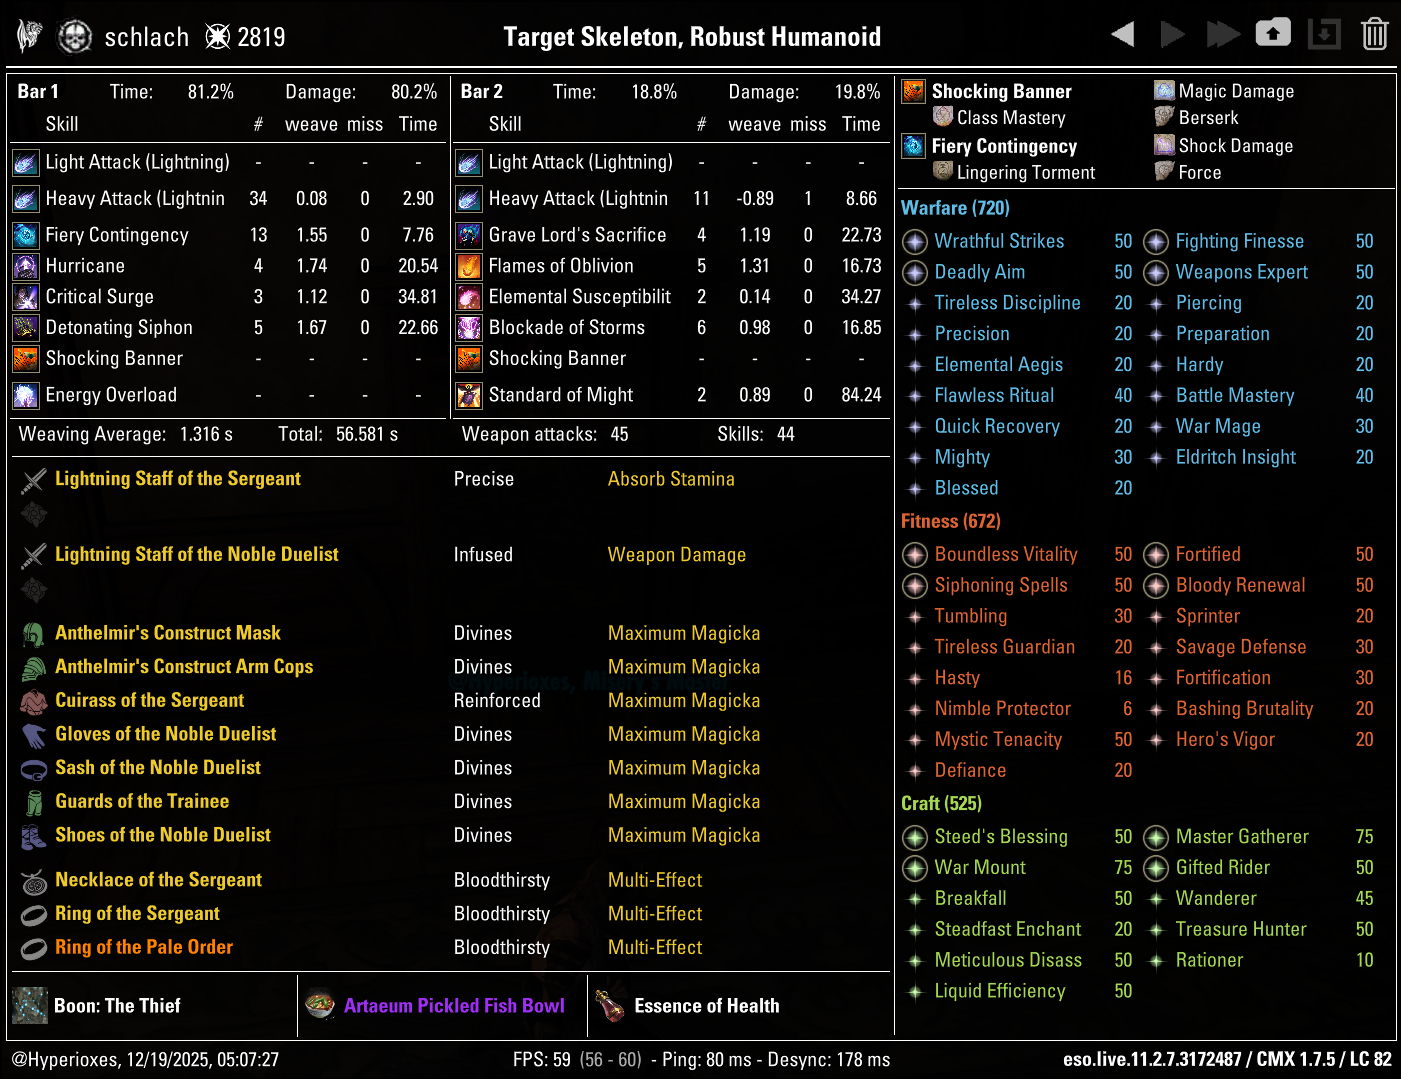
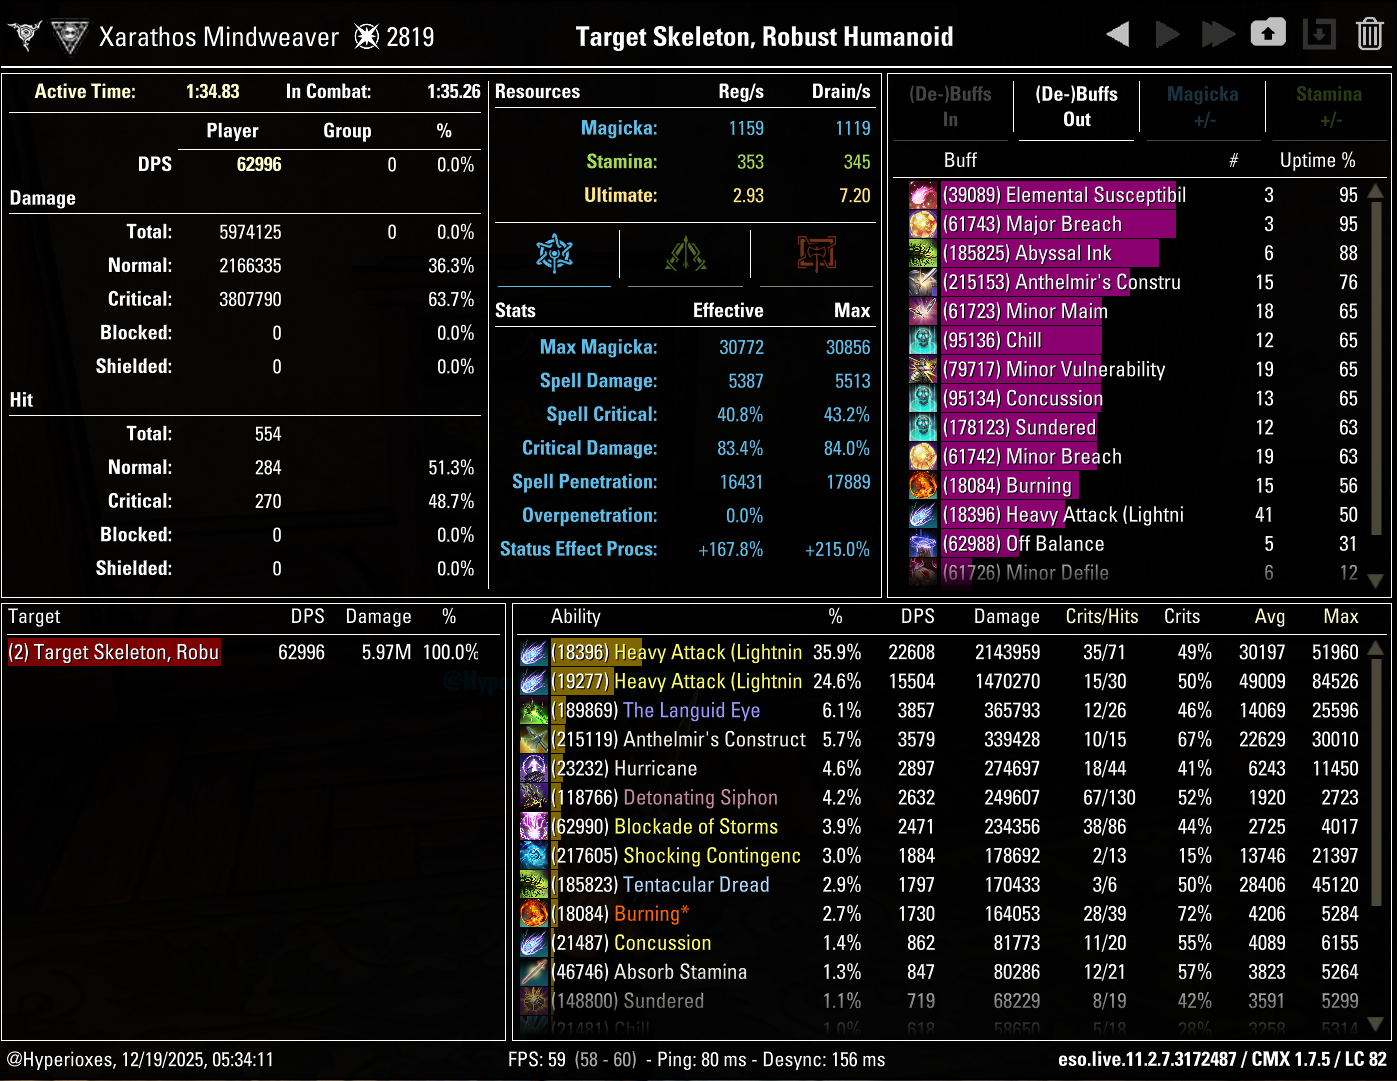
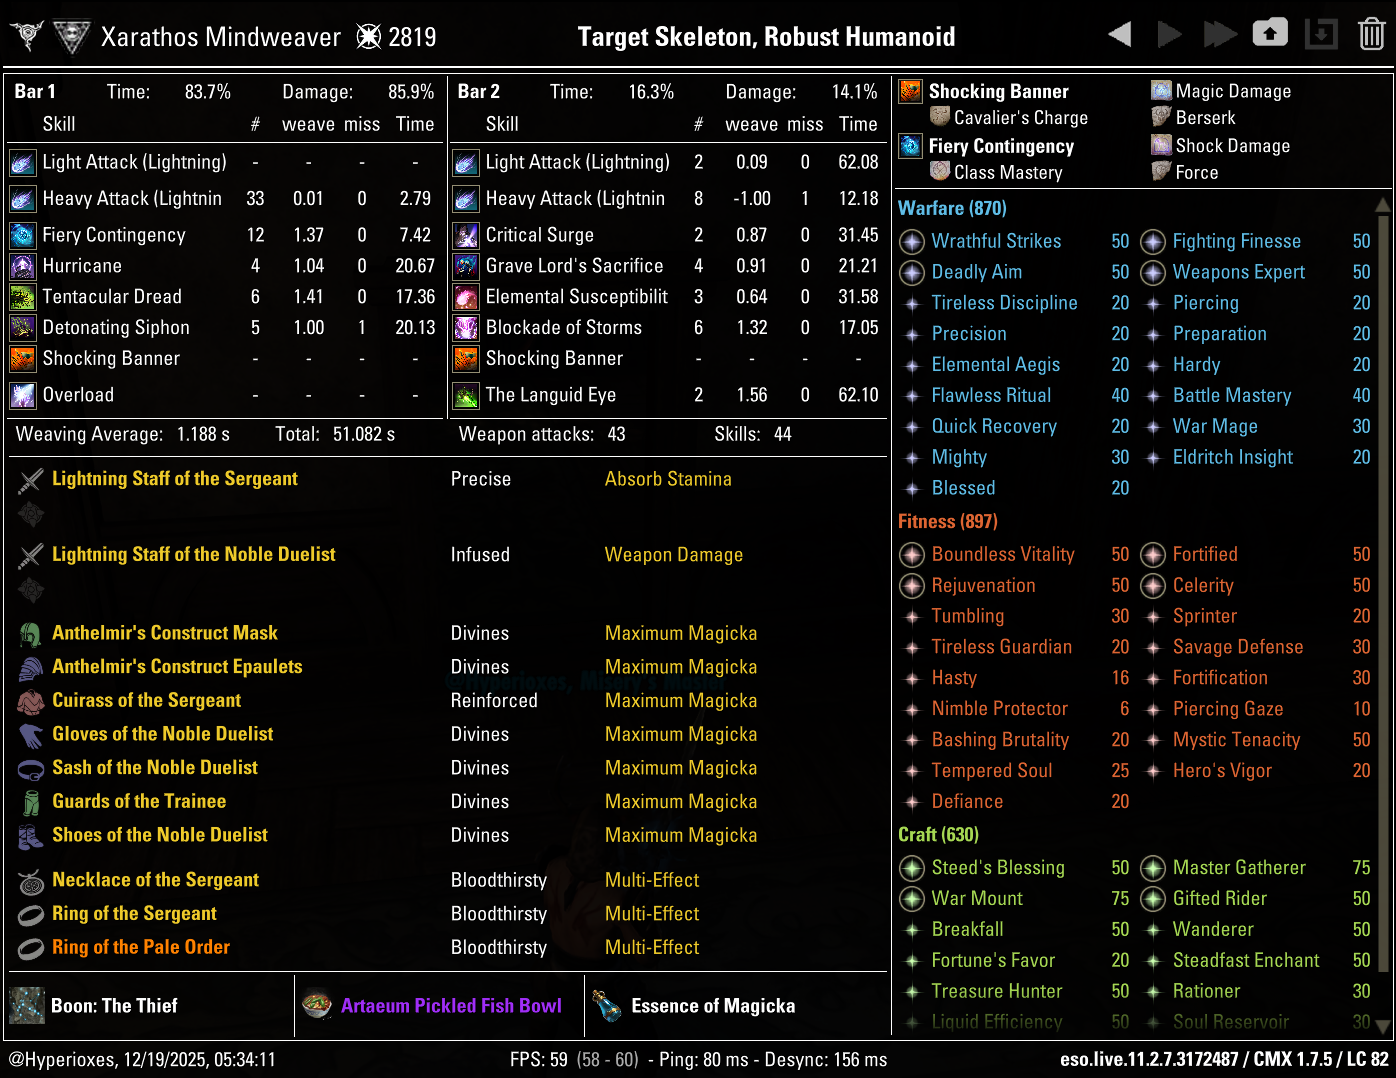
Parses
All parses are recorded on the 6 million Target Dummy
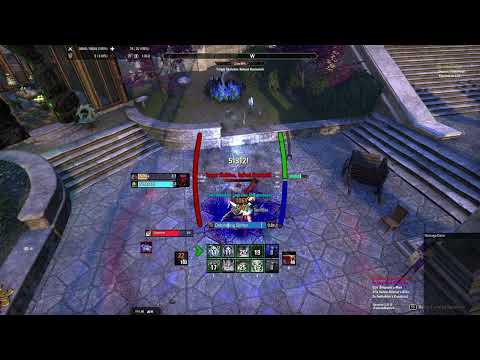
Gameplay
FAQ
No, you don't need a different setup. Use the base skills and the Regular gear setup from this guide for both Maelstrom Arena and Vateshran Hollows.
THANKS FOR READING

If you've enjoyed this guide and want to support me, you can do so through Patreon. Your support will help me produce more guides.