Werewolf DPS Build - ESO Guide
Werewolf DPS Build for ESO. Subclassing lets Werewolf benefit from class passives that continue to work in wolf form - Storm Calling, Aedric Spear and Assassination all have passives that stay active, which is a massive damage boost over pure class Werewolf. Works with any base class, with specific subclass combinations for each.
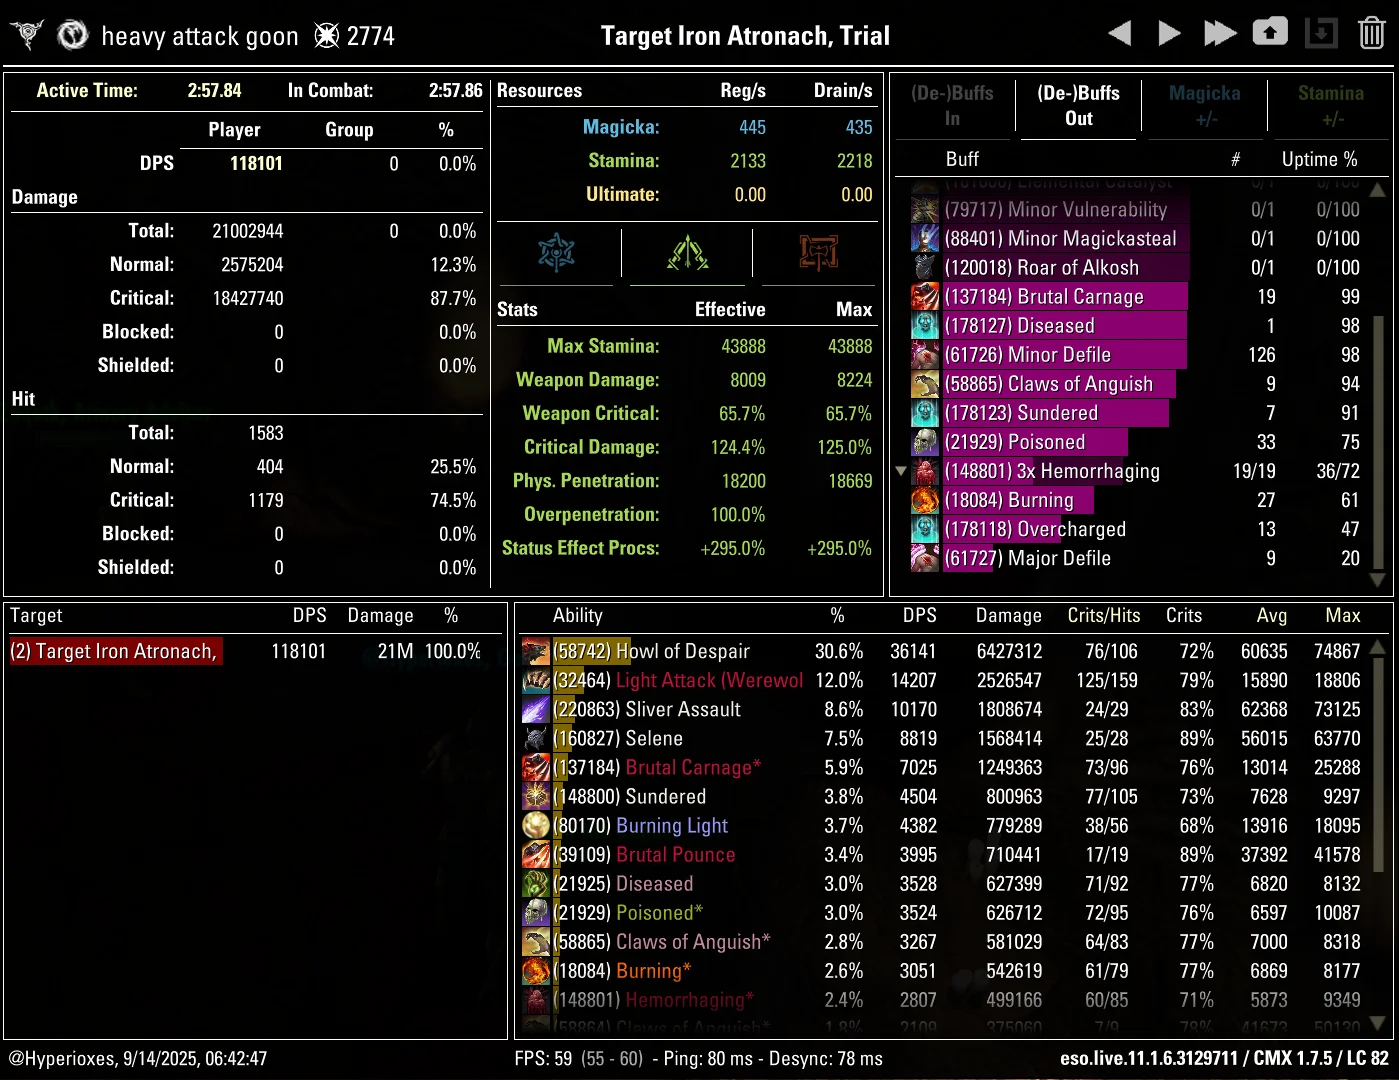
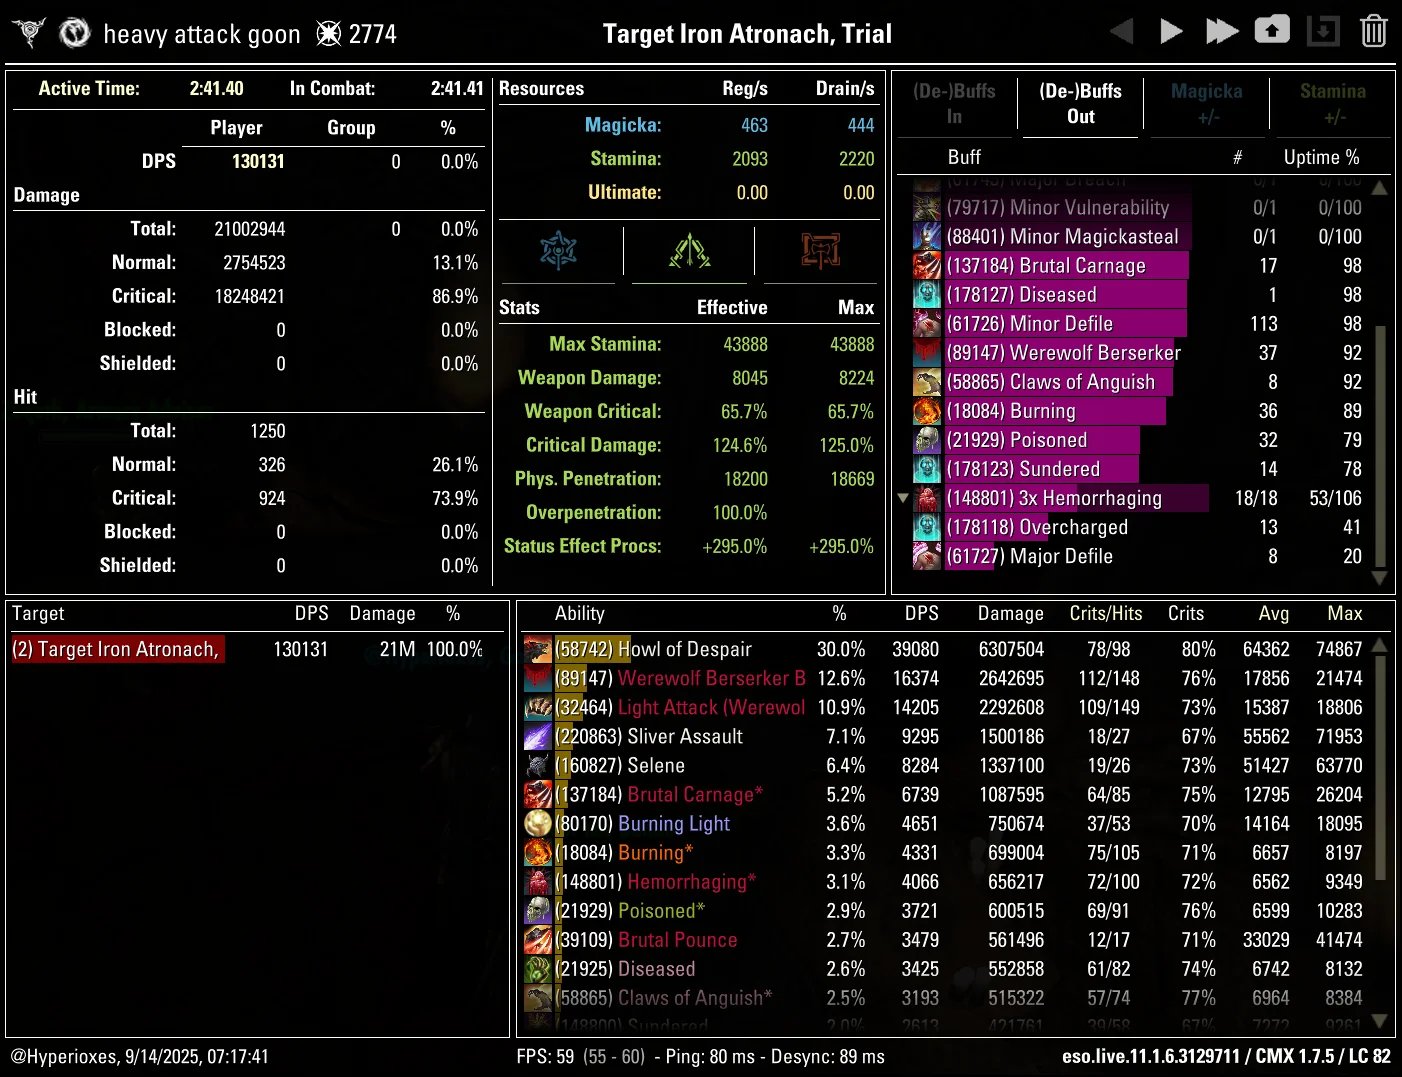
Werewolf is much more powerful when played with other Werewolves because of the Call of the Pack passive. Without Werewolf teammates you're forced to use the weaker Pack Leader ultimate morph to keep up your transformation, and the DPS ceiling drops from 130k to 118k.
Looking for a Solo Werewolf build? Check out the Solo Werewolf Build.
Subclassing
Strongest Combination
This combination can be used when you have either Sorcerer, Nightblade or Templar as your base class.
Storm Calling contains 3 passives which continue to work in Werewolf form - Capacitor, Energized and Amplitude
Aedric Spear contains 2 passives which continue to work in Werewolf form - Burning Light and Balanced Warrior
Assassination contains 2 passives which continue to work in Werewolf form - Master Assassin and Executioner
Arcanist base class variant
Use this combination when your base class is Arcanist. The Harnessed Quintessence passive continues to work in Werewolf form.
Warden base class variant
Use this combination when your base class is Warden. The Glacial Presence and Piercing Cold passives continue to work in Werewolf form and you can capitalize on them by using a Frost enchant. It's an extremely small bonus but Animal Companions skill line has no passives that work in Werewolf form. Green Balance can be used for additional 10% Max Health from Maturation, but this buff will usually be applied by the healer anyway.
Dragonknight base class variant
Use this combination when your base class is Dragonknight. The Landslide and Blessing at the Peak passives continue to work in Werewolf form. Heart of Stone is also nice though it's just defensive.
Necromancer base class variant
Use this combination when your base class is Necromancer. The Rapid Rot passive continues to work in Werewolf form. Bone Tyrant is another decent option because the Last Gasp passive continues to work in Werewolf form and grants 2412 Max Health.
Skill Setups
Base Setup
A base setup that will work for most situations and which should be your starting point when making situational setups
| Front Bar | Back Bar |
|---|---|
| Slot 1: Brutal Pounce | |
| Slot 2: Hircine's Rage | |
| Slot 3: Ferocious Roar | |
| Slot 4: Howl of Despair | |
| Slot 5: Claws of Anguish | |
| Ultimate: Pack Leader |
- Brutal Pounce - 1st part of this ability is a pounce which deals direct damage in an AoE at your destination and applies Hemorrhaging status effect to all targets. For up to 5 seconds after using the pounce, you can use the 2nd part of this ability which swipes in front of you, dealing no direct damage but applying a 10 second DoT which deals more damage based on missing health. Each enemy hit by the 2nd part of this ability grants you 100 Weapon and Spell Damage for 10 seconds, stacking up to 6 times. You have to keep up this Weapon Damage buff, which is why you'll have to refresh the DoT before it runs out. Try to use the pounce early so you have the swipe ready when your buff is about to run out.
- Hircine's Rage - a self-heal which grants you 3000 Stamina, Major Berserk and increases your damage taken by 5% if used at full health. Major Berserk increases your damage done by 10%. It also passively grants you Major Brutality and Sorcery while slotted.
- Ferocious Roar - an ability which you won't be using, but you have to choose this morph because the other one causes your Heavy Attacks to taunt enemies. It applies the Off Balance and Terrified debuffs to enemies around you and increases the speed of your Heavy Attacks by 33% for 10 seconds. However this is implemented very poorly and will break your animations unless you limit yourself to only Heavy Attacking during that time, which isn't worth it. It also passively grants you Major Savagery and Prophecy, increasing your Critical Chance by 12%.
- Howl of Despair - a spammable which deals 10% more damage to enemies who are Terrified. Terrified can be applied by Ferocious Roar, however it isn't worth keeping up. You could still potentially benefit from another Werewolf using their Roar. It also provides a Feeding Frenzy synergy which grants Empower and Minor Force for 20 seconds, which can be used by yourself. Empower increases the damage of your Heavy Attacks by 70% and Minor Force increases your Critical Damage by 10%.
- Claws of Anguish - AoE attack which deals direct damage and applies a 20 second DoT to all enemies hit. This is your AoE spammable. The initial attack and every tick of the DoT (which ticks every 2 seconds) applies the Diseased status effect.
- Pack Leader - this morph of the Werewolf ultimate summons 2 direwolves to fight at your side. These direwolves count for the Call of the Pack passive, allowing you to keep up your Werewolf transformation if you are the only Werewolf player in your group. This morph also reduces your damage taken by 10% and grants your entire group Minor Courage which is roughly a 4% damage increase, but it can also be applied by supports, or even by DDs using the Banner Bearer.
Skills that can replace skills from the base setup in specific situations
- Werewolf Berserker - this is the morph you should be using when playing with other Werewolf players, who will count for your Call of the Pack passive. This morph causes your Light Attacks to apply a bleed and causes your Heavy Attacks to deal damage in an AoE
Priority List
This is just a list of priorities. Simply recast abilities when they run out and follow this list of priorities when there are multiple things to refresh
- 1. Keep up the Weapon Damage from Brutal Pounce. You can use the pounce (1st part of the ability) when there's around 5 seconds left on the buff so that you have the swipe (2nd part of the ability) ready to go when the buff is about to expire
- 2. Hircine's Rage
- 3. Claws of Anguish
- 4. Howl of Despair spammable
Pre-buff
These abilities can be pre-cast before entering combat
Other tips
- In AoE fights, spam Claws of Anguish instead of Howl of Despair. In long AoE fights, you still have to cast it once every 20 seconds to get the Feeding Frenzy synergy, or more than once if someone steals the synergy from you.
- Thanks to the Empower buff from Howl of Despair, Heavy Attacking during the Off Balance debuff isn't that big of a DPS loss, which is why you should sprinkle in a few Heavy Attacks if your rotation allows it, as it restores a lot of Stamina. For example, during the 130k parse on the dummy which took 2 minutes and 41 seconds I have Heavy Attacked twice.
Final Setups
A few examples of final setups you could end up with after applying the situational skills to the base setup
A setup you should use when you have other Werewolves in your group
| Front Bar | Back Bar |
|---|---|
| Slot 1: Brutal Pounce | |
| Slot 2: Hircine's Rage | |
| Slot 3: Ferocious Roar | |
| Slot 4: Howl of Despair | |
| Slot 5: Claws of Anguish | |
| Ultimate: Werewolf Berserker |
What Changes
Changes compared to the Base Setup
- Werewolf Berserker replaces Pack Leader
Passives
There are no passives you need to skip with this build
![]() Class - Storm Calling
Class - Storm Calling
![]() Capacitor - High Priority
Capacitor - High Priority
![]() Energized - High Priority
Energized - High Priority
![]() Amplitude - High Priority
Amplitude - High Priority
![]() Expert Mage - Not needed
Expert Mage - Not needed
![]() Class - Aedric Spear
Class - Aedric Spear
![]() Piercing Spear - Not needed
Piercing Spear - Not needed
![]() Spear Wall - Not needed
Spear Wall - Not needed
![]() Burning Light - High Priority
Burning Light - High Priority
![]() Balanced Warrior - High Priority
Balanced Warrior - High Priority
![]() Class - Assassination
Class - Assassination
![]() Master Assassin - High Priority
Master Assassin - High Priority
![]() Executioner - High Priority
Executioner - High Priority
![]() Pressure Points - Not needed
Pressure Points - Not needed
![]() Hemorrhage - Not needed
Hemorrhage - Not needed
![]() Armor - Light Armor
Armor - Light Armor
![]() Grace - Low Priority
Grace - Low Priority
![]() Evocation - Low Priority
Evocation - Low Priority
![]() Spell Warding - Low Priority
Spell Warding - Low Priority
![]() Prodigy - High Priority
Prodigy - High Priority
![]() Concentration - High Priority
Concentration - High Priority
![]() Armor - Medium Armor
Armor - Medium Armor
![]() Dexterity - High Priority
Dexterity - High Priority
![]() Wind Walker - Low Priority
Wind Walker - Low Priority
![]() Improved Sneak - Not needed
Improved Sneak - Not needed
![]() Agility - High Priority
Agility - High Priority
![]() Athletics - Low Priority
Athletics - Low Priority
![]() Race - Your Race
Race - Your Race
Get all of your racials, no matter which race you are
![]() Craft - Alchemy
Craft - Alchemy
![]() Solvent Proficiency - Not needed
Solvent Proficiency - Not needed
![]() Keen Eye: Reagents - Not needed
Keen Eye: Reagents - Not needed
![]() Medicinal Use - High Priority
Medicinal Use - High Priority
![]() Chemistry - Not needed
Chemistry - Not needed
![]() Laboratory Use - Not needed
Laboratory Use - Not needed
![]() Snakeblood - Not needed
Snakeblood - Not needed
Gear
Base Setup
A base setup that will work for most situations and which should be your starting point when making situational setups
Switching gear for trash packs isn't worth it unless you're using gear-swap addons
Default setup
| Gear Slot | Set | Weight/Type | Trait | Enchantment |
|---|---|---|---|---|
 Head Head |
Selene | Light | Divines | Stamina |
 Shoulders Shoulders |
Selene | Medium | Divines | Stamina |
 Chest Chest |
Ansuul's Torment | Medium | Divines | Stamina |
 Hands Hands |
Ansuul's Torment | Medium | Divines | Stamina |
 Belt Belt |
Ansuul's Torment | Medium | Divines | Stamina |
 Legs Legs |
Ansuul's Torment | Medium | Divines | Stamina |
 Boots Boots |
Ansuul's Torment | Medium | Divines | Stamina |
 Necklace Necklace |
Berserking Warrior | Jewelry | Bloodthirsty | Increase Physical Harm |
 Ring Ring |
Berserking Warrior | Jewelry | Bloodthirsty | Increase Physical Harm |
 Ring Ring |
Berserking Warrior | Jewelry | Bloodthirsty | Increase Physical Harm |
 Frontbar Main Hand Frontbar Main Hand |
Berserking Warrior | Any 1-handed Weapon | Charged | Flame |
 Frontbar Off Hand Frontbar Off Hand |
Berserking Warrior | Any 1-handed Weapon | Charged | Poison |
When choosing different situational sets they should replace Ansuul, because all of the listed situational sets also provide Minor Slayer.
Gear that can be stronger than the setup from the table in specific situations or when specific circumstances are present
- Sul-Xan's Torment - the best set for trash packs and for bosses that regularly spawn smaller adds
- Slivers of Null Arca - the best set for Single Target damage
Gear that is easier to obtain and can be used while you work towards the best gear
Crafted
All of these are tradable and can be bought from other players
No Overland, Dungeon or Trial gear is listed as the Crafted options are superior.
Additional tips
- You can replace Poison enchant with Frost if you're a Warden using the Winter's Embrace skill line
Final Setups
A few examples of final setups you could end up with after applying situational rules to the base setup
This is the crafted gear setup you can start with
| Gear Slot | Set | Weight/Type | Trait | Enchantment |
|---|---|---|---|---|
 Head Head |
Assassin's Guile | Light | Divines | Stamina |
 Shoulders Shoulders |
Assassin's Guile | Medium | Divines | Stamina |
 Chest Chest |
Order's Wrath | Medium | Divines | Stamina |
 Hands Hands |
Order's Wrath | Medium | Divines | Stamina |
 Belt Belt |
Order's Wrath | Medium | Divines | Stamina |
 Legs Legs |
Order's Wrath | Medium | Divines | Stamina |
 Boots Boots |
Order's Wrath | Medium | Divines | Stamina |
 Necklace Necklace |
Tide-Born Wildstalker | Jewelry | Bloodthirsty | Increase Physical Harm |
 Ring Ring |
Tide-Born Wildstalker | Jewelry | Bloodthirsty | Increase Physical Harm |
 Ring Ring |
Tide-Born Wildstalker | Jewelry | Bloodthirsty | Increase Physical Harm |
 Frontbar Main Hand Frontbar Main Hand |
Tide-Born Wildstalker | Any 1-handed Weapon | Charged | Flame |
 Frontbar Off Hand Frontbar Off Hand |
Tide-Born Wildstalker | Any 1-handed Weapon | Charged | Poison |
This is a setup you should use if you don't have access to any Trial gear
| Gear Slot | Set | Weight/Type | Trait | Enchantment |
|---|---|---|---|---|
 Head Head |
Selene | Light | Divines | Stamina |
 Shoulders Shoulders |
Selene | Medium | Divines | Stamina |
 Chest Chest |
Order's Wrath | Medium | Divines | Stamina |
 Hands Hands |
Order's Wrath | Medium | Divines | Stamina |
 Belt Belt |
Order's Wrath | Medium | Divines | Stamina |
 Legs Legs |
Order's Wrath | Medium | Divines | Stamina |
 Boots Boots |
Order's Wrath | Medium | Divines | Stamina |
 Necklace Necklace |
Tide-Born Wildstalker | Jewelry | Bloodthirsty | Increase Physical Harm |
 Ring Ring |
Tide-Born Wildstalker | Jewelry | Bloodthirsty | Increase Physical Harm |
 Ring Ring |
Tide-Born Wildstalker | Jewelry | Bloodthirsty | Increase Physical Harm |
 Frontbar Main Hand Frontbar Main Hand |
Tide-Born Wildstalker | Any 1-handed Weapon | Charged | Flame |
 Frontbar Off Hand Frontbar Off Hand |
Tide-Born Wildstalker | Any 1-handed Weapon | Charged | Poison |
The best setup for Single Target damage
| Gear Slot | Set | Weight/Type | Trait | Enchantment |
|---|---|---|---|---|
 Head Head |
Selene | Light | Divines | Stamina |
 Shoulders Shoulders |
Selene | Medium | Divines | Stamina |
 Chest Chest |
Slivers of Null Arca | Medium | Divines | Stamina |
 Hands Hands |
Slivers of Null Arca | Medium | Divines | Stamina |
 Belt Belt |
Slivers of Null Arca | Medium | Divines | Stamina |
 Legs Legs |
Slivers of Null Arca | Medium | Divines | Stamina |
 Boots Boots |
Slivers of Null Arca | Medium | Divines | Stamina |
 Necklace Necklace |
Berserking Warrior | Jewelry | Bloodthirsty | Increase Physical Harm |
 Ring Ring |
Berserking Warrior | Jewelry | Bloodthirsty | Increase Physical Harm |
 Ring Ring |
Berserking Warrior | Jewelry | Bloodthirsty | Increase Physical Harm |
 Frontbar Main Hand Frontbar Main Hand |
Berserking Warrior | Any 1-handed Weapon | Charged | Flame |
 Frontbar Off Hand Frontbar Off Hand |
Berserking Warrior | Any 1-handed Weapon | Charged | Poison |
Use the Penetration Calculator to fine-tune your penetration for different content. Overland enemies have 9,100 armor while Instanced enemies (Arenas and Dungeons) have 18,200.
Champion Points
Race
The difference between best and worst race is about 5% of DPS and there is no content in the entire game that you'd be blocked from completing because of choosing a bad race.
Other decent options
Mundus
Attributes
You should always put all 64 attribute points into Stamina.
Food
Werewolf's sustain is really bad, so you can gain a lot from using a sustain food which doesn't provide Max Health. It can be risky, but the Pack Leader morph provides 10% unique damage mitigation, which can offset this.
Potions
You passively get Major Brutality/Sorcery from Hircine's Rage and Major Savagery/Prophecy from Ferocious Roar, so your potions only need to provide Restore Stamina.
Since you passively get Major Brutality/Sorcery from Hircine's Rage and Major Savagery/Prophecy from Ferocious Roar, the only effect you absolutely need on your potions is Restore Stamina. Out of all the alchemy combinations you can make with Restore Stamina, the one that increases physical resistance is the most useful one.
Another effect you can squeeze into potions with the Restore Stamina effect is Restore Health. However this causes the potions to be much more expensive to craft. On top of that, you have to use these potions on cooldown because you need the Stamina, which means you can't save the heal for when you actually need it, and the passive Health Recovery increase is basically meaningless because Health Recovery is a weak and redundant stat which barely does any healing. Because of that I recommend the cheaper potions as the default option, but if you don't mind the cost you can use the ones with Health Restore.
Parses
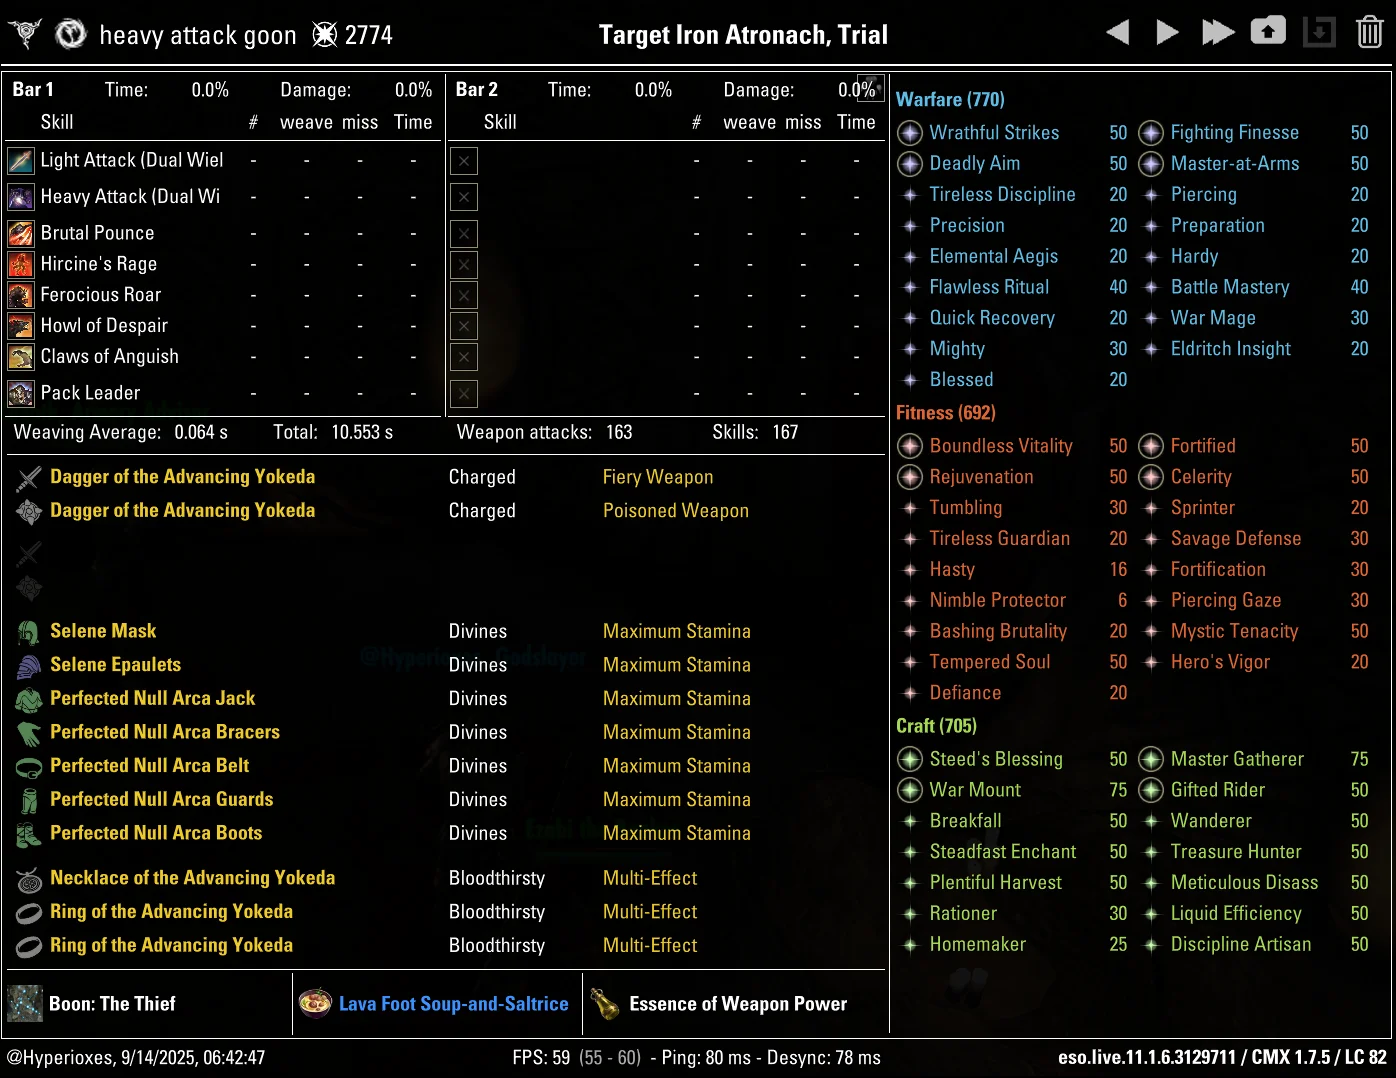
All parses are recorded on the 21 million Target Dummy

Gameplay
FAQ
Sorcerer, Nightblade and Templar are the best base classes because they can subclass into the strongest combination (Storm Calling, Aedric Spear and Assassination) at the same time. Other classes are locked into weaker combinations because they can only replace 2 of their 3 class skill lines.
The strongest subclass combination is Storm Calling, Aedric Spear and Assassination. All three skill lines have passives that continue to work in Werewolf form, which is a huge damage boost over pure class Werewolf.
Werewolf locks you into 5 Werewolf abilities with no access to class skills once you transform, so you can't slot situational skills that some fights need. You also need other Werewolves in your group to use the stronger Werewolf Berserker ultimate - without them you're stuck with Pack Leader and the DPS ceiling drops from 130k to 118k.
THANKS FOR READING

If you've enjoyed this guide and want to support me, you can do so through Patreon. Your support will help me produce more guides.
