TWO HANDED DEATH KNIGHT SUBCLASS SOLO GUIDE
Last updated: Update 47 - 21st August 2025
This build is capable of soloing every Veteran dungeon that doesnt have a specific mechanic that requires multiple people. Its also capable of soloing most Hard Mode dungeons, and with some adjustments even the more difficult ones.
In this guide Ill be regularly using the terms Regular and Difficult. Regular refers to content that is intended to be solo-ed (such as Maelstrom Arena or Vateshran Arena) and to any overland content such as World Bosses, Dolmens, Dragons, Volcanic Vents, Harrowstorms, Mirrormoor Incursions, etc. Majority of dungeon fights will also fall under that category. Difficult refers to extremely difficult dungeon fights.
SUBCLASSING
Combination

Necromancer - Grave Lord

Warden - Winter's Embrace

Nightblade - Assassination
This build uses Necromancer’s Grave Lord, Warden's Winter’s Embrace and Nightblade's Assassination skill lines. Your base class does not matter.
Necromancer’s Grave Lord is basically the backbone of the Death Knight theme, but it’s also an extremely strong skill line for Solo play, because it grants us 3271 penetration through the ![]() Dismember passive and 20% Crit Chance against low health enemies thanks to
Dismember passive and 20% Crit Chance against low health enemies thanks to ![]() Death Knell passive.
Death Knell passive.
Winter’s Embrace fulfils the “Frost” part of Death Knight theme, although from a purely gameplay perspective this skill line is rather weak and we’re nerfing ourselves by using it.
Nightblade’s Assassination is extremely strong and it does kind of fit into the Death Knight theme because of the ![]() Soul Harvest ultimate which allows us to drain slain enemies’ souls and get Ultimate out of it.
Soul Harvest ultimate which allows us to drain slain enemies’ souls and get Ultimate out of it.
SKILL SETUPS
Base Setup
A base setup that will work for most situations and which should be your starting point when making situational setups
| Front Bar | Back Bar |
|---|---|
| Slot 1: Wrecking Blow | Slot 1: Ice Fortress |
| Slot 2: Skeletal Archer | Slot 2: Arctic Blast |
| Slot 3: Relentless Focus | Slot 3: Elemental Susceptibility |
| Slot 4: Barbed Trap | Slot 4: Elemental Blockade |
| Slot 5: Smash | Slot 5: Ulfsild's Contingency |
| Ultimate: Soul Harvest | Ultimate: Northern Storm |

 Wrecking Blow - a spammable which will grant you Major Berserk for 3 seconds, increasing all of your damage done by 10%
 Skeletal Archer - an ability that summons a Skeletal Archer which attacks your enemies for 20 seconds. It also grants you Major Brutality and Major Sorcery for the duration, increasing your Weapon and Spell Damage by 20%. Getting Major Brutality from an ability allows you to use different potions. We need this ability on frontbar to trigger passives of the Grave Lord skill line, which will grant us a lot of penetration thanks to
  Dismember passive and increase our Critical Chance in execute thanks to
  Death Knell
 Relentless Focus - an ability that will cause your Light Attacks to generate stacks. You can spend 4 stacks to fire a powerful arrow that also heals you if you're in Melee range. It also grants you Major Savagery and Prophecy
 Barbed Trap - a DoT that will also apply Hemorrhage status effect at the start and grant you Minor Force buff, increasing your Critical Damage by 10%
 Smash
Smash  Bleed,
  Lingering Torment,
  Berserk) - AoE DoT which grants you the Minor Berserk buff which increases your damage done by 5%. It can also be used as your AoE spammable
 Soul Harvest - a cheap ultimate that increases target's damage taken from you by 20%. This is the ultimate you should use in Single Target fights. Having it slotted will also cause you to regain 10 Ultimate whenever you deal a final blow against an enemy
 Ice Fortress - your source of crucial Major Resolve buff which increases your armor by 5948. It will also grant you Minor Protection, reducing your damage taken by 5%
 Arctic Blast - an ability with a higher chance to proc the Chilled status effect, which deals increased damage thanks to the
  Glacial Presence passive. It can also be used as a self-heal when there are no enemies nearby.
 Elemental Susceptibility - an extremely strong ability that does a multitude of things. It’s completely free to cast so it'll help you sustain. It applies Major Breach, which reduces enemies’ armor by 5948 which is a massive damage increase. It also applies Burning, Chilled and Concussed status effects at the beginning and then every 7.5 seconds. All of these Status Effects deal decent damage, but Concussed will also apply Minor Vulnerability for 4 seconds, increasing enemies’ damage taken by 5%. Chilled will also apply Minor Maim for 4 seconds, reducing enemies’ damage done by 5% and it will also apply Minor Brittle for 4 seconds if you were on your Ice Staff bar while the Chilled effect procced, which is always going to happen at the beginning when you cast Elemental Susceptibility. Minor Brittle increase Critical Damage taken by 10%. The Chilled proc will also synergise with our
  Elemental Blockade
- Elemental Blockade - this ability will constantly apply your
 Weapon Damage enchantment. It will also constantly apply Minor Breach to enemies who are Chilled, and they’ll be Chilled thanks to Elemental Susceptibility
  Ulfsild's Contingency (Bleed, Lingering Torment,
  Intellect and Endurance) - a 22 second DoT that will improve our sustain by increasing both Stamina and Magicka recoveries by 15%
 Northern Storm - a powerful ultimate that deals damage in an AoE, increases your damage done and grants you Major Protection, reducing your damage taken by 10%
![]() Arctic Blast is the first skill that has to go when you need to slot something situational, unless the situational skill specifically says that it's replacing something else. If it has to be a front-barred skill you can replace
Arctic Blast is the first skill that has to go when you need to slot something situational, unless the situational skill specifically says that it's replacing something else. If it has to be a front-barred skill you can replace ![]() Smash but then you'll also have to change the
Smash but then you'll also have to change the ![]() Intellect and Endurance script on your
Intellect and Endurance script on your ![]() Ulfsild's Contingency to
Ulfsild's Contingency to ![]() Force to make up for it
Force to make up for it
 Resolving Vigor - use it for more difficult fights where the pressure is constant and thus you need the Minor Resolve. It can also be used as your main source of healing before you obtain the
  Ring of the Pale Order Mythic. It can also be used in fights with invulnerability phases where you can't heal with Ring of the Pale Order or
  Reaving Blows
 Silver Leash - a chain ability that you can slot in trash packs to stack enemies and get through them faster
 Unnerving Boneyard - a source of AoE Major Breach for trash fights or boss fights with lots of important adds
 Merciless Resolve - the other morph of Relentless Focus which costs Magicka instead of Stamina. You'll have to use this one instead if you're not using the
  Essence Thief set, otherwise you won't be able to sustain your Stamina. You'll also have to switch your food to
  Orzorga's Smoked Bear Haunch in order to sustain the Magicka cost of Merciless Resolve
- Ulfsild's Contingency (Bleed,
 Gladiator's Tenacity, Intellect and Endurance) - a slightly different script combination which trades the DoT component for damage reduction, for fights where you need more damage mitigation. You should recast it every 8 seconds when under pressure and every 22 seconds otherwise
  Revealing Flare - slot it for more difficult fights where you need more damage mitigation. It's a skill that passively grants Major Protection, reducing your damage taken by 10%. It will also trigger the
  Magicka Aid passive, which increases Magicka Recovery by 10%
 Precognition - an ultimate that breaks you out of some otherwise unavoidable stuns, you'll need it to get around some mechanics which are otherwise impossible or very difficult to solo, like for example Inferno's Hold in Zaan the Scalecaller fight
Priority List
I don't use a static rotation so this is just a list of priorities. Simply recast abilities when they run out and follow this list of priorities when there are multiple things to refresh
- Use Ice Fortress
- Use Skeletal Archer
- Use Elemental Susceptibility
- Use Barbed Trap
- Use Elemental Blockade
- Use Smash
- If you're at 9 stacks, use Relentless Focus
- Use Arctic Blast
- Use Ulfsild's Contingency
- If it's an AoE fight or you're starting at or close to 200 Ultimate, use Northern Storm
- If it's a Single Target fight, use Soul Harvest
- Use Wrecking Blow
Pre-buff
These abilities can be pre-cast before entering combat
Final Setups
A few examples of final setups you could end up with after applying the situational skills to the base setup
A setup for dealing with trash packs
| Front Bar | Back Bar |
|---|---|
| Slot 1: Wrecking Blow | Slot 1: Ice Fortress |
| Slot 2: Skeletal Archer | Slot 2: Silver Leash |
| Slot 3: Relentless Focus | Slot 3: Unnerving Boneyard |
| Slot 4: Barbed Trap | Slot 4: Elemental Blockade |
| Slot 5: Smash | Slot 5: Ulfsild's Contingency |
| Ultimate: Soul Harvest | Ultimate: Northern Storm |
EXPLANATION:
- Silver Leash replaces Arctic Blast so you can stack enemies
- Unnerving Boneyard replaces Elemental Susceptibility as it provides AoE Major Breach
A setup with lots of damage mitigation for bosses that hit very hard
| Front Bar | Back Bar |
|---|---|
| Slot 1: Wrecking Blow | Slot 1: Ice Fortress |
| Slot 2: Skeletal Archer | Slot 2: Arctic Blast |
| Slot 3: Relentless Focus | Slot 3: Elemental Susceptibility |
| Slot 4: Barbed Trap | Slot 4: Elemental Blockade |
| Slot 5: Revealing Flare | Slot 5: Ulfsild's Contingency |
| Ultimate: Soul Harvest | Ultimate: Northern Storm |
EXPLANATION:
- Revealing Flare replaces Smash because it provides 10% damage mitigation
- Ulfsild's Contingency changes the Lingering Torment script to Gladiator's Tenacity because it provides 8% damage mitigation
PASSIVES
 Class
Class Weapon
 Armor
Armor Guild
Guild Alliance War
 Racial
 Craft
Craft
Class - Assassination
![]() Master Assassin - High Priority
Master Assassin - High Priority
![]() Executioner - High Priority
Executioner - High Priority
![]() Pressure Points - High Priority
Pressure Points - High Priority
![]() Hemorrhage - High Priority
Hemorrhage - High Priority
GEAR
Base Setup
A base setup that will work for most situations and which should be your starting point when making situational setups
Switching gear for trash packs isn't worth it unless you're using gear-swap addons
Default setup
| Gear Slot | Set | Weight/Type | Trait | Enchantment |
|---|---|---|---|---|
 Head |
Light | |||
 Shoulders |
Medium | |||
 Chest |
Medium | |||
 Hands |
Medium | |||
 Belt |
Medium | |||
 Legs |
Medium | |||
 Boots |
Medium | |||
 Necklace |
Jewelry | |||
 Ring |
Jewelry | |||
Ring |
Jewelry | |||
 Frontbar Main Hand |
Greatsword | |||
Backbar Main Hand |
Ice Staff |
If you want to switch to a situational set it's best to replace ![]() Ansuul’s Torment if the situational set you're getting has a Minor Slayer line, and replace
Ansuul’s Torment if the situational set you're getting has a Minor Slayer line, and replace ![]() Essence Thief otherwise. Remember that in order to sustain without
Essence Thief otherwise. Remember that in order to sustain without ![]() Essence Thief you'll need to change your food to one with more sustain and re-morph
Essence Thief you'll need to change your food to one with more sustain and re-morph ![]() Relentless Focus to
Relentless Focus to ![]() Merciless Resolve
Merciless Resolve
Gear that can be stronger than the setup from the table in specific situations or when specific circumstances are present
 Sul-Xan’s Torment - the best set for trash packs and for bosses that regularly spawn smaller adds
 Order’s Wrath - better than
  Ansuul’s Torment in Overland content where you don't benefit from the Minor Slayer and penetration bonus lines
 Vestments of Olorime - provides 430 Weapon and Spell Damage, 5% damage reduction from Minor Aegis and can be back-barred without losing anything, allowing for much more flexibility with gear. It's the ideal set for more difficult fights
 Roksa the Warped - a monster set which provides a lot of sustain. You'll only have space for it when back-barring Vestments of Olorime
- Armor of the Trainee - 1 piece bonus of this set provides 1454 max health. It also comes in any weight so we can use it on the chest piece, which combined with the
 Reinforced trait will provide a lot of armor
Gear that is easier to obtain and can be used while you work towards the best gear
Crafted:
All of these are tradable and can be bought from other players
No Overland, Dungeon or Trial gear is listed as the Crafted options are superior.
Final Setups
A few examples of final setups you could end up with after applying situational rules to the base setup
This is the crafted gear setup you can start with
| Gear Slot | Set | Weight/Type | Trait | Enchantment |
|---|---|---|---|---|
Head |
Medium | |||
Shoulders |
Medium | |||
Chest |
Heavy / Medium | |||
Hands |
Medium | |||
Belt |
Light | |||
Legs |
Medium | |||
Boots |
Medium | |||
Necklace |
Jewelry | |||
Ring |
Jewelry | |||
Ring |
Jewelry | |||
Frontbar Main Hand |
Greatsword | |||
Backbar Main Hand |
Ice Staff |
The weight distribution of the setup from the table is 1 Heavy 5 Medium 1 Light so that you can start leveling up all your armor skill lines. Once you transition to Regular setup you'll be using 6 Medium 1 Light most of the time, switching to 1 Heavy 5 Medium 1 Light only against more difficult fights
The setup in the table uses only crafted gear, but if you already own parts of the Regular setup like ![]() Ring of the Pale Order you can start using them immediately
Ring of the Pale Order you can start using them immediately
If you want to Solo some difficult content without ![]() Ring of the Pale Order you'll have to add
Ring of the Pale Order you'll have to add ![]() Reaving Blows to your CP setup
Reaving Blows to your CP setup
ADDITIONAL INFO:
- Use
 Training traits if you're still leveling. If you're already max level and have enough Champion Points you can instead use
  Divines
 - Since this setup doesn't use Essence Thief, you'll have to re-morph Relentless Focus into Merciless Resolve
This is a setup you should use if you have no access to any Trial gear
| Gear Slot | Set | Weight/Type | Trait | Enchantment |
|---|---|---|---|---|
Head |
Light | |||
Shoulders |
Medium | |||
Chest |
Medium | |||
Hands |
Medium | |||
Belt |
Medium | |||
Legs |
Medium | |||
Boots |
Medium | |||
Necklace |
Jewelry | |||
Ring |
Jewelry | |||
Ring |
Jewelry | |||
Frontbar Main Hand |
Greatsword | |||
Backbar Main Hand |
Ice Staff |
ADDITIONAL INFO:
- Ansuul’s Torment gets replaced by Tide-Born Wildstalker
This is the ideal setup for trash packs
| Gear Slot | Set | Weight/Type | Trait | Enchantment |
|---|---|---|---|---|
Head |
Light | |||
Shoulders |
Medium | |||
Chest |
Medium | |||
Hands |
Medium | |||
Belt |
Medium | |||
Legs |
Medium | |||
Boots |
Medium | |||
Necklace |
Jewelry | |||
Ring |
Jewelry | |||
Ring |
Jewelry | |||
Frontbar Main Hand |
Greatsword | |||
Backbar Main Hand |
Ice Staff |
ADDITIONAL INFO:
- Ansuul’s Torment gets replaced by Sul-Xan’s Torment
This is my suggested setup for soloing extremely difficult fights in dungeons.
| Gear Slot | Set | Weight/Type | Trait | Enchantment |
|---|---|---|---|---|
Head |
Medium | |||
Shoulders |
Medium | |||
Chest |
Heavy | |||
Hands |
Medium | |||
Belt |
Light | |||
Legs |
Medium | |||
Boots |
Medium | |||
Necklace |
Jewelry | |||
Ring |
Jewelry | |||
Ring |
Jewelry | |||
Frontbar Main Hand |
Greatsword | |||
Backbar Main Hand |
Ice Staff |
ADDITIONAL INFO:
- Ansuul’s Torment is now front-barred instead of being fully on body
- Essence Thief and
 Crushing Wall get replaced by back-barred Vestments of Olorime
 - This creates space for adding a Monster Set - Roksa the Warped, and 1 piece Armor of the Trainee on your chest slot, with Heavy armor weight and Reinforced trait
- Since this setup doesn't use Essence Thief, you'll have to re-morph Relentless Focus into Merciless Resolve
- You can change some (or all) of the
 Stamina enchants to
  Health ones for extremely hard hitting bosses
CHAMPION POINTS
Warfare
- Master-at-Arms (6% Direct Damage)
- Deadly Aim (6% Single Target Damage)
- Fighting Finesse (8% Critical Damage and Healing)
- Wrathful Strikes (205 Weapon and Spell Damage added to damaging skills)
Fitness
 Boundless Vitality (1400 Max Health)
- Bloody Renewal (1500 Stamina on kills)
- Rejuvenation (90 Health, Stamina and Magicka Recovery)
- Fortified (1731 armor)
ADDITIONAL INFO:
- When soloing extremely difficult dungeons you should replace Wrathful Strikes andFighting Finesse with 2 of the 4 mitigation CPs (Ironclad, Duelists Rebuff, Enduring Resolve, Unassailable)
- Use Bracing Anchor in fights where you have to block a lot attacks and where you don't have to move that much
- Use Celerity in fights where you have to move a lot
- Reaving Blows is another decent Blue CP for when you need more HPS
RACE
When it comes to solo PvE, you need both damage and survivability so pretty much all races have useful racials.
The best race for dealing damage is Khajiit. While the Critical Damage from ![]() Feline Ambush can sometimes be wasted due to Critical Damage being capped at 125%, it will never happen in solo content, because there will be no tanks or healers providing you with the Major Force buff.
Feline Ambush can sometimes be wasted due to Critical Damage being capped at 125%, it will never happen in solo content, because there will be no tanks or healers providing you with the Major Force buff.
The best race for survivability is Nord. The ![]() Rugged racial will provide around 6% damage mitigation.
Rugged racial will provide around 6% damage mitigation.
MUNDUS
You should use  The Shadow Mundus which increases Critical Damage.
For extremely difficult dungeons you should consider switching to  The Lady Mundus, which increases your Armor.
ATTRIBUTES
HEALTH
0
STAMINA
64
MAGICKA
0
For most content you should put all 64 points into Stamina. For difficult content you should devote as many attribute points as necessary to Health - for some content youll be able to get away with 32 Health 32 Stamina, for the extremely difficult stuff youll need 64 Health.
FOOD
Your sustain can vary greatly because it's impacted by your armor weight composition, your race, whether you're wearing ![]() Essence Thief and how much blocking/dodge rolling you're required to do in a certain fight. Choose the food with more recoveries if you can't sustain
Essence Thief and how much blocking/dodge rolling you're required to do in a certain fight. Choose the food with more recoveries if you can't sustain
 Garlic Cod with Potato Crust - Max Health, Max Stamina. The default option
- Orzorga's Smoked Bear Haunch - Maximum Health, Stamina Recovery and Magicka Recovery. Use it when you're giving up Essence Thief and switching Relentless Focus to Merciless Resolve. You'll need its Magicka Recovery to sustain Merciless Resolve.
 Jewels of Misrule is a cheaper alternative
  Orzorga's Tripe Trifle Pocket - Max Health, Stamina Recovery. Use it when you need even more Stamina Recovery (for example for more blocking/dodge rolling) while keeping Relentless Focus and Essence Thief
POTIONS

Most of the time you should use Tri-Stat potions (Restore Health, Restore Stamina, Restore Magicka). They'll greatly improve your sustain. You can craft them by combining![]() Columbine,
Columbine,![]() Bugloss and
Bugloss and![]() Mountain's Flower.
Mountain's Flower.
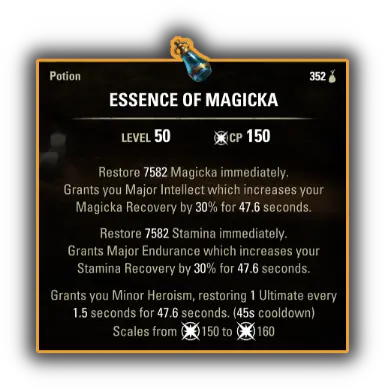
There are better potions but they're expensive. Heroism potions (Heroism, Restore Stamina, Restore Magicka) can provide a 100% uptime on Minor Heroism buff which generates ultimate, but they're extremely expensive because they're crafted by combining![]() Dragon Rheum,
Dragon Rheum,![]() Dragon's Blood and
Dragon's Blood and![]() Columbine.
Columbine.
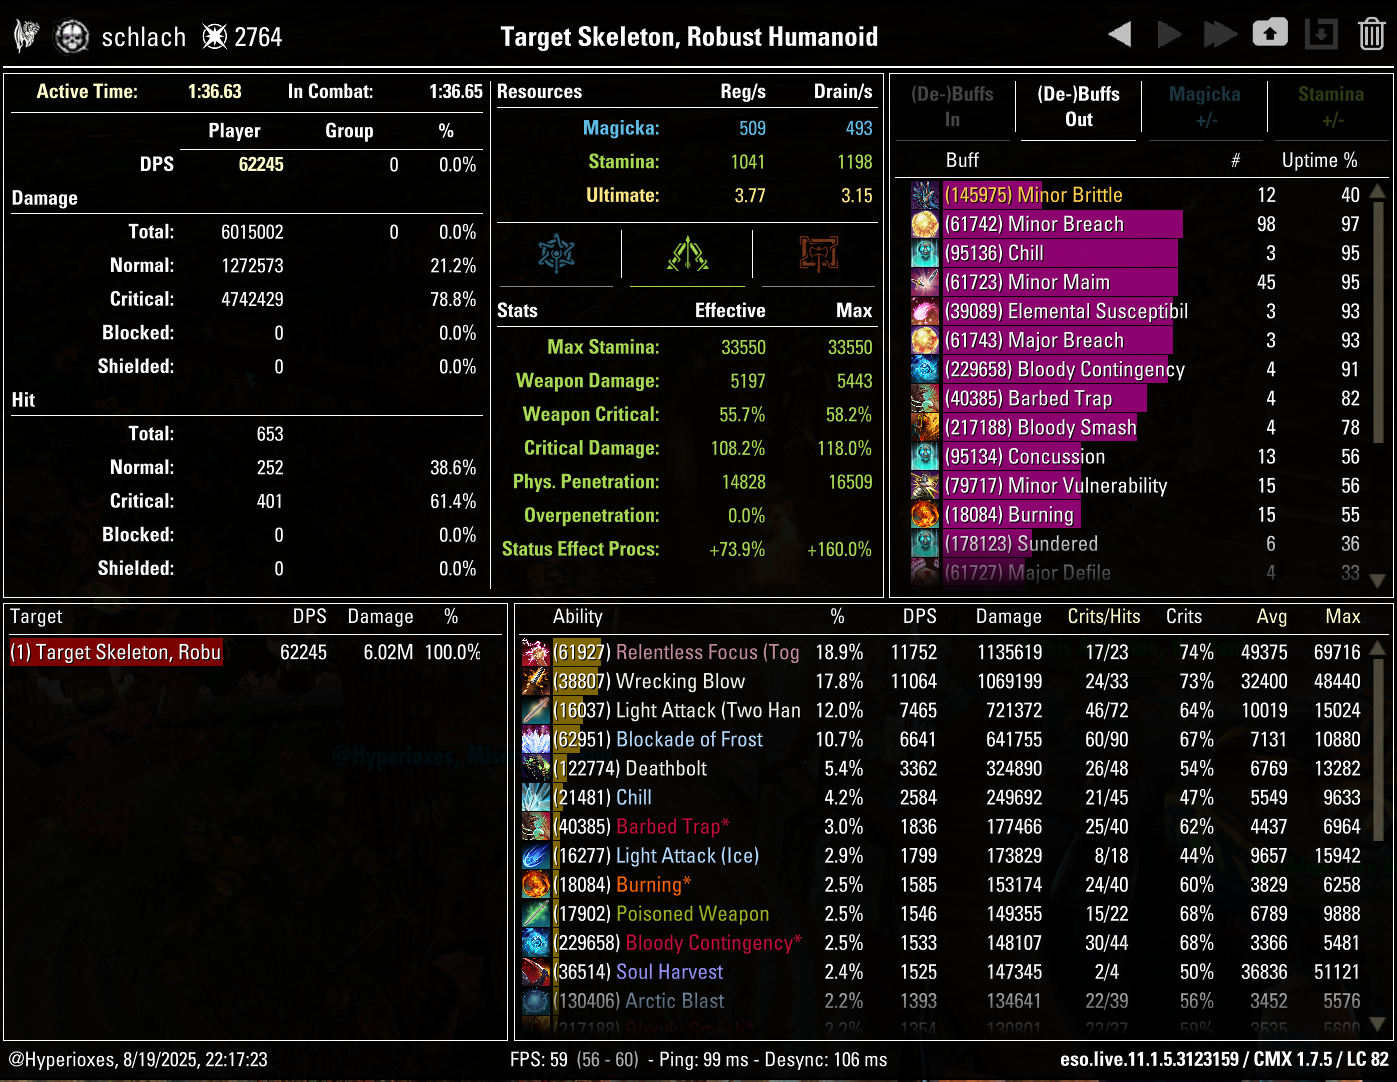
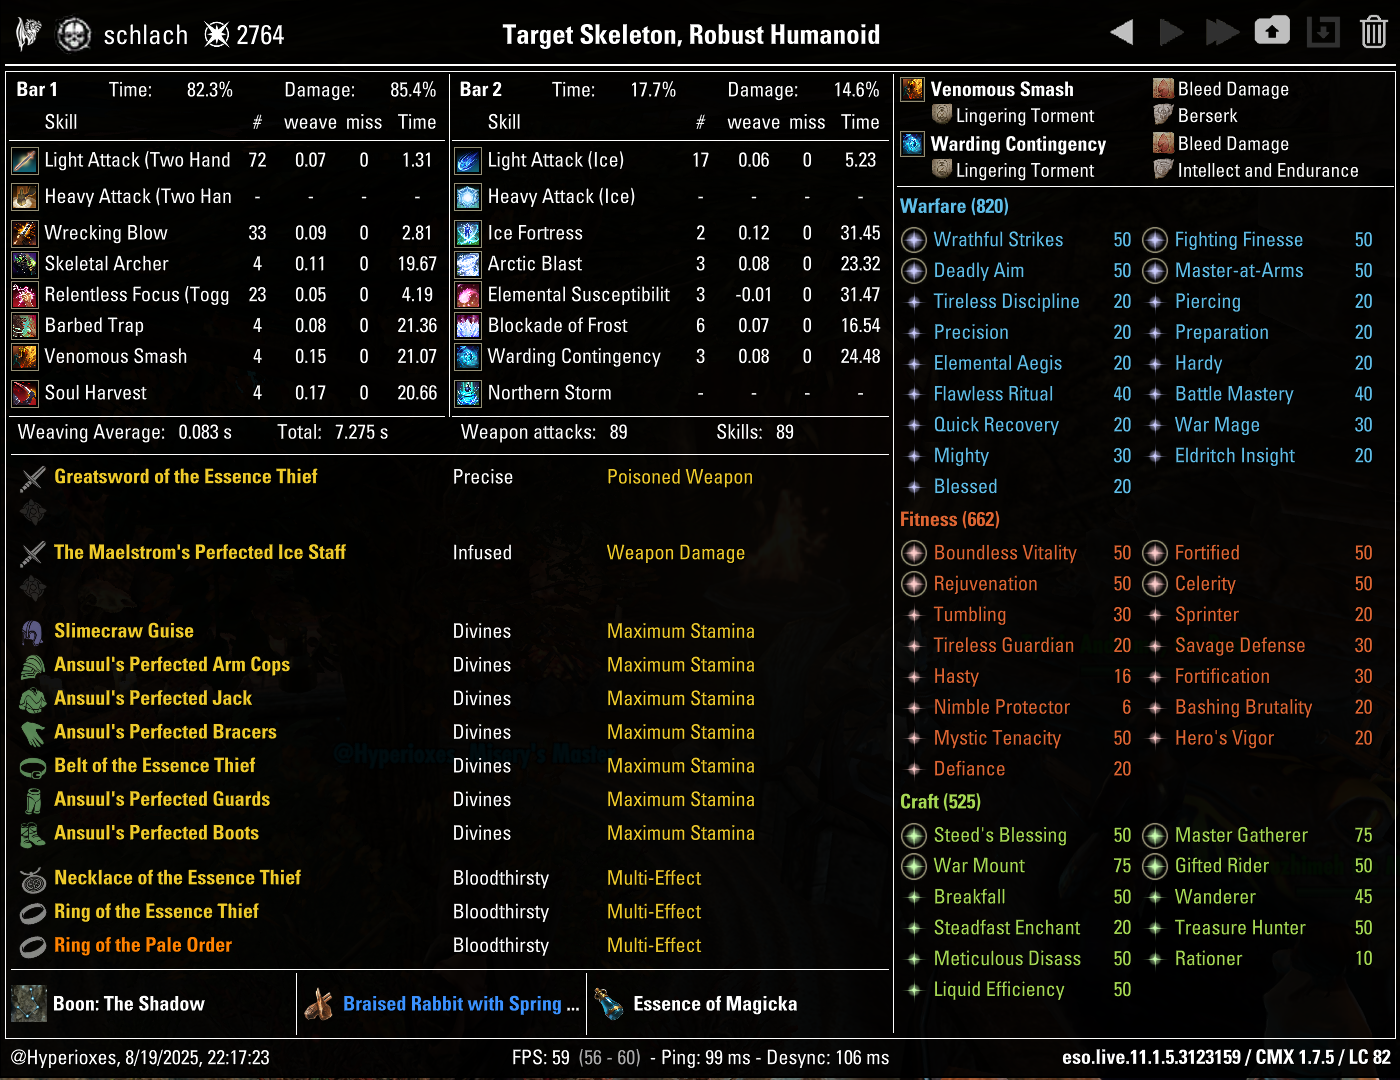
PARSE
62.2k on the 6mil dummy using Regular setup
Recording of the 60.9k parse (Update 46)
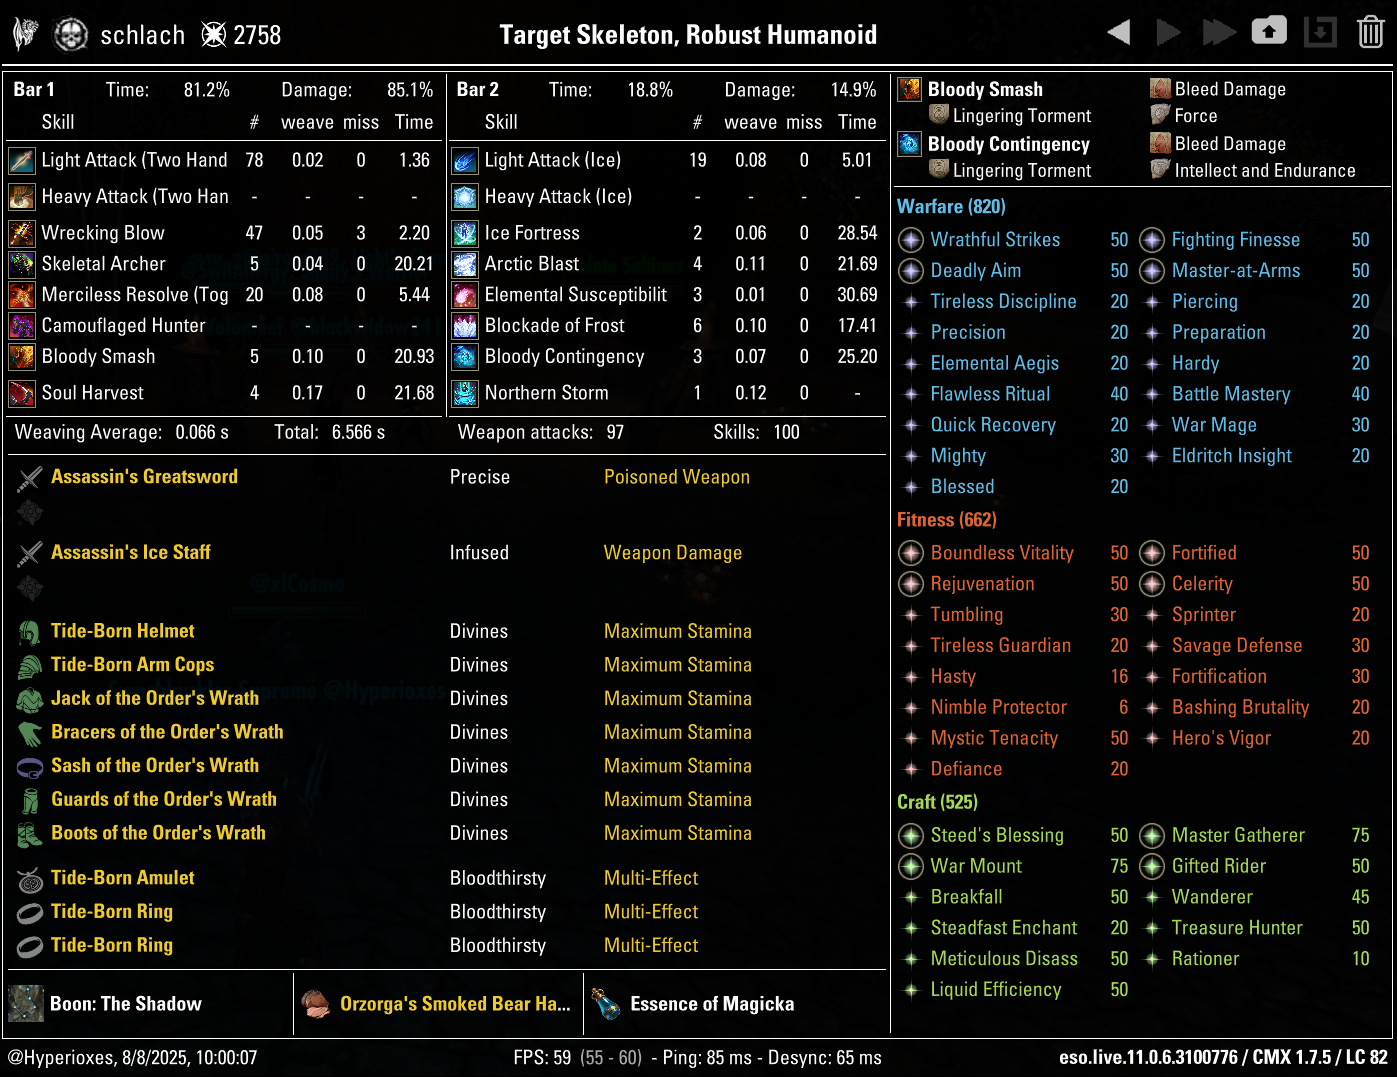
OTHER PARSES
Crafted - 56k DPS (Update 46)

GAMEPLAY
Here you can see this build tackling Veteran dungeons
THANKS FOR READING

If you've enjoyed this guide and want to support me, you can do so through Patreon. Your support will help me produce more guides.
CHANGELOG
Update 47 - 21st August 2025
- Changed Camouflaged Hunter to Barbed Trap
- Changed Smash's Force script to Berserk
- Updated regular parse