HEAVY ATTACK DRAGONKNIGHT SOLO GUIDE
Last updated: Update 44 - 4th February 2025
This build is capable of soloing every Veteran dungeon that doesnt have a specific mechanic that requires multiple people. Its also capable of soloing most Hard Mode dungeons, and with some adjustments even the more difficult ones.
In this guide Ill be regularly using the terms Regular and Difficult. Regular refers to content that is intended to be solo-ed (such as Maelstrom Arena or Vateshran Arena) and to any overland content such as World Bosses, Dolmens, Dragons, Volcanic Vents, Harrowstorms, Mirrormoor Incursions, etc. Majority of dungeon fights will also fall under that category. Difficult refers to extremely difficult dungeon fights.
SKILL SETUPS
| Front Bar | Back Bar |
|---|---|
| Slot 1: Ulfsild's Contingency | Slot 1: Volatile Armor |
| Slot 2: Flames of Oblivion | Slot 2: Simmering Frenzy |
| Slot 3: Eruption | Slot 3: Elemental Susceptibility |
| Slot 4: Barbed Trap | Slot 4: Elemental Blockade |
| Slot 5: Banner Bearer | Slot 5: Banner Bearer |
| Ultimate: Flawless Dawnbreaker | Ultimate: Standard of Might |
SCRIBING:
- Use the Flame, Gladiator's Tenacity and Brutality and Sorcery combination on your Ulfsild's Contingency
- Use the Magic, Class Mastery and Berserk combination on your Banner Bearer
- Use Scalding Rune instead of Ulfsild's Contingency if you don't have access to Scribing
- Use Degeneration (frontbar) and Engulfing Flames (backbar) instead of Banner Bearer if you don't have access to Scribing
INFO:
- Use Engulfing Flames or Venomous Claw instead of Simmering Frenzy if you're not a Vampire
VAMPIRISM
Becoming a Vampire is extremely beneficial on this build because it allows us to use Simmering Frenzy in easier fights and since it's a Heavy Attack build we can mostly ignore the increased ability cost that you get from being a Vampire.
By staying on 3rd Stage of Vampirism you'll also benefit from the Undeath passive, but you should lower or completely cleanse Vampirism when trying to solo an extremely difficult dungeon with lots of flame damage.
GEAR
This is the crafted gear setup you can start with.
| Gear Slot | Set | Weight/Type | Trait | Enchantment |
|---|---|---|---|---|
 Head |
New Moon Acolyte | Medium | Training /Divines | Magicka |
 Shoulders |
New Moon Acolyte | Medium | Training /Divines | Magicka |
 Chest |
Order's Wrath | Heavy | Training /Reinforced | Magicka |
 Hands |
Order's Wrath | Light | Training /Divines | Magicka |
 Belt |
Order's Wrath | Light | Training /Divines | Magicka |
 Legs |
Order's Wrath | Medium | Training /Divines | Magicka |
 Boots |
Order's Wrath | Light | Training /Divines | Magicka |
 Necklace |
New Moon Acolyte | Jewelry | Bloodthirsty | Increase Physical Harm |
 Ring |
New Moon Acolyte | Jewelry | Bloodthirsty | Increase Physical Harm |
Ring |
New Moon Acolyte | Jewelry | Bloodthirsty | Increase Physical Harm |
 Frontbar Main Hand |
Assassin's Guile | Lightning Staff | Precise | Absorb Stamina |
Backbar Main Hand |
Assassin's Guile | Lightning Staff | Infused | Weapon Damage |
ADDITIONAL INFO:
- Use Training traits if you're still leveling. If you're already max level and have enough Champion Points you can instead use Divines and Reinforced on the chest piece
This is my suggested setup for regular content, such as Solo Arenas, World Bosses, Dolmens, Dragons, Volcanic Vents, Harrowstorms, Mirrormoor Incursions and majority of the dungeons.
| Gear Slot | Set | Weight/Type | Trait | Enchantment |
|---|---|---|---|---|
Head |
Anthelmir's Construct | Medium | Divines | Magicka |
Shoulders |
Anthelmir's Construct | Medium | Divines | Magicka |
Chest |
Sergeant's Mail | Heavy | Reinforced | Magicka |
Hands |
Noble Duelist | Light | Divines | Magicka |
Belt |
Noble Duelist | Light | Divines | Magicka |
Legs |
Armor of the Trainee | Medium | Divines | Magicka |
Boots |
Noble Duelist | Light | Divines | Magicka |
Necklace |
Sergeant's Mail | Jewelry | Bloodthirsty | Increase Physical Harm |
Ring |
Sergeant's Mail | Jewelry | Bloodthirsty | Increase Physical Harm |
Ring |
Ring of the Pale Order | Jewelry | Bloodthirsty | Increase Physical Harm |
Frontbar Main Hand |
Sergeant's Mail | Lightning Staff | Precise | Absorb Stamina |
Backbar Main Hand |
Noble Duelist | Lightning Staff | Infused | Weapon Damage |
This is my suggested setup for soloing extremely difficult fights in dungeons.
| Gear Slot | Set | Weight/Type | Trait | Enchantment |
|---|---|---|---|---|
Head |
Anthelmir's Construct | Medium | Divines /Well-Fitted | Magicka |
Shoulders |
Anthelmir's Construct | Medium | Divines /Well-Fitted | Magicka |
Chest |
Sergeant's Mail | Heavy | Reinforced | Magicka |
Hands |
Vestment of Olorime | Light | Divines /Well-Fitted | Magicka |
Belt |
Vestment of Olorime | Light | Divines /Well-Fitted | Magicka |
Legs |
Armor of the Trainee | Medium | Divines /Well-Fitted | Magicka |
Boots |
Vestment of Olorime | Light | Divines /Well-Fitted | Magicka |
Necklace |
Sergeant's Mail | Jewelry | Bloodthirsty | Increase Physical Harm |
Ring |
Sergeant's Mail | Jewelry | Bloodthirsty | Increase Physical Harm |
Ring |
Ring of the Pale Order | Jewelry | Bloodthirsty | Increase Physical Harm |
Frontbar Main Hand |
Sergeant's Mail | Lightning Staff | Precise | Absorb Stamina |
Backbar Main Hand |
Vestment of Olorime | Lightning Staff | Infused | Weapon Damage |
ADDITIONAL INFO:
CHAMPION POINTS
Warfare
- Weapons Expert (20% Light and Heavy Attack Damage)
- Deadly Aim (6% Single Target Damage)
- Fighting Finesse (8% Critical Damage and Healing)
- Exploiter (10% Damage against Off Balance enemies)
Fitness
- Boundless Vitality (1400 Max Health)
- Fortified (1731 armor)
- Sustained by Suffering (150 Health, Stamina and Magicka Recovery when debuffed)
- Rejuvenation (90 Health, Stamina and Magicka Recovery)
ADDITIONAL INFO:
- Replace Sustained by Suffering with Bastion when using Hardened Armor
- When soloing extremely difficult dungeons you should replace Exploiter and Fighting Finesse with 2 of the 4 mitigation CPs (Ironclad, Duelists Rebuff, Enduring Resolve, Unassailable)
RACE
When it comes to solo PvE, you need both damage and survivability so pretty much all races have useful racials.
The best race for dealing damage is Khajiit. While the Critical Damage from Feline Ambush can sometimes be wasted due to Critical Damage being capped at 125%, it will never happen in solo content, because there will be no tanks or healers providing you with the Major Force buff.
The best race for survivability is Nord. The Rugged racial will provide around 6% damage mitigation.
MUNDUS
For overland content you should use The Shadow Mundus, which increases your Critical Damage.
 The Shadow
For instanced content you should use The Lover Mundus, which increases your Penetration.
 The Lover
For extremely difficult dungeons you should consider switching to The Lady Mundus, which increases your Armor.
 The Lady
ATTRIBUTES
HEALTH
0
STAMINA
0
MAGICKA
64
For most content you should put all 64 points into Magicka. For difficult content you should devote as many attribute points as necessary to Health - for some content youll be able to get away with 32 Health 32 Magicka, for the extremely difficult stuff youll need 64 Health.
FOOD
You should use the Artaeum Pickled Fish Bowl. If you need a cheaper alternative, Solitude Salmon-Millet Soup provides only slightly lower stats.
Other decent foods:
- Orzorga's Tripe Trifle Pocket provides Stamina Recovery at the cost of Maximum Magicka. It will lower your damage, but its very useful for fights where you have to dodge roll a lot.
- Orzorga's Smoked Bear Haunch provides Magicka and Stamina Recovery at the cost of Maximum Magicka. It will lower your damage, but its very useful for fights where you have to both dodge roll a lot and spam your Hardened Ward.
POTIONS

Since your sustain is being taken care of by the fact that Heavy Attacks restore resources, you can instead use the Armor potions, which will increase your armor by 5280. You can craft them by combining Bugloss, Mountain's Flower and Mudcrab Chitin.

In fights where you need to dodge roll a lot you can use Tri-Stat potions instead. You can craft them by combining Columbine, Bugloss and Mountain's Flower.
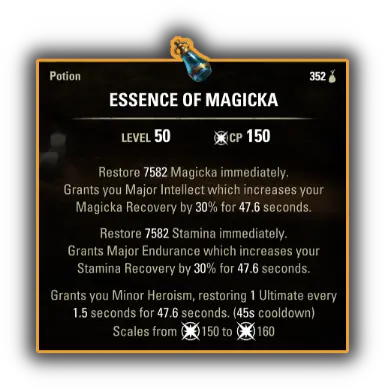
Heroism potions are an expensive alternative to Tri-Stat potions. They provide Minor Heroism on top of the sustain. They're crafted by combining Dragon Rheum, Dragon's Blood and Columbine.
GAMEPLAY
Here you can see this build tackling Veteran dungeons
THANKS FOR READING

If you've enjoyed this guide and want to support me, you can do so through Patreon. Your support will help me produce more guides.