


One Bar Magicka Templar Solo Build - ESO Guide
One Bar Magicka Templar (MagPlar) Solo Build for ESO, carried by ![]() Puncturing Sweep, an AoE spammable that heals you for 25% of the damage done.
Puncturing Sweep, an AoE spammable that heals you for 25% of the damage done. ![]() Radiant Glory is also a powerful execute that heals, so you get a ton of healing from your abilities.
Radiant Glory is also a powerful execute that heals, so you get a ton of healing from your abilities.
Compared to other pure class and subclass solo builds, it's below other options when soloing the most difficult stuff (Veteran Hard Mode DLC Dungeons) and operated by a very good player. But it's extremely good for the average player because of how much free healing the kit provides, making it one of the most comfortable solo builds in ESO Update 49 for players who don't want to bar swap.
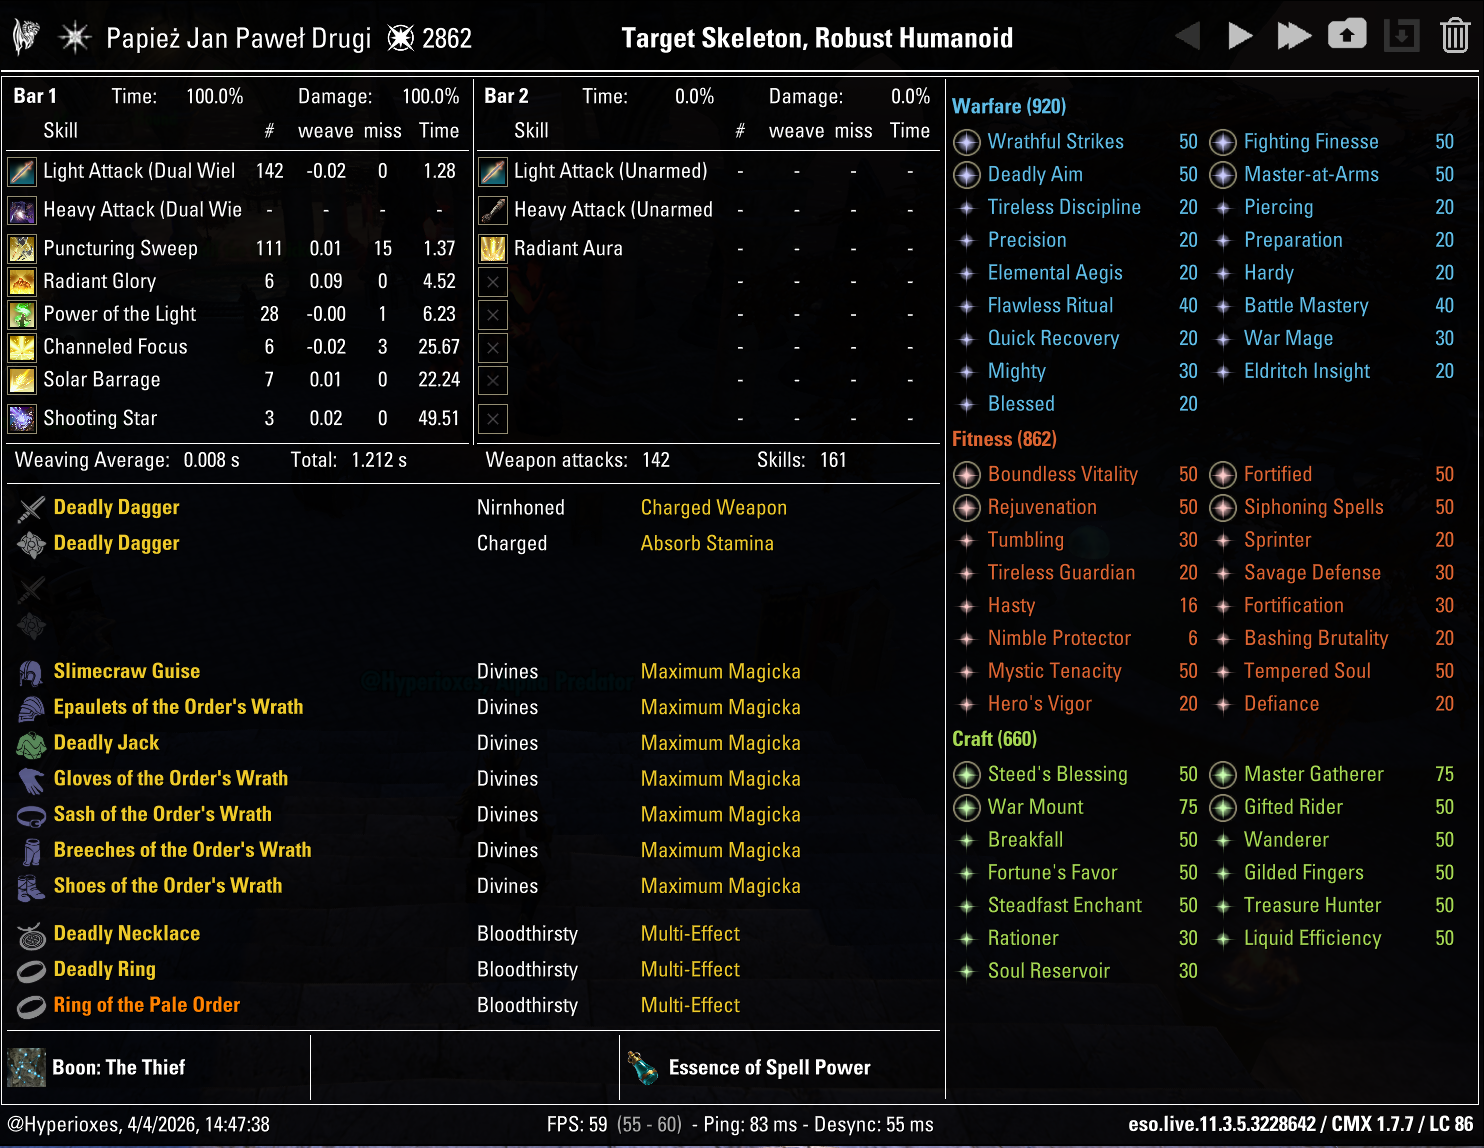
Capable of soloing Veteran Hard Mode Falkreath Hold, Veteran Castle Thorn and Veteran Hard Mode Cradle of Shadows. Parses 41.2k with ![]() Ring of the Pale Order and 47k with
Ring of the Pale Order and 47k with ![]() Oakensoul Ring.
Oakensoul Ring.
There's also a two bar version of this build - the Magicka Templar Solo Build.
Skill Setups
Base Setup
A base setup that will work for most situations and which should be your starting point when making situational setups
| Front Bar | Back Bar |
|---|---|
| Slot 1: Puncturing Sweep | Slot 1: Restoring Aura |
| Slot 2: Radiant Glory | |
| Slot 3: Power of the Light | |
| Slot 4: Channeled Focus | |
| Slot 5: Solar Barrage | |
| Ultimate: Shooting Star |
 Puncturing Sweep - a spammable that will heal you for 25% of the damage done and deals full damage in an AoE
 Radiant Glory - an execute to which you should switch when your enemy is roughly at 25% HP. It'll heal you for 15% of the damage done
 Power of the Light - an ability that deals a lot of damage and applies the Sunder status effect. Sunder applies Minor Breach and grants you 100 Weapon and Spell Damage for 4 seconds. Power of the Light is also going to proc the
  Illuminate passive, granting you Minor Sorcery for 20 seconds, which increases your Spell Damage by 10%
 Channeled Focus - an ability that places a rune on the ground and grants you Major Resolve for 25 seconds, which is an extremely important defensive buff. It's also going to restore your Magicka and heal you for 2% of your Max Health every second, which increases to 6% if you're standing inside of the rune
 Solar Barrage - a 22 second DoT effect which deals damage around you and increases your damage done with class abilities by 5%
 Shooting Star - an ultimate that deals damage in an AoE, leaves a ground DoT and grants you Ultimate for each enemy hit with the initial blast. Having it slotted will also trigger the
  Magicka Controller passive which increases your Max Magicka and Magicka Recovery by 2%
 Restoring Aura - an ability you can keep slotted on your backbar to gain its passive benefits. It will grant you Minor Endurance, Intellect and Fortitude, increasing all your recoveries by 15%
These are skills you can swap in depending on the situation. ![]() Solar Barrage is the first skill you should replace
Solar Barrage is the first skill you should replace
 Elemental Susceptibility - your source of Major Breach which you'll need for Instanced content, because enemies there have more armor. You'll also have to switch to a Destruction Staff to use it
 Resolving Vigor - use it for fights where there's a lot of damage happening in a short burst. The HoT from Resolving Vigor is short but very strong, so casting it at the right time can help you survive such mechanics. The Minor Resolve it provides will also reduce all of your damage taken. It can also be used in fights with invulnerability phases where you can't heal with
  Ring of the Pale Order, Puncturing Sweep and Radiant Glory
 Silver Leash - a chain ability that you can slot in trash packs to stack enemies and get through them faster
 Razor Caltrops - a source of AoE Major Breach which can be used instead of Elemental Susceptibility in AoE fights
 Revealing Flare - slot it for more difficult fights where you need more damage mitigation. It's a skill that passively grants Major Protection, reducing your damage taken by 10%. It will also trigger the
  Magicka Aid passive, which increases Magicka Recovery by 10%
 Ritual of Retribution - a decent ground DoT which cleanses 2 debuffs when cast. It wasn't strong enough to make it into Base Setup but it becomes worth it whenever a fight has some important debuff you need to cleanse
 Luminous Shards - a 10 second ground DoT which will grant you a synergy which restores 3960 Stamina and Magicka when used
 Wield Soul (
 Bleed,
  Lingering Torment,
  Breach) - never the ideal skill but it can be your source of Major Breach if you want to use a weapon type different than Destruction Staff for roleplay reasons
 Precognition - an ultimate that breaks you out of some otherwise unavoidable stuns, you'll need it to get around some mechanics which are otherwise impossible or very difficult to solo, like for example Inferno's Hold in Zaan the Scalecaller fight
Priority List
This is just a list of priorities. Simply recast abilities when they run out and follow this list of priorities when there are multiple things to refresh
- 1. Channeled Focus
- 2. Power of the Light
- 3. Shooting Star if it's ready
- 4. Solar Barrage
- 5. (if enemy is below 25% Max HP) Radiant Glory spammable
- 6. Puncturing Sweep spammable
Pre-buff
These abilities can be pre-cast before entering combat
Final Setups (Overland)
A few examples of final setups you could end up with after applying the situational skills to the base setup
A setup for dealing with trash packs
| Front Bar | Back Bar |
|---|---|
| Slot 1: Puncturing Sweep | Slot 1: Restoring Aura |
| Slot 2: Radiant Glory | |
| Slot 3: Silver Leash | |
| Slot 4: Channeled Focus | |
| Slot 5: Solar Barrage | |
| Ultimate: Shooting Star |
What Changes
Changes compared to the Base Setup
- Silver Leash replaces Power of the Light
A setup which trades damage for more survivability. Use it against harder boss fights or if you simply want a tankier build and don't mind fights taking longer
| Front Bar | Back Bar |
|---|---|
| Slot 1: Puncturing Sweep | Slot 1: Restoring Aura |
| Slot 2: Radiant Glory | |
| Slot 3: Power of the Light | |
| Slot 4: Channeled Focus | |
| Slot 5: Revealing Flare | |
| Ultimate: Shooting Star |
What Changes
Changes compared to the Base Setup
- Revealing Flare replaces Solar Barrage
A skill setup for when you're using the ![]() Oakensoul Ring
Oakensoul Ring
| Front Bar | Back Bar |
|---|---|
| Slot 1: Puncturing Sweep | |
| Slot 2: Radiant Glory | |
| Slot 3: Power of the Light | |
| Slot 4: Luminous Shards | |
| Slot 5: Solar Barrage | |
| Ultimate: Shooting Star |
What Changes
Changes compared to the Base Setup
- Luminous Shards replaces Channeled Focus. The build relied on sustain from Channeled Focus, so it has to be replaced by another sustain ability
Final Setups (Instanced)
Final setups for Instanced content
| Front Bar | Back Bar |
|---|---|
| Slot 1: Puncturing Sweep | Slot 1: Restoring Aura |
| Slot 2: Radiant Glory | |
| Slot 3: Power of the Light | |
| Slot 4: Channeled Focus | |
| Slot 5: Elemental Susceptibility | |
| Ultimate: Shooting Star |
What Changes
Changes compared to the Base Setup
- Elemental Susceptibility replaces Solar Barrage
| Front Bar | Back Bar |
|---|---|
| Slot 1: Puncturing Sweep | Slot 1: Restoring Aura |
| Slot 2: Radiant Glory | |
| Slot 3: Silver Leash | |
| Slot 4: Channeled Focus | |
| Slot 5: Razor Caltrops | |
| Ultimate: Shooting Star |
What Changes
Changes compared to the Instanced Regular setup
- Silver Leash replaces Power of the Light
- Razor Caltrops replaces Elemental Susceptibility
| Front Bar | Back Bar |
|---|---|
| Slot 1: Puncturing Sweep | |
| Slot 2: Radiant Glory | |
| Slot 3: Power of the Light | |
| Slot 4: Luminous Shards | |
| Slot 5: Elemental Susceptibility | |
| Ultimate: Shooting Star |
What Changes
Changes compared to the Instanced Regular setup
- Luminous Shards replaces Channeled Focus. The build relied on sustain from Channeled Focus, so it has to be replaced by another sustain ability
Passives
Some trees are only needed when using situational skills, for example Fighters Guild provides nothing without ![]() Silver Leash
Silver Leash
 Class
Class
 Weapon
 Armor
Armor
 Guild
Guild
 Alliance War
 Racial
 Craft
Craft
Class - Aedric Spear
![]() Piercing Spear - High Priority
Piercing Spear - High Priority
![]() Spear Wall - High Priority
Spear Wall - High Priority
![]() Burning Light - High Priority
Burning Light - High Priority
![]() Balanced Warrior - High Priority
Balanced Warrior - High Priority
Class - Dawn's Wrath
![]() Enduring Rays - High Priority
Enduring Rays - High Priority
![]() Prism - High Priority
Prism - High Priority
![]() Illuminate - High Priority
Illuminate - High Priority
![]() Restoring Spirit - High Priority
Restoring Spirit - High Priority
Class - Restoring Light
![]() Mending - High Priority
Mending - High Priority
![]() Sacred Ground - High Priority
Sacred Ground - High Priority
![]() Light Weaver - Medium Priority
Light Weaver - Medium Priority
![]() Master Ritualist - Not needed
Master Ritualist - Not needed
Weapon - Dual Wield
![]() Slaughter - Low Priority
Slaughter - Low Priority
![]() Dual Wield Expert - High Priority
Dual Wield Expert - High Priority
![]() Controlled Fury - Not Needed
Controlled Fury - Not Needed
![]() Ruffian - Low Priority
Ruffian - Low Priority
![]() Twin Blade and Blunt - High Priority
Twin Blade and Blunt - High Priority
Weapon - Destruction Staff
![]() Tri Focus - Low Priority
Tri Focus - Low Priority
![]() Penetrating Magic - Medium Priority
Penetrating Magic - Medium Priority
![]() Elemental Force - High Priority
Elemental Force - High Priority
![]() Ancient Knowledge - High Priority
Ancient Knowledge - High Priority
![]() Destruction Expert - Low Priority
Destruction Expert - Low Priority
Armor - Light Armor
![]() Grace - Low Priority
Grace - Low Priority
![]() Evocation - High Priority
Evocation - High Priority
![]() Spell Warding - High Priority
Spell Warding - High Priority
![]() Prodigy - High Priority
Prodigy - High Priority
![]() Concentration - High Priority
Concentration - High Priority
Armor - Medium Armor
![]() Dexterity - High Priority
Dexterity - High Priority
![]() Wind Walker - High Priority
Wind Walker - High Priority
![]() Improved Sneak - Not needed
Improved Sneak - Not needed
![]() Agility - High Priority
Agility - High Priority
![]() Athletics - High Priority
Athletics - High Priority
Guild - Fighters Guild
![]() Intimidating Presence - Medium Priority
Intimidating Presence - Medium Priority
![]() Slayer - High Priority
Slayer - High Priority
![]() Banish the Wicked - High Priority
Banish the Wicked - High Priority
![]() Skilled Tracker - Medium Priority
Skilled Tracker - Medium Priority
![]() Bounty Hunter - Not needed
Bounty Hunter - Not needed
Guild - Mages Guild
![]() Persuasive Will - Not needed
Persuasive Will - Not needed
![]() Mage Adept - Not needed
Mage Adept - Not needed
![]() Everlasting Magic - High Priority
Everlasting Magic - High Priority
![]() Magicka Controller - High Priority
Magicka Controller - High Priority
![]() Might of the Guild - Low Priority
Might of the Guild - Low Priority
Guild - Psijic Order
![]() Clairvoyance - Low Priority
Clairvoyance - Low Priority
![]() Spell Orb - Not needed
Spell Orb - Not needed
![]() Concentrated Barrier - Low Priority
Concentrated Barrier - Low Priority
![]() Deliberation - Not needed
Deliberation - Not needed
Alliance War - Support
![]() Magicka Aid - Medium Priority
Magicka Aid - Medium Priority
![]() Combat Medic - Not needed
Combat Medic - Not needed
![]() Battle Resurrection - Not needed
Battle Resurrection - Not needed
Race - Your Race
Get all of your racials, no matter which race you are
Craft - Alchemy
![]() Solvent Proficiency - Not needed
Solvent Proficiency - Not needed
![]() Keen Eye: Reagents - Not needed
Keen Eye: Reagents - Not needed
![]() Medicinal Use - High Priority
Medicinal Use - High Priority
![]() Chemistry - Not needed
Chemistry - Not needed
![]() Laboratory Use - Not needed
Laboratory Use - Not needed
![]() Snakeblood - Not needed
Snakeblood - Not needed
Gear
Base Setup
A base setup that is meant for Overland content and will work for most situations. It should be your starting point when making situational setups
Switching gear for trash packs isn't worth it unless you're using gear-swap addons
| Gear Slot | Set | Weight/Type | Trait | Enchantment |
|---|---|---|---|---|
 Head Head |
Light | |||
 Shoulders Shoulders |
Light | |||
 Chest Chest |
Medium | |||
 Hands Hands |
Light | |||
 Belt Belt |
Light | |||
 Legs Legs |
Light | |||
 Boots Boots |
Light | |||
 Necklace Necklace |
Jewelry | |||
 Ring Ring |
Jewelry | |||
| Ring |
Jewelry | |||
 Frontbar Main Hand Frontbar Main Hand |
Dagger | |||
 Frontbar Off Hand Frontbar Off Hand |
Dagger |
Gear that can be stronger than the setup from the table in specific situations or when specific circumstances are present
 Sul-Xan's Torment - the best set for trash packs and for bosses that regularly spawn smaller adds
 Oakensoul Ring - alternative to Ring of the Pale Order. Does more damage but has much worse survivability. It can be more convenient for most fights because it removes the need to prebuff most skills, but don't use it against difficult World Bosses and anything above their level
 Aetheric Lancer - outperforms
  Order's Wrath when using Oakensoul Ring instead of Ring of the Pale Order. Without Oakensoul, we can't fit Luminous Shards into our setup which means Aetheric Lancer stops proccing in execute once we switch from Puncturing Sweep to Radiant Glory. Since it procs Sundered, you should also change the
  Absorb Stamina enchant to
  Flame, or
  Poison in Instanced content (since Elemental Susceptibility already provides Burning)
Gear that is easier to obtain and can be used while you work towards the best gear
Crafted
All of these are tradable and can be bought from other players
Only listing a single alternative because one of the sets from Base Setup, ![]() Order's Wrath, is also a crafted set
Order's Wrath, is also a crafted set
No Overland, Dungeon or Trial gear is listed as the Crafted options are superior.
Final Setups
A few examples of final setups you could end up with after applying situational rules to the base setup
This is the crafted gear setup you can start with
| Gear Slot | Set | Weight/Type | Trait | Enchantment |
|---|---|---|---|---|
| Head |
Light | |||
| Shoulders |
Light | |||
| Chest |
Medium | |||
| Hands |
Light | |||
| Belt |
Light | |||
| Legs |
Light | |||
| Boots |
Light | |||
| Necklace |
Jewelry | |||
| Ring |
Jewelry | |||
| Ring |
Jewelry | |||
| Frontbar Main Hand |
Dagger | |||
| Frontbar Off Hand |
Dagger |
The setup in the table uses only crafted gear, but if you already own parts of the Regular setup like ![]() Ring of the Pale Order you can start using them immediately
Ring of the Pale Order you can start using them immediately
This is a setup you should use in Instanced content (Arenas and Dungeons), where enemies have 18,200 armor instead of 9,100
| Gear Slot | Set | Weight/Type | Trait | Enchantment |
|---|---|---|---|---|
| Head |
Light | |||
| Shoulders |
Light | |||
| Chest |
Medium | |||
| Hands |
Light | |||
| Belt |
Light | |||
| Legs |
Light | |||
| Boots |
Light | |||
| Necklace |
Jewelry | |||
| Ring |
Jewelry | |||
| Ring |
Jewelry | |||
| Frontbar Main Hand |
Lightning Staff |
 Whorl of the Depths replaces Order's Wrath, because in Instanced content you can benefit from the Minor Slayer buff, which makes it better
- Daggers are replaced with a Lightning Staff to be able to use Elemental Susceptibility
- 1-piece
 Slimecraw is replaced with 1-piece
  Valkyn Skoria
- If you don't have access to Trial gear, use Tide-Born Wildstalker instead of Whorl of the Depths and change Valkyn Skoria back to Slimecraw. Order's Wrath also works if you want to keep things simple since it's already used in the base setup. Tide-Born Wildstalker beats Order's Wrath this time because its penetration line isn't wasted, as it allows you to switch back to Slimecraw
A gear setup for when you're using the ![]() Oakensoul Ring
Oakensoul Ring
| Gear Slot | Set | Weight/Type | Trait | Enchantment |
|---|---|---|---|---|
| Head |
Light | |||
| Shoulders |
Light | |||
| Chest |
Medium | |||
| Hands |
Light | |||
| Belt |
Light | |||
| Legs |
Light | |||
| Boots |
Light | |||
| Necklace |
Jewelry | |||
| Ring |
Jewelry | |||
| Ring |
Jewelry | |||
| Frontbar Main Hand |
Dagger | |||
| Frontbar Off Hand |
Dagger |
- Oakensoul Ring replaces Ring of the Pale Order
- Aetheric Lancer replaces Order's Wrath, because with Oakensoul Ring we can fit Luminous Shards into the setup which keeps it proccing through execute
- Absorb Stamina enchant is changed to Flame, because Aetheric Lancer already procs Sundered
- If you want to use Oakensoul Ring in Instanced content, replace Ring of the Pale Order with it in the Instanced gear setup and swap Whorl of the Depths to Aetheric Lancer
Use the Penetration Calculator to fine-tune your penetration for different content. Overland enemies have 9,100 armor while Instanced enemies (Arenas and Dungeons) have 18,200.
Champion Points
Race
For solo PvE you need both damage and survivability, so every race brings something to the table, but these two stand out as the best options for damage and survivability respectively


Mundus


Attributes
For most content you should put all 64 points into Magicka. For difficult content you should devote as many attribute points as necessary to Health - for some content you'll be able to get away with 32 Health 32 Magicka, for the extremely difficult stuff you'll need 64 Health.
Food
Your sustain can vary greatly because it's impacted by your armor weight composition, your race and how much blocking/dodge rolling you're required to do in a certain fight. Choose the food with more recoveries if you can't sustain
Potions
Use the Spell Power potions (Increase Spell Power, Spell Critical, Restore Magicka). They'll greatly improve your sustain and provide Major Sorcery and Major Prophecy which are crucial.
Use Tri-Stat potions when running the ![]() Oakensoul Ring setup. Oakensoul already provides Major Sorcery and Major Prophecy so you don't need them from potions, and restoring Stamina on top of Magicka will help with blocking and dodge rolling.
Oakensoul Ring setup. Oakensoul already provides Major Sorcery and Major Prophecy so you don't need them from potions, and restoring Stamina on top of Magicka will help with blocking and dodge rolling.
Parses
All parses are recorded on the 6 million Target Dummy
Patch: Update 49
Using Regular setup
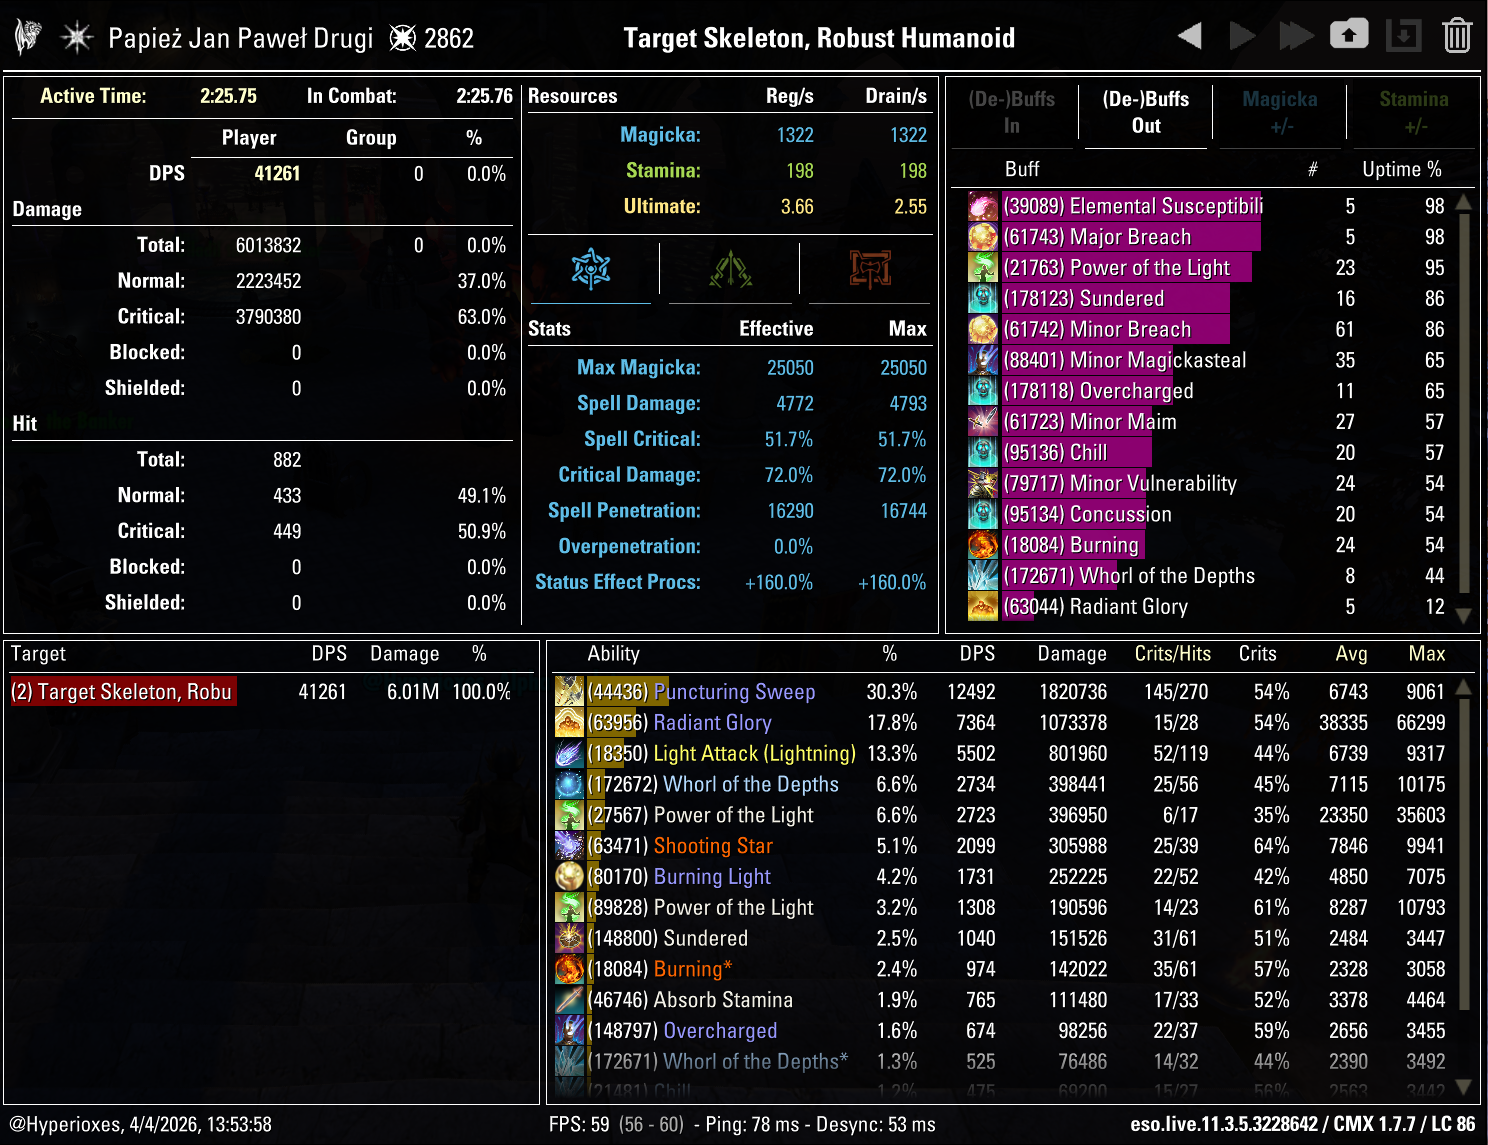


Patch: Update 49
Using Oakensoul setup
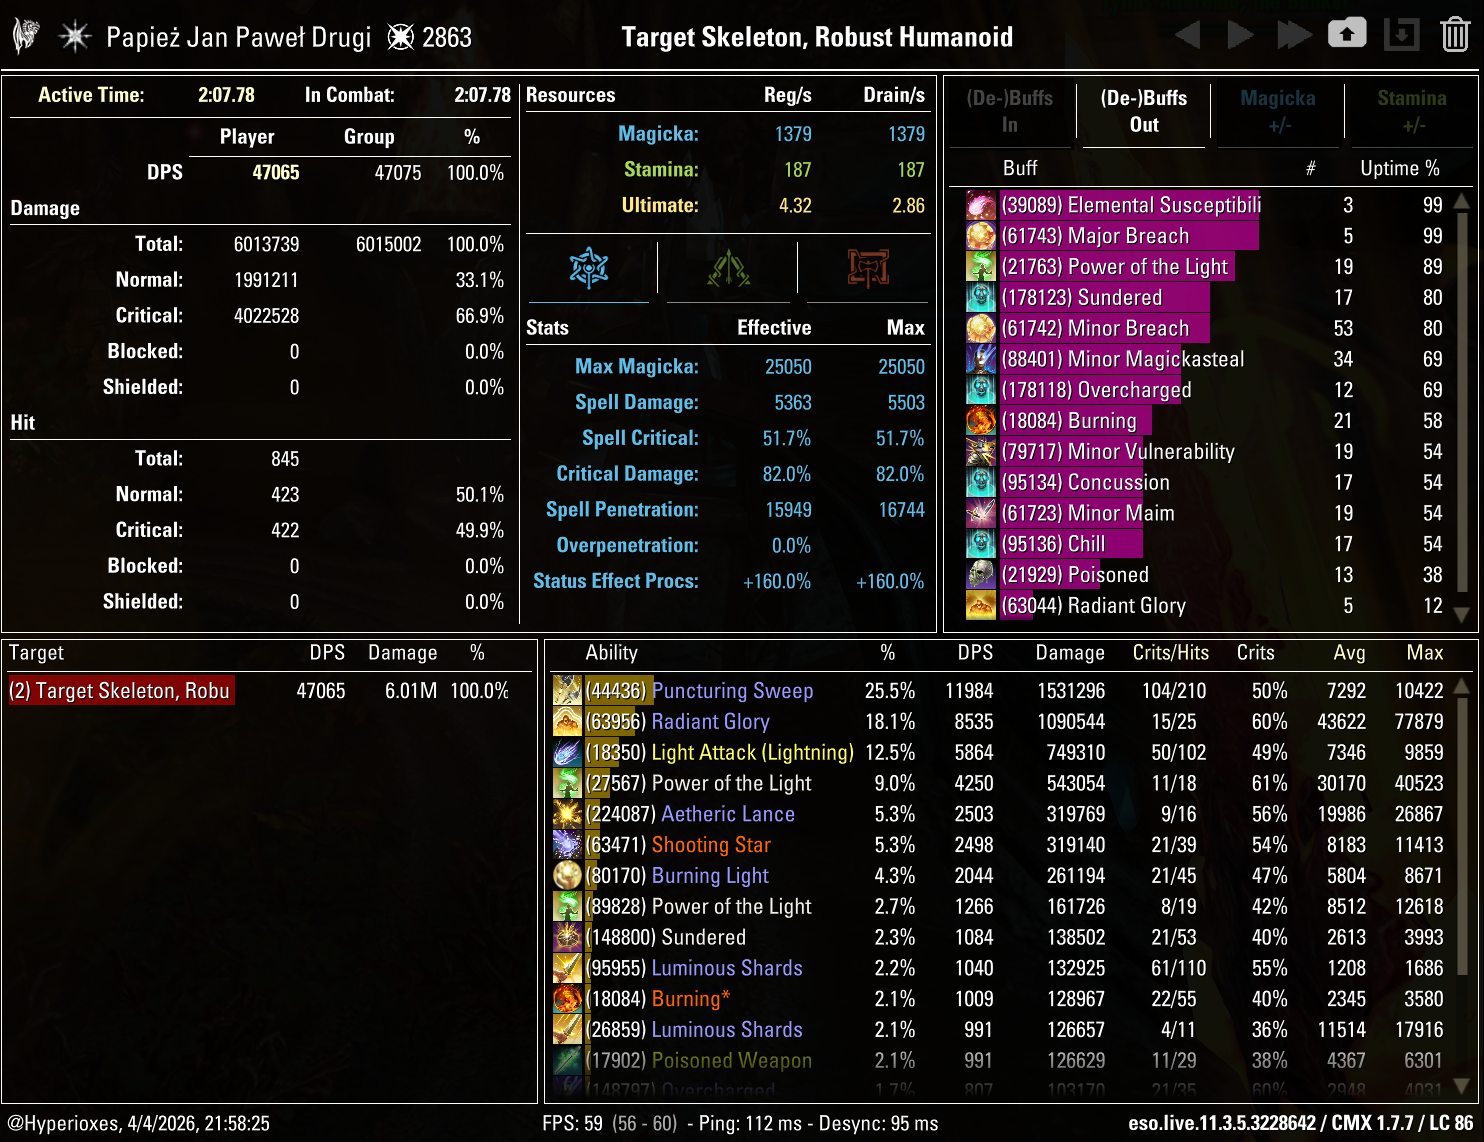
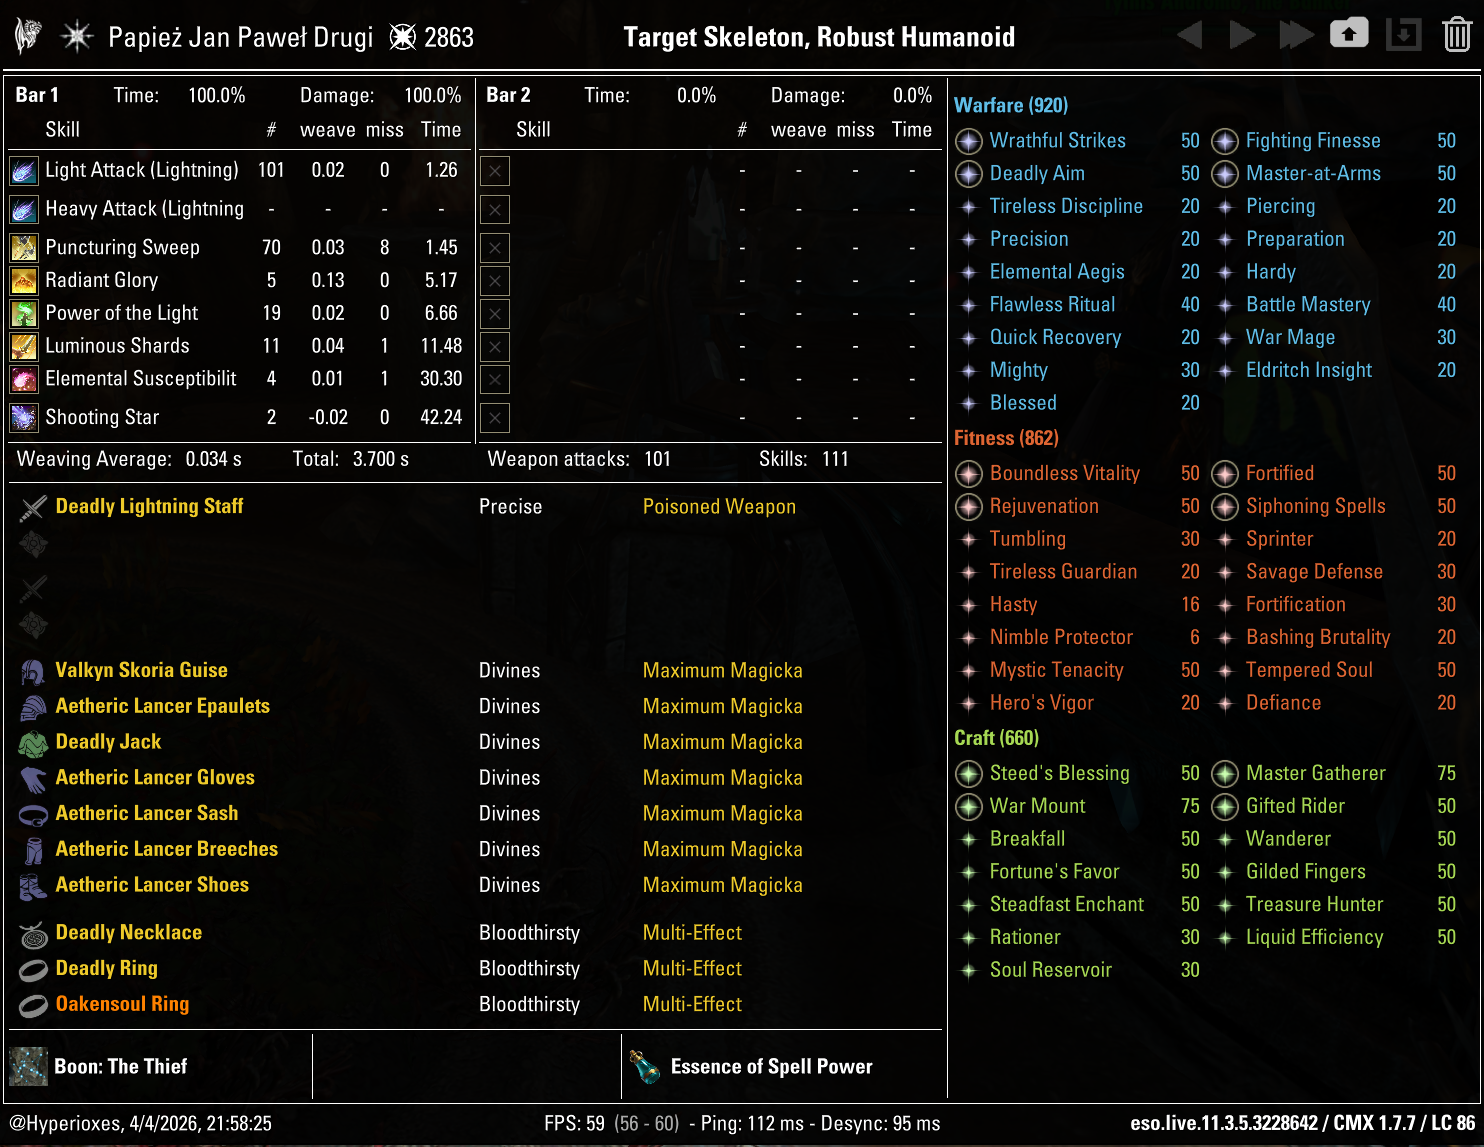

Patch: Update 49
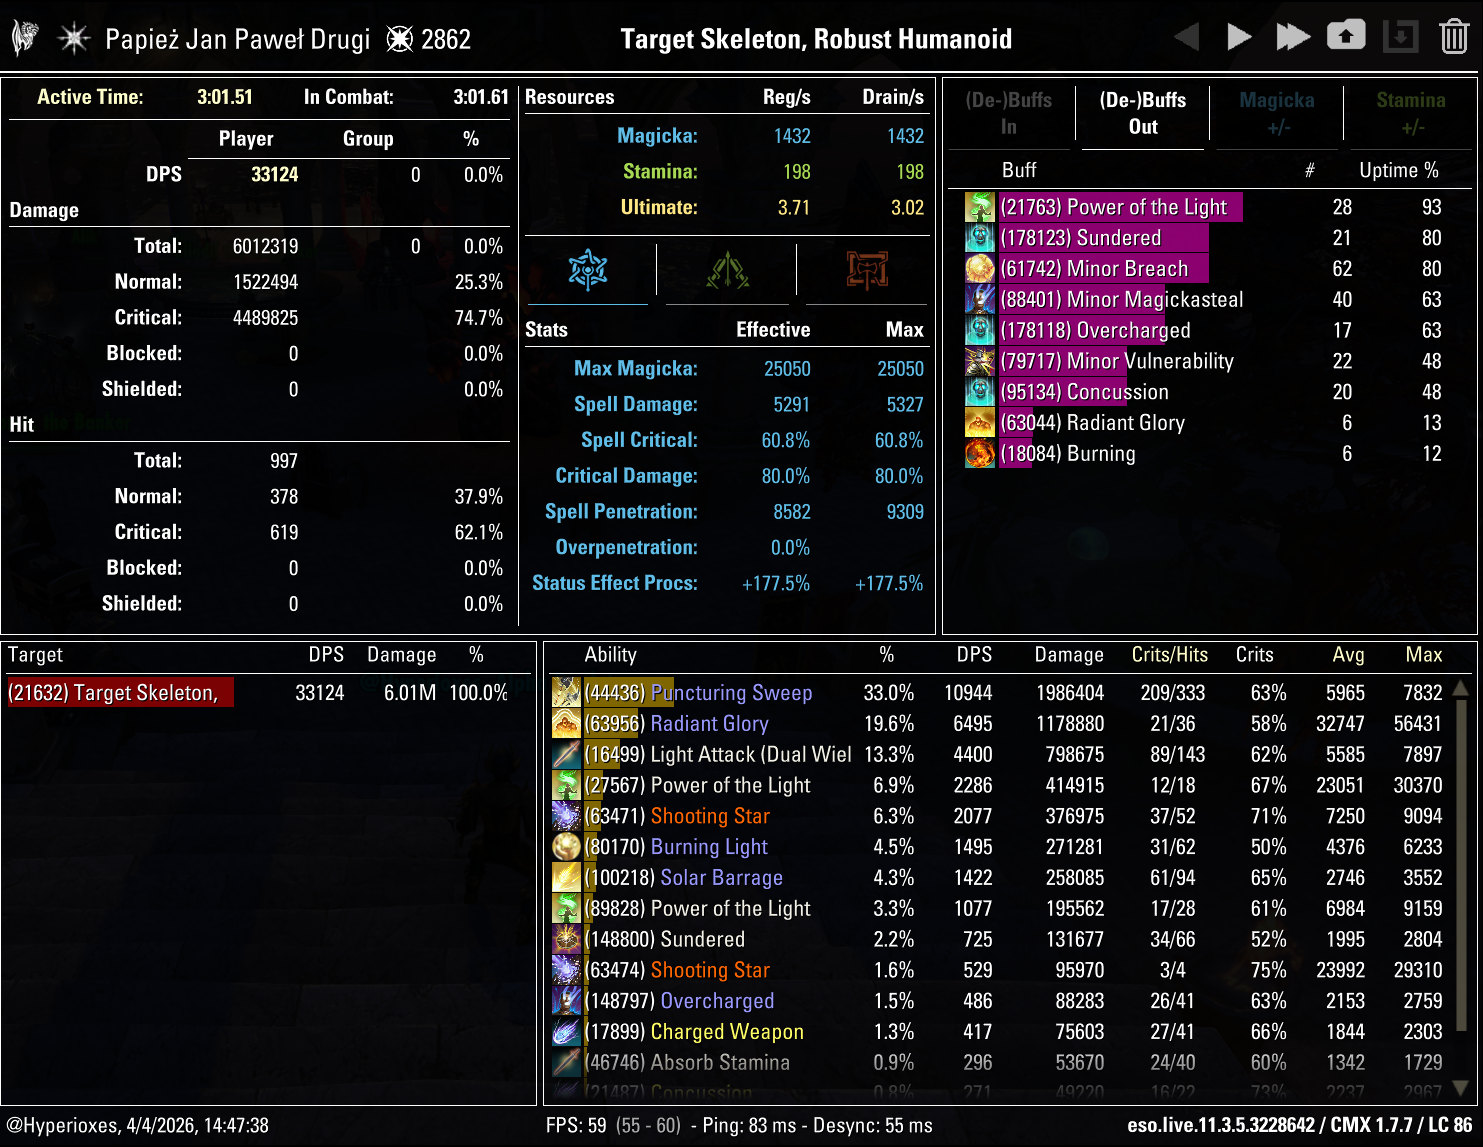
Using Overland setup which is heavily underpenning on the Skeleton Dummy. This parse is just to show the rotation, not for comparison

Gameplay
Here you can see this build tackling Veteran dungeons
Fashion

| Slot | Style | Dyes |
|---|---|---|
| Head |
Divine Gold
Thalmor Black
Thalmor Black
|
|
| Shoulders |
Divine Gold
|
|
| Chest |
Thalmor Black
Divine Gold
Fire Drake's Flame
|
|
| Hands |
Divine Gold
Thalmor Black
Thalmor Black
|
|
| Belt |
Divine Gold
|
|
| Legs |
Divine Gold
Thalmor Black
Thalmor Black
|
|
| Feet |
Divine Gold
Thalmor Black
Thalmor Black
|
|
| Frontbar Main Hand |
Julianos White
Divine Gold
Fire Drake's Flame
|
|
| Frontbar Off Hand |
Julianos White
Divine Gold
Fire Drake's Flame
|
|
FAQ
Yes, this build doesn't use any Dual Wield skills so you can replace the Daggers with any weapon type. Greatsword, Lightning Staff and Bow will cause the smallest DPS loss (≈2%), then Inferno Staff (≈4%), and then support-oriented weapons (Ice Staff, One Handed and Shield) will cause a bigger DPS loss (≈7%). For Instanced content, if you want to use a weapon type other than Destruction Staff, you'll need ![]() Wield Soul with the Breach script as your source of Major Breach for Instanced content instead of
Wield Soul with the Breach script as your source of Major Breach for Instanced content instead of ![]() Elemental Susceptibility.
Elemental Susceptibility.
No, you don't need a different setup. Use the Instanced skill and gear setups from this guide for both Maelstrom Arena and Vateshran Hollows.
Khajiit is the best race for damage thanks to 12% Critical Damage from ![]() Feline Ambush, which won't be wasted in solo content. Nord is the best race for survivability, providing around 5-7% damage mitigation through the
Feline Ambush, which won't be wasted in solo content. Nord is the best race for survivability, providing around 5-7% damage mitigation through the ![]() Rugged racial passive.
Rugged racial passive.
Yes, ![]() Puncturing Sweep is classified as Direct Damage.
Puncturing Sweep is classified as Direct Damage.
![]() Ring of the Pale Order is better for difficult content because of the healing it provides.
Ring of the Pale Order is better for difficult content because of the healing it provides. ![]() Oakensoul Ring does more damage but has much worse survivability.
Oakensoul Ring does more damage but has much worse survivability.
THANKS FOR READING

If you've enjoyed this guide and want to support me, you can do so through Patreon. Your support will help me produce more guides.