Vampire DPS Build - ESO Guide
Vampire DPS build for ESO using Arterial Burst as its spammable, combined with Nightblade's Assassination, Necromancer's Grave Lord and Templar's Aedric Spear. It's a fully thematic Vampire build - Blood Mist and Swarming Scion are included despite being pretty bad abilities, because they fit the fantasy.
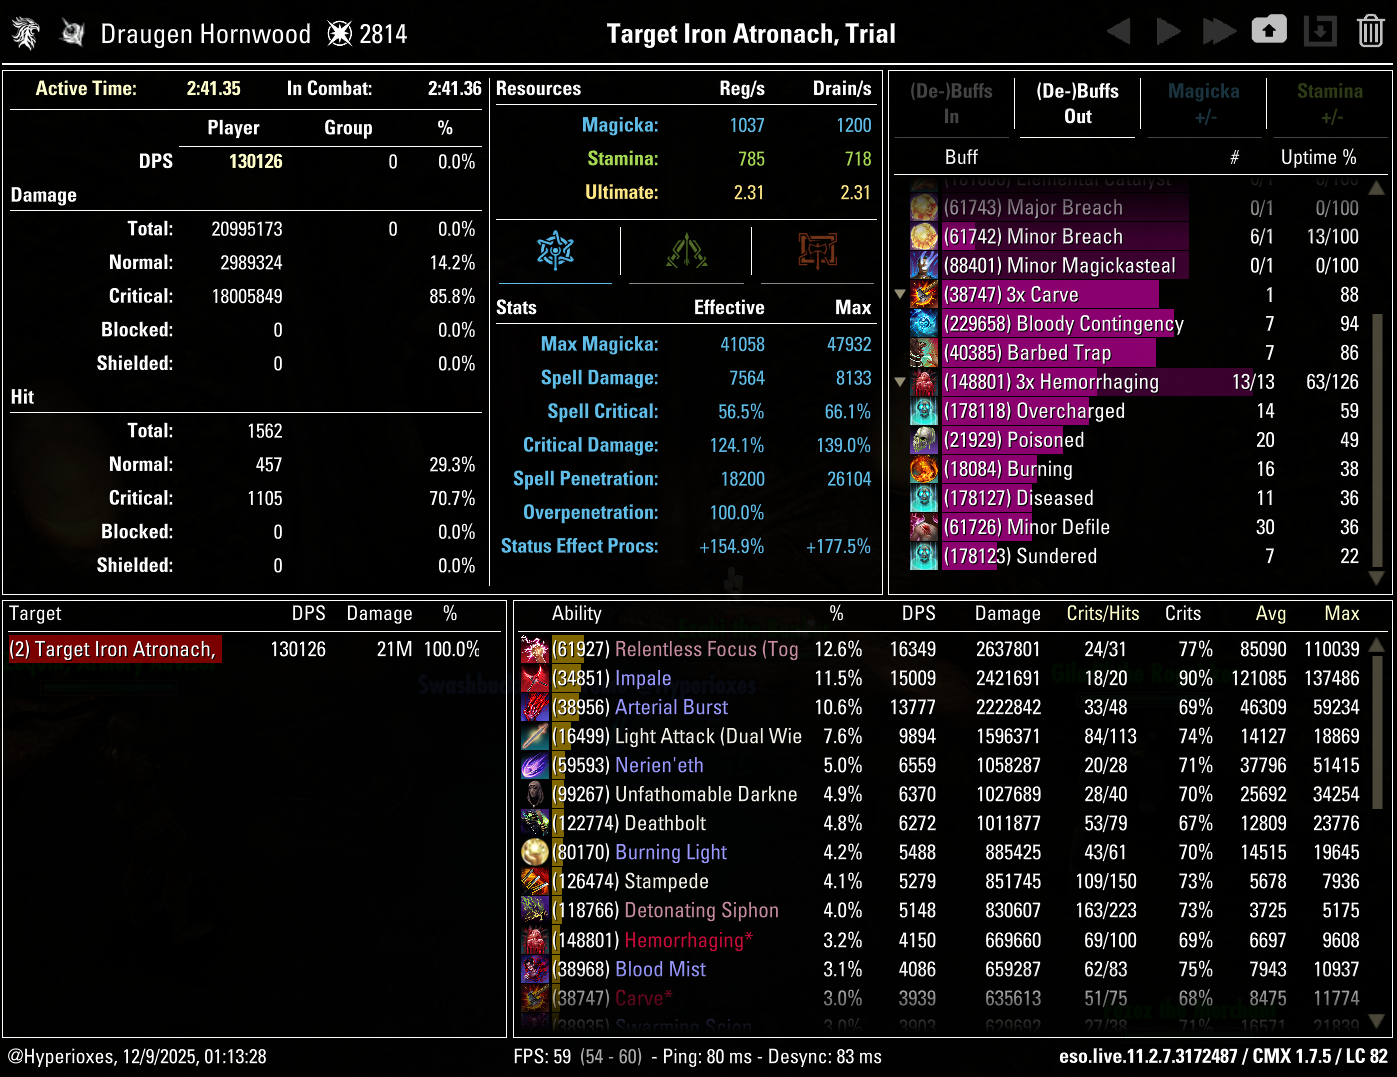
Doesn't match the strongest meta builds in raw DPS, but 130k is still more than enough to clear most content in ESO Update 49. Impale serves as an extremely strong execute, and Death Knell from Grave Lord synergizes with it by increasing your Critical Chance in execute phase.
Parses 130k on the Iron Atronach dummy. Cleared Veteran Lucent Citadel and Veteran Dreadsail Reef.
Subclassing
Combination
This build can use either Nightblade, Necromancer or Templar as your base class
First, we're going to use Nightblade's Assassination. The skill line has extremely strong passives and extremely strong abilities which fit the Vampire theme. We're going to make use of Relentless Focus and Impale.
Next, we're going to use Grave Lord. It's a decently strong skill line that also fits the Vampire theme. It's going to grant us a lot of penetration through Dismember passive making us less reliant on Tanks and the Death Knell passive which increases your Critical Chance in execute will synergize extremely well with Impale, the execute from Assassination skill line.
Now, with Assassination, Grave Lord and Vampire skills on our bar, we simply won't have enough bar space for skills from a third skill line. Which is why we'll choose a skill line with the best passives, which is going to be Aedric Spear. Normally that would break the Vampire theme but we won't be using any Aedric Spear skills, just the passives, so you won't see any holy visuals.
Skill Setups
Base Setup
A base setup that will work for most situations and which should be your starting point when making situational setups
| Front Bar | Back Bar |
|---|---|
| Slot 1: Arterial Burst | Slot 1: Skeletal Archer |
| Slot 2: Impale | Slot 2: Barbed Trap |
| Slot 3: Relentless Focus | Slot 3: Carve |
| Slot 4: Detonating Siphon | Slot 4: Stampede |
| Slot 5: Ulfsild's Contingency | Slot 5: Blood Mist |
| Ultimate: Crescent Sweep | Ultimate: Swarming Scion |
- Arterial Burst - a cheap and strong spammable that's guaranteed to apply the Hemorrhaging status effect
- Impale - an execute you should switch to when enemy is below 25% HP
- Relentless Focus - an ability that will cause your Light Attacks to generate stacks. You can spend 4 stacks to fire a powerful arrow that also heals you if you're in Melee range. It also grants you Major Savagery and Prophecy
- Detonating Siphon - an ability that connects you to a corpse with a tether which deals a lot damage over its duration and explodes at the end. It also passively increases your damage done by 3%
- Ulfsild's Contingency (Bleed, Lingering Torment, Intellect and Endurance) - deals damage in an AoE, applies a 22 second DoT and grants you Minor Intellect and Endurance, increasing your Stamina and Magicka recoveries by 15%. This is your spammable when you need more AoE damage. It's delayed until the next ability but you can trigger it early by simply bashing your enemy.
- Crescent Sweep - an Ultimate that is slotted just to trigger the Piercing Spear passive, which increases Critical Damage by 12%
- Skeletal Archer - an ability that summons a Skeletal Archer which attacks your enemies for 20 seconds. It also grants you Major Brutality and Major Sorcery for the duration, increasing your Weapon and Spell Damage by 20%. Getting Major Brutality from an ability allows you to use different potions. It will also produce a corpse we'll need for Detonating Siphon
- Barbed Trap - a DoT that will also apply Hemorrhage status effect at the start and grant you Minor Force buff, increasing your Critical Damage by 10%
- Carve - AoE attack which applies a 12 second DoT to all hit enemies which gets 10 seconds longer each time you refresh it, lasting up to 32 seconds on third cast. It also grants you a damage shield after casting it.
- Stampede - a gap closer which leaves a ground DoT under your target which will constantly proc your Weapon Damage enchantment and increase your Direct Damage done thanks to Merciless Charge set
- Blood Mist - a dash after which you gain an effect which deals damage around you every 2 seconds for 20 seconds and heals you for 45% of the damage caused. In order to smoothly weave it into your rotation, you have to aim it right in front of your feet and barswap right after casting it.
- Swarming Scion - an extremely expensive ultimate which grants you 10,000 of all Maximum Resources and deals damage around you for 20 seconds. You cannot generate any additional Ultimate while transformed.
Whenever you need to slot situational skills, replace Blood Mist unless stated otherwise
- Proximity Detonation - extremely good ability for trash packs, you can pre-buff it a few seconds before entering combat
- Trample (Disease, Cavalier's Charge, Heroism) - another extremely good ability for trash packs, you can cast it as you're running into them
- Whirling Blades - an execute spammable for trash packs. It costs Stamina but you only have to switch to it when enemies are low, so it's possible to sustain it
- Resolving Vigor - a self-heal you'll need for some fights
- Unnerving Boneyard - a very strong AoE ability which can be used in trash packs and AoE fights. You should also use it as your source of Major Breach whenever you're assigned to mechanics which put you far away from your tank (such as Nahviintaas portal, Reef Guardian Reef Hearts, etc.)
This is just a list of priorities. Simply recast abilities when they run out and follow this list of priorities when there are multiple things to refresh
You should stop refreshing DoTs that don't provide buffs when boss is about to die and focus on spamming Impale instead. Skeletal Archer and Barbed Trap provide crucial buffs and should be kept up at all times. The same applies to Ulfsild's Contingency if you're struggling with sustain.
For maximum damage you want to save up Relentless Focus stacks and use it only during Off Balance, but this is relevant only when using the Exploiter Champion Point, which you can only slot if your group is providing enough Critical Damage for you to hit the 125% Critical Damage cap without Fighting Finesse, which will only happen in very good groups or on the parse dummy.
If you can't sustain enough Magicka for Impale in execute, weave in Relentless Focus every now and then.
Blood Mist is very clunky to use. To minimize the clunkyness, aim it right in front of your feet and cancel it with a barswap.
Priority List
- 1. Stampede
- 2. Skeletal Archer
- 3. Detonating Siphon (if there is no corpse, wait until Skeletal Archer is at 10 seconds and recast it, this will produce an early corpse)
- 4. Barbed Trap
- 5. Ulfsild's Contingency
- 6. Carve (refresh it before it fully expires)
- 7. Blood Mist
- 8. Crescent Sweep if it's obvious you won't get enough Ultimate for another Swarming Scion before the fight ends
- 9. Swarming Scion if it's ready
- 10. If enemy is below 25% HP use Impale
- 11. Relentless Focus if you have at least 4 stacks
- 12. Arterial Burst
Pre-buff
These abilities can be pre-cast before entering combat
Final Setups
A few examples of final setups you could end up with after applying the situational skills to the base setup
Example of a setup you can use for trash packs
| Front Bar | Back Bar |
|---|---|
| Slot 1: Trample | Slot 1: Skeletal Archer |
| Slot 2: Whirling Blades | Slot 2: Proximity Detonation |
| Slot 3: Relentless Focus | Slot 3: Carve |
| Slot 4: Unnerving Boneyard | Slot 4: Stampede |
| Slot 5: Ulfsild's Contingency | Slot 5: Blood Mist |
| Ultimate: Crescent Sweep | Ultimate: Swarming Scion |
EXPLANATION
- Trample replaces Arterial Burst
- Whirling Blades replaces Impale
- Unnerving Boneyard replaces Detonating Siphon
- Proximity Detonation replaces Barbed Trap
Example of a setup fully specialized for Single Target damage
| Front Bar | Back Bar |
|---|---|
| Slot 1: Arterial Burst | Slot 1: Skeletal Archer |
| Slot 2: Impale | Slot 2: Ulfsild's Contingency |
| Slot 3: Relentless Focus | Slot 3: Carve |
| Slot 4: Detonating Siphon | Slot 4: Stampede |
| Slot 5: Barbed Trap | Slot 5: Blood Mist |
| Ultimate: Crescent Sweep | Ultimate: Swarming Scion |
EXPLANATION
- Barbed Trap swaps places with Ulfsild's Contingency. This prevents you from using Ulfsild's Contingency as an AoE spammable but causes Barbed Trap to trigger the Slayer passive on your frontbar
Passives
There are no passives you need to skip with this build
![]() Class - Assassination
Class - Assassination
![]() Master Assassin - High Priority
Master Assassin - High Priority
![]() Executioner - High Priority
Executioner - High Priority
![]() Pressure Points - High Priority
Pressure Points - High Priority
![]() Hemorrhage - High Priority
Hemorrhage - High Priority
![]() Class - Grave Lord
Class - Grave Lord
![]() Reusable Parts - Low Priority
Reusable Parts - Low Priority
![]() Death Knell - High Priority
Death Knell - High Priority
![]() Dismember - High Priority
Dismember - High Priority
![]() Rapid Rot - High Priority
Rapid Rot - High Priority
![]() Class - Aedric Spear
Class - Aedric Spear
![]() Piercing Spear - High Priority
Piercing Spear - High Priority
![]() Spear Wall - Low Priority
Spear Wall - Low Priority
![]() Burning Light - High Priority
Burning Light - High Priority
![]() Balanced Warrior - High Priority
Balanced Warrior - High Priority
![]() World - Vampire
World - Vampire
![]() Dark Stalker - Not needed
Dark Stalker - Not needed
![]() Strike from the Shadows - High Priority
Strike from the Shadows - High Priority
![]() Undeath - Not needed
Undeath - Not needed
![]() Unnatural Movement - Not needed
Unnatural Movement - Not needed
![]() Weapon - Dual Wield
Weapon - Dual Wield
![]() Slaughter - High Priority
Slaughter - High Priority
![]() Dual Wield Expert - High Priority
Dual Wield Expert - High Priority
![]() Controlled Fury - High Priority
Controlled Fury - High Priority
![]() Ruffian - Medium Priority
Ruffian - Medium Priority
![]() Twin Blade and Blunt - High Priority
Twin Blade and Blunt - High Priority
![]() Weapon - Two Handed
Weapon - Two Handed
![]() Forceful - Low Priority
Forceful - Low Priority
![]() Heavy Weapons - High Priority
Heavy Weapons - High Priority
![]() Balanced Blade - Medium Priority
Balanced Blade - Medium Priority
![]() Follow Up - Low Priority
Follow Up - Low Priority
![]() Battle Rush - Low Priority
Battle Rush - Low Priority
![]() Armor - Light Armor
Armor - Light Armor
![]() Grace - Low Priority
Grace - Low Priority
![]() Prodigy - High Priority
Prodigy - High Priority
![]() Spell Warding - Low Priority
Spell Warding - Low Priority
![]() Evocation - High Priority
Evocation - High Priority
![]() Concentration - High Priority
Concentration - High Priority
![]() Armor - Medium Armor
Armor - Medium Armor
![]() Dexterity - High Priority
Dexterity - High Priority
![]() Wind Walker - High Priority
Wind Walker - High Priority
![]() Improved Sneak - Not needed
Improved Sneak - Not needed
![]() Agility - High Priority
Agility - High Priority
![]() Athletics - Low Priority
Athletics - Low Priority
![]() Guild - Mages Guild
Guild - Mages Guild
![]() Persuasive Will - Not needed
Persuasive Will - Not needed
![]() Mage Adept - High Priority
Mage Adept - High Priority
![]() Everlasting Magic - High Priority
Everlasting Magic - High Priority
![]() Magicka Controller - High Priority
Magicka Controller - High Priority
![]() Might of the Guild - Medium Priority
Might of the Guild - Medium Priority
![]() Guild - Fighters Guild
Guild - Fighters Guild
![]() Intimidating Presence - Medium Priority
Intimidating Presence - Medium Priority
![]() Slayer - High Priority
Slayer - High Priority
![]() Banish the Wicked - Medium Priority
Banish the Wicked - Medium Priority
![]() Skilled Tracker - High Priority
Skilled Tracker - High Priority
![]() Bounty Hunter - Not needed
Bounty Hunter - Not needed
![]() Alliance War - Support
Alliance War - Support
![]() Magicka Aid - Low Priority
Magicka Aid - Low Priority
![]() Combat Medic - Not needed
Combat Medic - Not needed
![]() Battle Resurrection - Not needed
Battle Resurrection - Not needed
![]() Race - Your Race
Race - Your Race
Get all of your racials, no matter which race you are
![]() Craft - Alchemy
Craft - Alchemy
![]() Solvent Proficiency - Not needed
Solvent Proficiency - Not needed
![]() Keen Eye: Reagents - Not needed
Keen Eye: Reagents - Not needed
![]() Medicinal Use - High Priority
Medicinal Use - High Priority
![]() Chemistry - Not needed
Chemistry - Not needed
![]() Laboratory Use - Not needed
Laboratory Use - Not needed
![]() Snakeblood - Not needed
Snakeblood - Not needed
Vampirism
You should stay at 2nd stage of Vampirism. This stage will allow you to benefit from the Strike from the Shadows passive which will be triggered by Blood Mist. With Blood Mist being cast every 20 seconds, the uptime of the Weapon Damage buff from Strike from the Shadows won't exceed 30% so it's not very important, so you should lower your Stage to 1 if you encounter any sustain issues, or if you're doing content with a lot of Flame damage.
Gear
Base Setup
A base setup that will work for most situations and which should be your starting point when making situational setups
Switching gear for trash packs isn't worth it unless you're using gear-swap addons
| Gear Slot | Set | Weight/Type | Trait | Enchantment |
|---|---|---|---|---|
 Head Head |
Nerieneth | Medium | Divines | Magicka |
 Shoulders Shoulders |
Nerieneth | Light | Divines | Magicka |
 Chest Chest |
Ansuul's Torment | Medium | Divines | Magicka |
 Hands Hands |
Ansuul's Torment | Medium | Divines | Magicka |
 Belt Belt |
Ansuul's Torment | Medium | Divines | Magicka |
 Legs Legs |
Ansuul's Torment | Medium | Divines | Magicka |
 Boots Boots |
Ansuul's Torment | Medium | Divines | Magicka |
 Necklace Necklace |
Unfathomable Darkness | Jewelry | Bloodthirsty | Increase Magical Harm |
 Ring Ring |
Unfathomable Darkness | Jewelry | Bloodthirsty | Increase Magical Harm |
 Ring Ring |
Unfathomable Darkness | Jewelry | Bloodthirsty | Increase Magical Harm |
 Frontbar Main Hand Frontbar Main Hand |
Unfathomable Darkness | Dagger | Nirnhoned | Flame |
 Frontbar Off Hand Frontbar Off Hand |
Unfathomable Darkness | Dagger | Charged | Poison |
 Backbar Main Hand Backbar Main Hand |
Merciless Charge | Greatsword | Infused | Weapon Damage |
Gear that can be stronger than the setup from the table in specific situations or when specific circumstances are present
- Velothi Ur-Mage's Amulet - extremely strong Mythic for trash and AoE fights. Pair it with Slimecraw or any Monster Set with 1-piece Critical Chance bonus
- Sul-Xan's Torment - a replacement for Unfathomable Darkness in trash packs. Can also work in AoE fights if they include adds which die often enough for you to keep up Sul-Xan's buff
- Tide-Born Wildstalker - a replacement for Unfathomable Darkness in AoE fights (it's also listed in the Alternative Gear since it's crafted)
- Macabre Vintage - a thematic set that can work for trash packs in 4-man content
Gear that is easier to obtain and can be used while you work towards the best gear
Crafted:
All of these are tradable and can be bought from other players
No Overland, Dungeon or Trial gear is listed as the Crafted options are superior.
Final Setups
A few examples of final setups you could end up with after applying situational rules to the base setup
This is the crafted gear setup you can start with
| Gear Slot | Set | Weight/Type | Trait | Enchantment |
|---|---|---|---|---|
 Head Head |
Order's Wrath | Medium | Divines | Magicka |
 Shoulders Shoulders |
Order's Wrath | Medium | Divines | Magicka |
 Chest Chest |
Tide-Born Wildstalker | Medium | Divines | Magicka |
 Hands Hands |
Tide-Born Wildstalker | Medium | Divines | Magicka |
 Belt Belt |
Tide-Born Wildstalker | Light | Divines | Magicka |
 Legs Legs |
Tide-Born Wildstalker | Medium | Divines | Magicka |
 Boots Boots |
Tide-Born Wildstalker | Medium | Divines | Magicka |
 Necklace Necklace |
Order's Wrath | Jewelry | Bloodthirsty | Increase Magical Harm |
 Ring Ring |
Order's Wrath | Jewelry | Bloodthirsty | Increase Magical Harm |
 Ring Ring |
Order's Wrath | Jewelry | Bloodthirsty | Increase Magical Harm |
 Frontbar Main Hand Frontbar Main Hand |
Highland Sentinel | Dagger | Nirnhoned | Flame |
 Frontbar Off Hand Frontbar Off Hand |
Highland Sentinel | Dagger | Charged | Poison |
 Backbar Main Hand Backbar Main Hand |
Highland Sentinel | Greatsword | Infused | Weapon Damage |
This is a setup you should use if you don't have access to any Trial gear
| Gear Slot | Set | Weight/Type | Trait | Enchantment |
|---|---|---|---|---|
 Head Head |
Nerieneth | Medium | Divines | Magicka |
 Shoulders Shoulders |
Nerieneth | Light | Divines | Magicka |
 Chest Chest |
Tide-Born Wildstalker | Medium | Divines | Magicka |
 Hands Hands |
Tide-Born Wildstalker | Medium | Divines | Magicka |
 Belt Belt |
Tide-Born Wildstalker | Medium | Divines | Magicka |
 Legs Legs |
Tide-Born Wildstalker | Medium | Divines | Magicka |
 Boots Boots |
Tide-Born Wildstalker | Medium | Divines | Magicka |
 Necklace Necklace |
Unfathomable Darkness | Jewelry | Bloodthirsty | Increase Magical Harm |
 Ring Ring |
Unfathomable Darkness | Jewelry | Bloodthirsty | Increase Magical Harm |
 Ring Ring |
Unfathomable Darkness | Jewelry | Bloodthirsty | Increase Magical Harm |
 Frontbar Main Hand Frontbar Main Hand |
Unfathomable Darkness | Dagger | Nirnhoned | Flame |
 Frontbar Off Hand Frontbar Off Hand |
Unfathomable Darkness | Dagger | Charged | Poison |
 Backbar Main Hand Backbar Main Hand |
Merciless Charge | Greatsword | Infused | Weapon Damage |
The best setup for trash packs
| Gear Slot | Set | Weight/Type | Trait | Enchantment |
|---|---|---|---|---|
 Head Head |
Sul-Xan's Torment | Medium | Divines | Magicka |
 Shoulders Shoulders |
Slimecraw | Light | Divines | Magicka |
 Chest Chest |
Ansuul's Torment | Medium | Divines | Magicka |
 Hands Hands |
Ansuul's Torment | Medium | Divines | Magicka |
 Belt Belt |
Ansuul's Torment | Medium | Divines | Magicka |
 Legs Legs |
Ansuul's Torment | Medium | Divines | Magicka |
 Boots Boots |
Ansuul's Torment | Medium | Divines | Magicka |
 Necklace Necklace |
Velothi Ur-Mage's Amulet | Jewelry | Bloodthirsty | Increase Magical Harm |
 Ring Ring |
Sul-Xan's Torment | Jewelry | Bloodthirsty | Increase Magical Harm |
 Ring Ring |
Sul-Xan's Torment | Jewelry | Bloodthirsty | Increase Magical Harm |
 Frontbar Main Hand Frontbar Main Hand |
Sul-Xan's Torment | Dagger | Nirnhoned | Flame |
 Frontbar Off Hand Frontbar Off Hand |
Sul-Xan's Torment | Dagger | Charged | Poison |
 Backbar Main Hand Backbar Main Hand |
Merciless Charge | Greatsword | Infused | Weapon Damage |
The best setup for AoE fights
| Gear Slot | Set | Weight/Type | Trait | Enchantment |
|---|---|---|---|---|
 Head Head |
Tide-Born Wildstalker | Medium | Divines | Magicka |
 Shoulders Shoulders |
Slimecraw | Light | Divines | Magicka |
 Chest Chest |
Ansuul's Torment | Medium | Divines | Magicka |
 Hands Hands |
Ansuul's Torment | Medium | Divines | Magicka |
 Belt Belt |
Ansuul's Torment | Medium | Divines | Magicka |
 Legs Legs |
Ansuul's Torment | Medium | Divines | Magicka |
 Boots Boots |
Ansuul's Torment | Medium | Divines | Magicka |
 Necklace Necklace |
Velothi Ur-Mage's Amulet | Jewelry | Bloodthirsty | Increase Magical Harm |
 Ring Ring |
Tide-Born Wildstalker | Jewelry | Bloodthirsty | Increase Magical Harm |
 Ring Ring |
Tide-Born Wildstalker | Jewelry | Bloodthirsty | Increase Magical Harm |
 Frontbar Main Hand Frontbar Main Hand |
Tide-Born Wildstalker | Dagger | Nirnhoned | Flame |
 Frontbar Off Hand Frontbar Off Hand |
Tide-Born Wildstalker | Dagger | Charged | Poison |
 Backbar Main Hand Backbar Main Hand |
Merciless Charge | Greatsword | Infused | Weapon Damage |
Champion Points
Race
The difference between best and worst race is about 5% of DPS and there is no content in the entire game that you'd be blocked from completing because of choosing a bad race.
Other decent options
Mundus
Attributes
You should always put all 64 attribute points into Magicka
Put all 64 points into Magicka for maximum damage
Food
Use a Max Health + Max Magicka food for most content. Switch to a Max Magicka food for dummy parsing.
Potions
Most of the time you should use Tri-Stat potions. They'll greatly improve your sustain.
Heroism potions provide 100% uptime on Minor Heroism which generates Ultimate, but they're extremely expensive.
Parses
All parses are recorded on the 21 million Target Dummy
Patch: Update 48
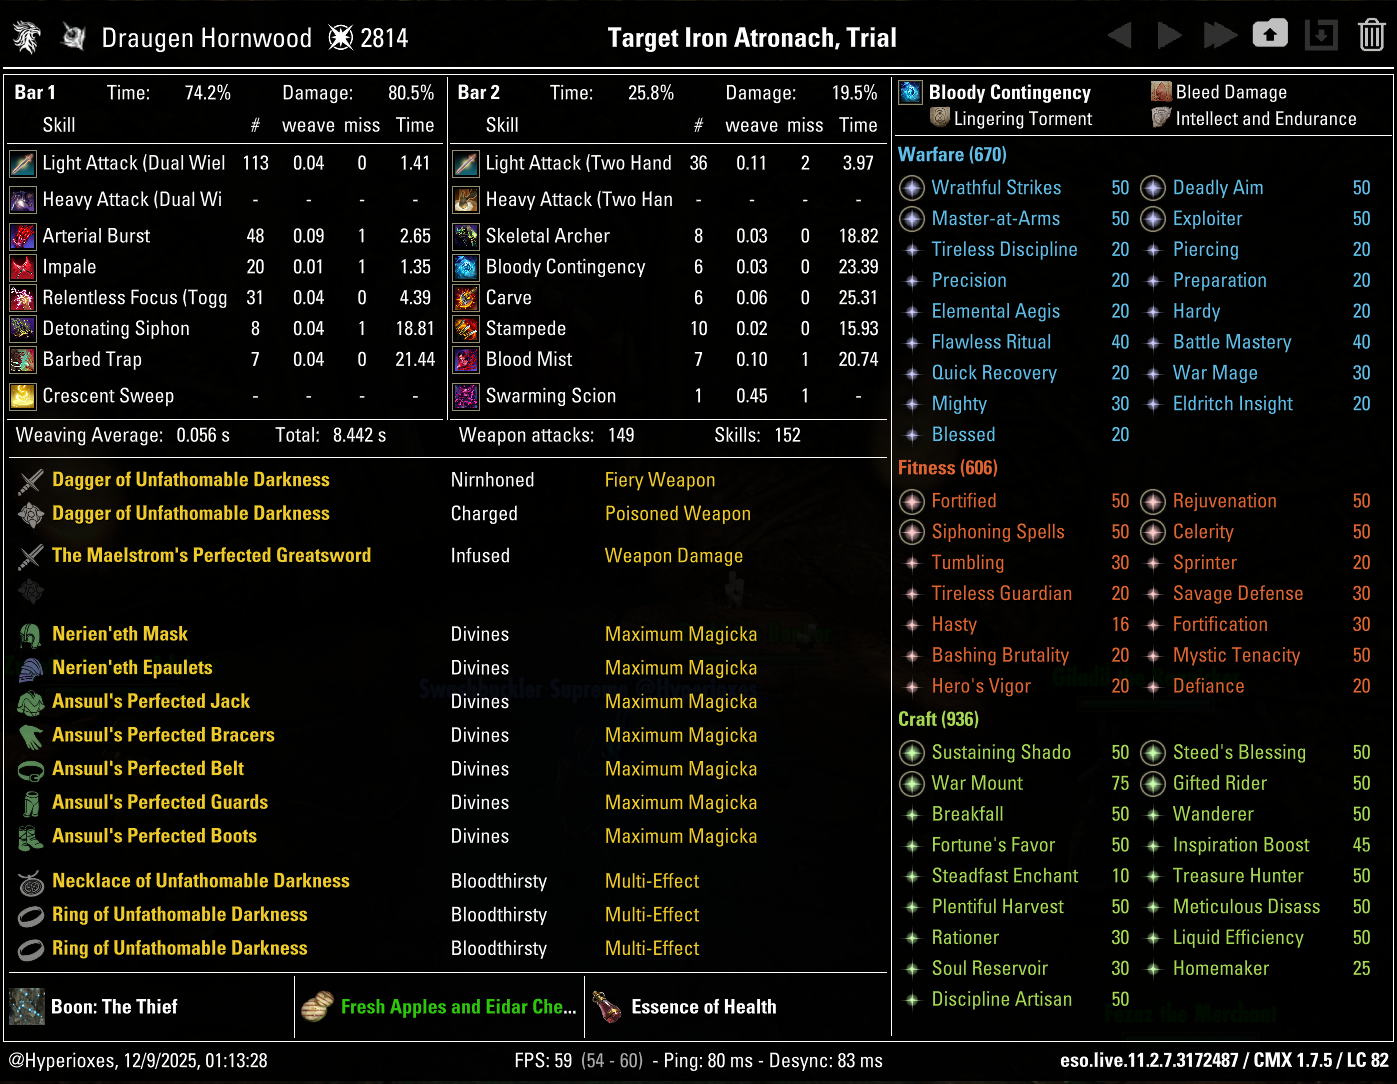
Regular setup with Nerieneth + Ansuul's Torment + Unfathomable Darkness
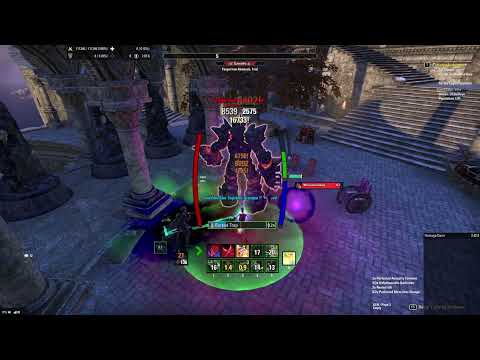
Gameplay
FAQ
You should stay at Stage 2 of Vampirism. This lets you benefit from the Strike from the Shadows passive which is triggered by Blood Mist. Lower to Stage 1 if you encounter sustain issues or content with a lot of Flame damage.
This build can use Nightblade, Necromancer, or Templar as your base class. All three provide the required skill lines: Assassination, Grave Lord, and Aedric Spear.
Yes, this build has been used to clear Veteran Lucent Citadel and Veteran Dreadsail Reef. While it is a thematic build that does not always choose the most optimal option, it is powerful enough for all Veteran content.
Yes, you can replace the Dual Wield Daggers with other weapons. Greatsword, Lightning Staff and Bow will cause the smallest DPS loss (≈2%), then Inferno (≈4%), and then support-oriented weapons (Ice Staff, One Handed and Shield) will cause bigger DPS loss (≈7%). Unlike Solo builds, you don't need to swap any frontbar skills when switching weapons. Replacing the backbar Greatsword is not recommended because of the Merciless Charge set which requires a Two Handed weapon.
They're completely different things. Werewolf is a full playstyle transformation that locks you into 5 Werewolf abilities - it's all you do. Vampire is just another skill line on top of your existing build. It doesn't have to change your playstyle at all. This build does use several Vampire skills for the fantasy, but at its core Vampire is just a skill line with a spammable and a few situational abilities. If you're interested in Werewolf, check out the Werewolf DPS Build.
THANKS FOR READING

If you've enjoyed this guide and want to support me, you can do so through Patreon. Your support will help me produce more guides.
