
Hyperioxes
Hyperioxes
Home Solo Stamina Necromancer

Stamina Necromancer Solo Build - ESO Guide

Solo Two Bar Stamina Pure Class Necromancer
Up to date for: Update 50 - 26th May 2026
Last changed: Update 50 - 26th May 2026

U50 PTS is final and Update 50 launches on June 8, 2026. Live servers are still on Update 49 until then.

Update 50 Drops In
-- Days -- Hours -- Minutes

Timer is set to June 8, 2026 at 16:00 UTC.

Pure Class Stamina Necromancer (StamCro) Solo Build for ESO Update 50. This setup leans into corpses by utilizing and constantly detonating corpses and triggering with and . also provides up to 20% Max Health.

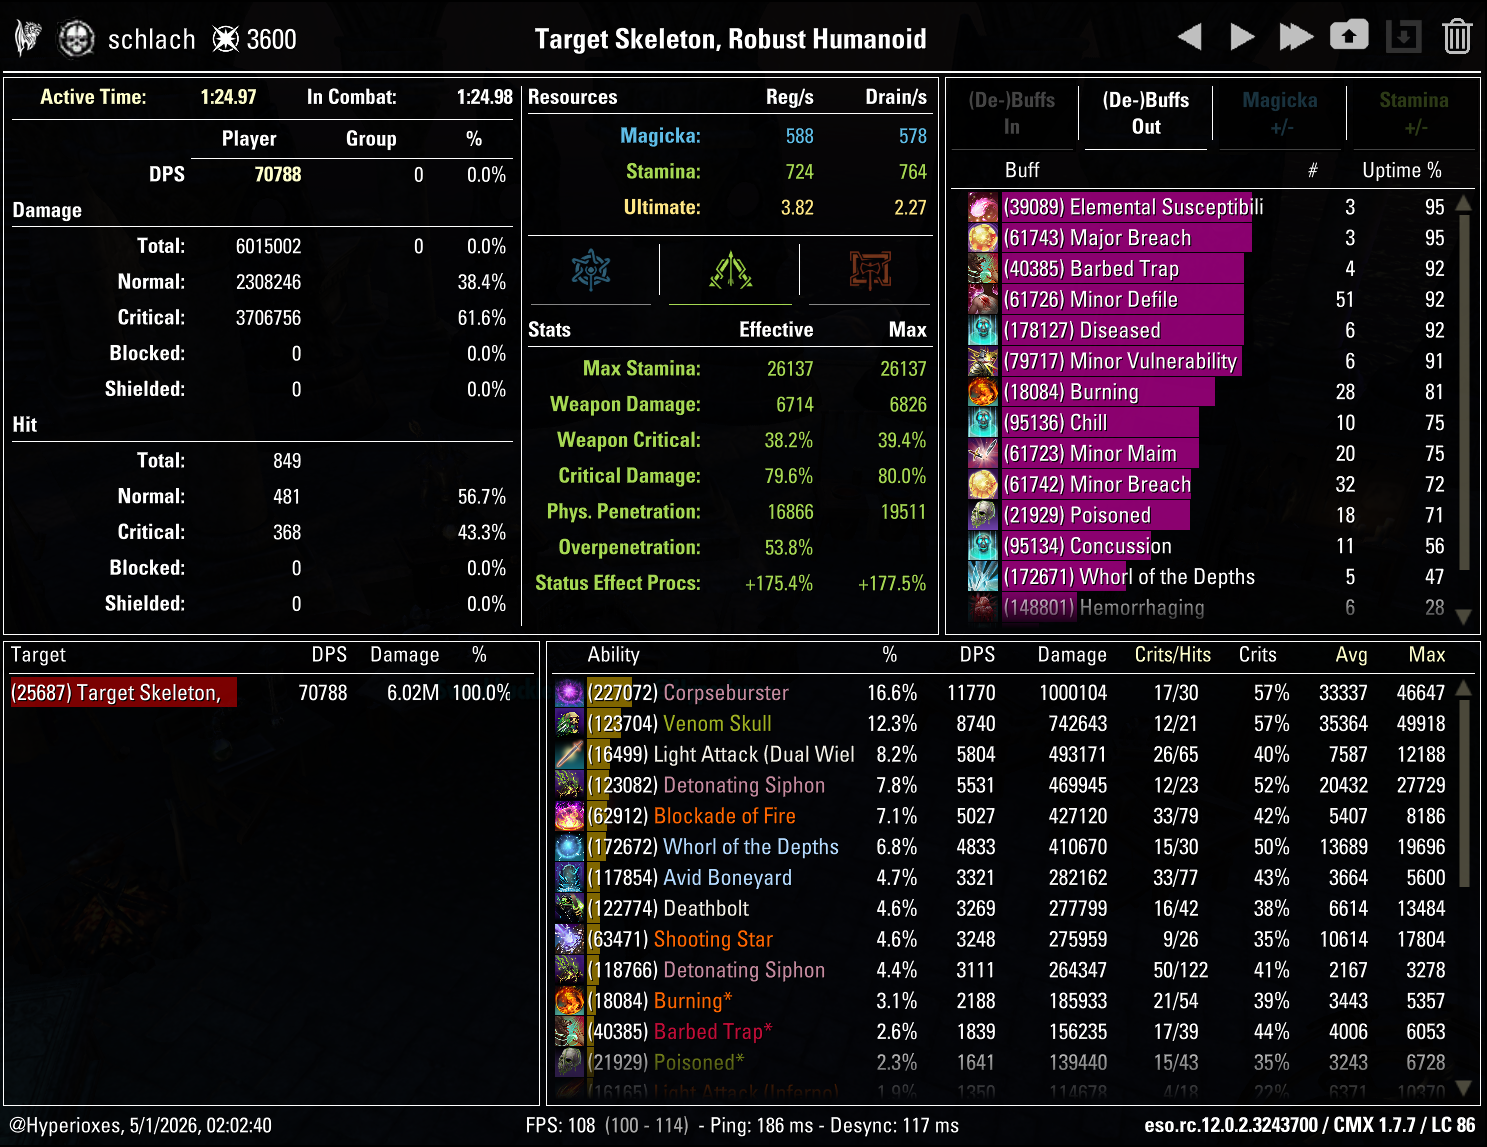
This setup soloed Veteran Hard Mode Scalecaller Peak and parses 68.9k DPS on the 6 million dummy.

Simulated Parse Tables

I built a simulator that takes the current setup from the guide and plays it through the listed rotation. It uses the listed gear, skills, Champion Points, race, food, potions, target armor and target health. It tracks skill casts, light attacks, DoT ticks, cooldowns, execute scaling, crits and status effect rolls. It assumes 100% of light attacks hit and a 0.025 second weave average.

Most comparison tables use deterministic rolls on a 15 million HP target unless the row says 6m, random, or real CMX. There is no 15 million Target Dummy in ESO. I use that health value because the 6 million dummy dies too fast, so random crits, status effects and execute timing can move the DPS by a lot.

For comparison tables I keep the setup identical and change one thing at a time. That makes the tables better for comparing options than random dummy parses, where one run can get better crits, different status effects or a better execute window.

The baseline sim uses instead of because you can't parse with Sul-Xan on the dummy, and I wanted the simulator checked against a real parse. Sul-Xan comparison rows say whether the Soul buff is active.

Run Simulated DPS Notes
15m deterministic sim
67.1k DPS
Used for most comparison tables
6m deterministic sim
67.4k DPS
Same setup on real dummy health
Real 6m CMX parse
68.9k DPS
Recorded in game
100 random 6m sims
Lowest 63.0k DPS
Highest 69.8k DPS
This is why random parses are unreliable when crits and status effects roll differently
Advertisement

Class Mastery

Class Masteries are a new U50 system where each class picks 2 of 5 passive bonuses (Class Mastery Points, not Skill Points). Activating subclassing in any capacity disables Class Mastery, so it's a tradeoff between keeping your native skill lines or subclassing.

Situational

Necromancer Class Mastery

Pound of Flesh

Knock upon death's door and demand your due.

When you take damage you have a 10% chance to heal 2467 Health and restore 5% of your missing Stamina, up to once per second. This chance increases by 1% for every missing Health percent you have and the healing is based off your Max Health.

Notes

Replaces in fights where you have to permablock to survive and need the sustain.

Not worth it

Necromancer Class Mastery

Veil's Forfeit

Call souls back from an early grave. Only you may grant them release.

While you are in combat, directly healing a target below 66% Health relinquishes them from death's clutches and allows you to use a corpse consuming ability against them within 10 seconds, up to once every second.

Extends the duration of you apply by 50%.

Notes

Not useful for this setup.

Necromancer Class Mastery

Malevolent Promise

Death's knell is a familiar song. Share it with your enemies.

Upgrades rank 2 of to mark the closest non-player enemy to you with death's touch for 6 seconds, allowing you to use a corpse consuming ability on them. Consuming or replacing this effect forcibly triggers rank 1 of 's Ultimate generation and triggers rank 2 of .

This effect can occur once every 2 seconds.

Notes

Not useful for this setup.

Skill Setups

Base Setup

A base setup that will work for most situations and which should be your starting point when making situational setups

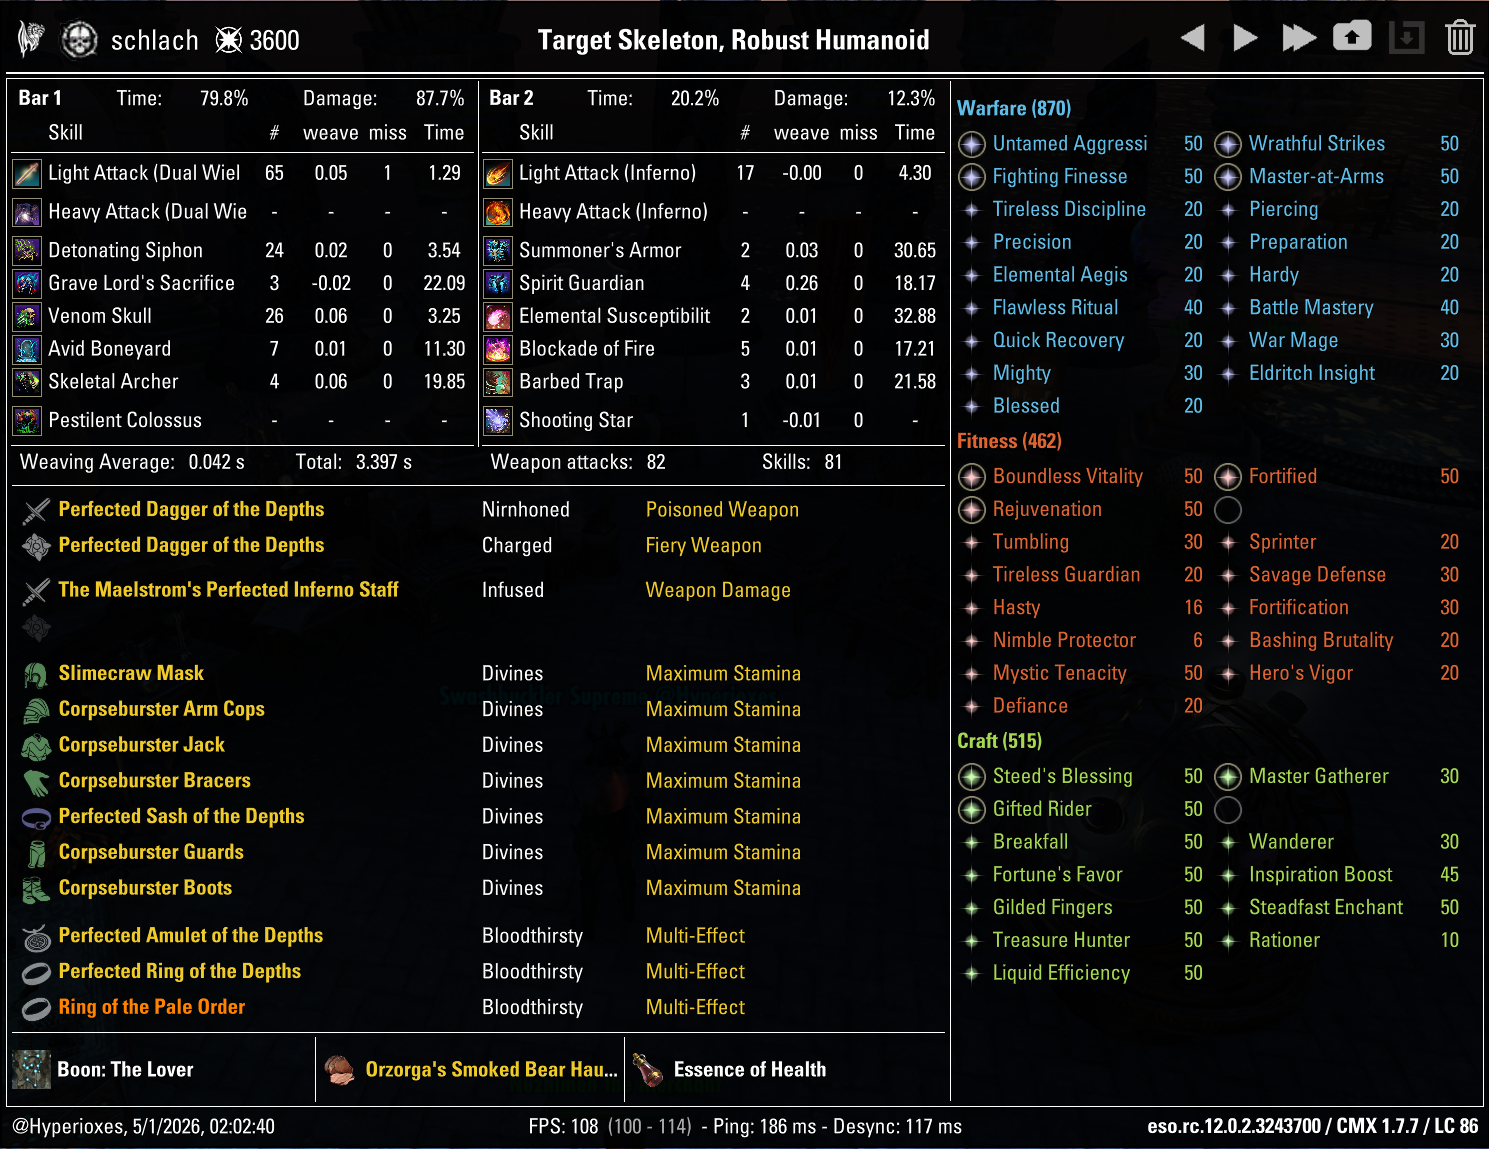
Front Bar Back Bar
Slot 1: Detonating SiphonMorph of Shocking Siphon Slot 1: Summoner's ArmorMorph of Bone Armor
Slot 2: Grave Lord's SacrificeMorph of Sacrificial Bones Slot 2: Spirit GuardianMorph of Spirit Mender
Slot 3: Venom SkullMorph of Flame Skull Slot 3: Elemental SusceptibilityMorph of Weakness to Elements
Slot 4: Avid BoneyardMorph of Boneyard Slot 4: Elemental BlockadeMorph of Wall of Elements
Slot 5: Skeletal ArcherMorph of Skeletal Mage Slot 5: Barbed TrapMorph of Trap Beast
Ultimate: Pestilent ColossusMorph of Frozen Colossus Ultimate: Shooting StarMorph of Meteor

All frontbar skills are from the Grave Lord skill line to boost .

  • - an ability that consumes a corpse to form a tether between it and you, which deals damage over 20 seconds and grants you and . When the ability ends or is reactivated the corpse explodes dealing additional damage. This is your main tool for proccing .
  • - an ability that summons a skeleton that will charge at you after 2.5 seconds, creating a corpse and granting you a 20 second buff that increases your damage done with Necromancer abilities and DoTs by 15%. It also makes your empowered deal damage in an AoE
  • - a spammable. Every third cast deals more damage and creates a corpse near the enemy. Casting any Necromancer ability while Venom Skull is slotted counts toward the third cast.
  • - a ground DoT that applies to all enemies inside of it, increasing their damage taken by 5%. It can consume a corpse to deal more damage, which will also proc . It also grants you the Grave Robber synergy which you can use yourself.
  • - an ability that summons an archer to attack your enemies and grants you and for 20 seconds, which increase your Weapon and Spell Damage by 20%. It creates a corpse when it expires.
  • - an ultimate that we won't be using, but we'll keep it slotted on our frontbar to boost
  • - an ability that will grant you and , increasing your armor by 8922, and reduces the cost of your , and by 15%. It also triggers the passive, which reduces your damage taken from DoTs by 15%. It turns you into a corpse on cast, up to once every 10 seconds.
  • - an ability that will summon a wraith that reduces your damage taken by 10% and heals you every 2 seconds. It will also create a corpse when it expires
  • - an extremely strong ability that does a multitude of things. It's completely free to cast so it'll help you sustain. It applies , which reduces enemies' armor by 5948 which is a massive damage increase. It also applies , and status effects at the beginning and then every 7.5 seconds. All of these Status Effects deal decent damage, but will also apply for 4 seconds, increasing enemies' damage taken by 5%. will also apply for 4 seconds, reducing enemies' damage done by 5%
  • - a 15 second ground DoT which constantly applies your enchantment and deals more damage thanks to .
  • - a 20 second DoT that will also apply status effect at the start and grant you for 20 seconds, increasing your Critical Damage by 10%
  • - a 185 Ultimate cost AoE that leaves a ground DoT and grants you Ultimate for each enemy hit with the initial blast, up to 6 enemies.

is the first skill that has to go if you need to slot something situational and can give up damage, unless the situational skill specifically says it's replacing something else. Replace instead if you can spare survivability.

  • - use it for fights where there's a lot of damage happening in a short burst. The HoT from is short but very strong, so casting it at the right time can help you survive such mechanics
  • - a chain ability that you can slot in trash packs to stack enemies and get through them faster
  • - a source of AoE Major Breach which can be used instead of in AoE fights
  • - a purge that costs only Health. Use it in fights where you need to purge an important debuff
  • - a 12 second HoT which consumes a corpse
  • - slot it for more difficult fights where you need more damage mitigation. It's a skill that passively grants , reducing your damage taken by 10%. It will also trigger the passive, which increases Magicka Recovery by 10%
  • - an ultimate that breaks you out of some otherwise unavoidable stuns, you'll need it to get around some mechanics which are otherwise impossible or very difficult to solo, like for example Inferno's Hold in Zaan the Scalecaller fight
Rotation Simulated Parse Damage Change
Priority List
67.1k DPS
Baseline
Static Rotation
62.2k DPS
-7.2%

Priority List

A list of priorities. Simply recast abilities when they run out and follow this list of priorities when there are multiple things to refresh.

  • 1.
  • 2.
  • 3.
  • 4. when available
  • 5.
  • 6.
  • 7. if the next cast is empowered
  • 8.
  • 9. - refresh when there's less than 6 seconds left
  • 10.
  • 11. if there's a corpse available
  • 12.

Pre-buff

These abilities can be pre-cast before entering combat.

Final Setups

A few examples of final setups you could end up with after applying the situational skills to the base setup

A setup for trash packs

Front Bar Back Bar
Slot 1: Detonating SiphonMorph of Shocking Siphon Slot 1: Summoner's ArmorMorph of Bone Armor
Slot 2: Grave Lord's SacrificeMorph of Sacrificial Bones Slot 2: Silver LeashMorph of Silver Bolts
Slot 3: Venom SkullMorph of Flame Skull Slot 3: Razor CaltropsMorph of Caltrops
Slot 4: Avid BoneyardMorph of Boneyard Slot 4: Elemental BlockadeMorph of Wall of Elements
Slot 5: Skeletal ArcherMorph of Skeletal Mage Slot 5: Barbed TrapMorph of Trap Beast
Ultimate: Pestilent ColossusMorph of Frozen Colossus Ultimate: Shooting StarMorph of Meteor

What Changes

Changes compared to the Base Setup

  • replaces
  • replaces

Skill Setup Comparison

Setup Simulated Parse Damage vs Regular
Regular
67.1k DPS
Baseline
Tanky
62.8k DPS
-6.4%

Passives

Some trees are only needed when using situational skills, for example Psijic Order provides nothing without

Class

Weapon

Armor

Guild

Alliance War

Racial

Craft

Class - Grave Lord

Reusable Parts - High Priority

Death Knell - High Priority

Dismember - High Priority

Rapid Rot - High Priority

Gear

Overland (Base) is your starting point and works for most situations. Crafted is a beginner version using only craftable sets. Instanced is a swap for Arenas and Dungeons where enemies have higher armor.

Switching gear for trash packs isn't worth it unless you're using gear-swap addons

Gear Slot Set Weight/Type Trait Enchantment
HeadHead Medium
ShouldersShoulders Medium
ChestChest Medium
HandsHands Medium
BeltBelt Light
LegsLegs Medium
FeetBoots Medium
NeckNecklace Jewelry
RingRing Jewelry
RingRing Jewelry
MainhandFrontbar Main Hand Dagger
OffhandFrontbar Off Hand Dagger
MainhandBackbar Main Hand Inferno Staff
Look here You dont need the Trial gear. Crafted is only about a 3.6% damage loss against Overland enemies and 5.9% against Instanced enemies compared to .
Body
Corpseburster - Class Set (Infinite Archive)

If you don't have it, use in order

  1. - Crafted
  2. - Crafted
Chest, Weapons and Jewelry
Sul-Xan's Torment - Trial Set (Rockgrove)

If you don't have it, use in order

  1. - Crafted
  2. - Crafted
Monster Helm
Slimecraw - Monster Set (Wayrest Sewers I)

Alternative (same bonus)

  1. - Direfrost Keep
  2. - Scalecaller Peak
  3. - Moongrave Fane
  4. - Stone Garden
  5. - Bedlam Veil

Use the Penetration Calculator to fine-tune your penetration for different content. Overland enemies have 9,100 armor while Instanced enemies (Arenas and Dungeons) have 18,200.

Gear Set Comparisons

Damage comparison for the set options.

All of these use 6 Medium / 1 Light and .

Weapons + Jewelry

Compares + X weapons and jewelry set.

Source
Set Source Simulated Parse Damage
Trial - Sanity's Edge
Interrupt 70.6k DPS
No Interrupt 64.2k DPS
Best -9.1%
Trial - Rockgrove
Soul 68.0k DPS
No Soul 61.7k DPS
-3.7% -12.5%
Trial - Dreadsail Reef
67.1k DPS
-4.9%
Trial - Lucent Citadel
66.2k DPS
-6.2%
Dungeon - Unhallowed Grave
64.3k DPS
-8.8%
Crafted
64.3k DPS
-8.8%
Crafted
3 Stacks 62.7k DPS
0 Stacks 60.2k DPS
-11.1% -14.6%
Overland - West Weald
62.4k DPS
-11.6%
Crafted
62.2k DPS
-11.8%
Dungeon - Frostvault
62.2k DPS
-11.8%
Dungeon - Falkreath Hold
61.7k DPS
-12.5%
Overland - Wrothgar
61.4k DPS
-13.0%
PvP - Cyrodiil
61.4k DPS
-13.0%
Crafted
60.6k DPS
-14.1%
Overland - Blackwood
60.4k DPS
-14.3%
Crafted
60.2k DPS
-14.7%
Overland - Deshaan
59.8k DPS
-15.2%

Front Bar Weapons

Daggers are the default weapon.

Front Bar Weapon Simulated Parse Damage vs Daggers
Dual Wield Daggers
67.1k DPS
Baseline
Lightning Staff
64.7k DPS
-3.5%
Greatsword
64.3k DPS
-4.1%
Bow
64.3k DPS
-4.1%
Inferno Staff
63.5k DPS
-5.4%
Ice Staff
62.2k DPS
-7.2%
Sword and Shield
61.8k DPS
-7.9%
Restoration Staff
60.4k DPS
-9.9%

Only the front bar weapon changes. Daggers use and . Every one-weapon option uses a weapon and keeps the same backbar Inferno Staff. Sword and Shield uses a sword plus a shield.

Situational Swaps

Alternative setups for different goals and content types

  • Use in fights where you can interrupt something at least once every 30 seconds.
  • Replace in fights with no adds. is the strongest fallback. Use if you don't have it

Additional Tips

  • You can change some (or all) of the enchants to ones for extremely hard hitting bosses
Advertisement

Champion Points

WarfareWarfare
8% Critical Damage and Healing
Next strongest CP damage-wise
205 Weapon and Spell Damage
Next strongest CP damage-wise
6% Direct Damage
Strong because Corpseburster and Venom Skull are a large part of the parse
6% Single Target Damage
Strong because Venom Skull is a large part of the parse
More Mitigation
Replace + with 2 mitigation CPs: , , , or (depending on the type of damage the Boss deals to you)
More Healing
is a decent option if you need more HPS
FitnessFitness
1400 Max Health
Survivability
1500 Stamina on kills
Sustain
90 Health, Magicka and Stamina Recovery
Sustain
1731 Armor
Survivability
Block Mitigation
Use in fights where you need to block a lot and can afford to be slower
Movement Speed
Use in fights where you have to move a lot
Sustain in fights with lots of adds
Use along with if you need more Magicka sustain in fights with lots of adds
Craft Craft
20% Movement Speed out of combat
Extremely useful utility
Quality of Life
Green Champion Points don't affect Combat, choose whatever Quality of Life you prefer

Race

For solo you need both damage and survivability, so every race brings something to the table. I use Nord because in difficult solo content the armor racial is worth the DPS trade-off. If you want to use a different race, the table shows comparison between their DPS.

Nord
Nord
The tankiest race. Nord is also what I use for soloing Veteran Hard Mode DLC Dungeons. provides around 5-7% damage mitigation depending on your current armor, making difficult content easier to survive without sacrificing much damage.
Rugged 2600 armor
Stalwart 1500 Max Stamina, 0.5 Ultimate per second
Resist Frost 1000 Max Health, 4620 Frost Resistance
Race Simulated Parse Damage vs Nord
Dark Elf
69.6k DPS
+3.8%
Khajiit
69.6k DPS
+3.8%
Orc
69.3k DPS
+3.3%
High Elf
68.9k DPS
+2.7%
Wood Elf
67.9k DPS
+1.2%
Redguard
67.4k DPS
+0.5%
Imperial
67.4k DPS
+0.5%
Nord Default
67.1k DPS
Baseline
Argonian
66.9k DPS
-0.3%
Breton
66.7k DPS
-0.6%

Mundus

The Thief
Default
1212 Critical Rating (1982 with 7 Divines)
When to use
Use most of the time. It increases your Critical Chance.
The Lady
Difficult Content
2744 Armor (4489 with 7 Divines)
When to use
Consider switching for extremely difficult dungeons. It increases your Armor.

Attributes

For most content you should put all 64 points into Stamina. For difficult content you should devote as many attribute points as necessary to Health - for some content you'll be able to get away with 32 Health 32 Stamina, for the extremely difficult stuff you'll need 64 Health.

Health
0
Stamina
64
Magicka
0
All points into Stamina. Use it for most content
Health
32
Stamina
32
Magicka
0
Split evenly between Health and Stamina. Use this whenever you start to struggle
Health
64
Stamina
0
Magicka
0
All points into Health. Use this for very difficult fights
Attributes Simulated Parse Damage Change
64 Stamina
67.1k DPS
Baseline
32 Health / 32 Stamina
65.9k DPS
-1.8%
64 Health
64.4k DPS
-4.0%

As you can see, the damage loss from changing attributes is minimal, but you gain up to 7808 Health, so change attributes whenever you struggle with some harder enemy.

Food

Orzorga's Smoked Bear Haunch
Default
Max Health Stamina Recovery Magicka Recovery
The default option. Our don't restore resources, so the food has to cover Stamina and Magicka Recovery. is a cheaper alternative.
Braised Rabbit with Spring Vegetables
Full Damage
Max Health Max Stamina
Full damage option. Trades the recoveries for Max Stamina and more Max Health, but you'll need or potions in order to sustain.
Setup Simulated Parse Damage Change
+
67.1k DPS
Baseline
+ or
69.0k DPS
+2.8%

Potions

Armor Potion
Default
Restore Health +5280 Armor

The default option. It gives you the armor while your food covers sustain. This is the potion shown as Essence of Health in CMX.

Tri-Stat Potion
Full Damage
Restore Health Restore Stamina Restore Magicka

Full damage option. The sustain from it lets you switch from to for more damage.

Heroism Potion
Full Damage
Restore Stamina Restore Magicka

Same idea as , but straight up better because it adds on top. More damage, just much more expensive to craft.

Parses

All parses are recorded on the 6 million Target Dummy.

Regular Setup
68,871 DPS
Regular Setup
68,871DPS
6mil Skeleton Dummy
Patch
U50 PTS Week 4
Armor
6 Medium / 1 Light
Gear Setup
Instanced (No Sul-Xan)
Skill Setup
Regular
Potion
Food
Mundus
Race
Nord
CMX Parse
Stamina Necromancer Solo CMX Parse - Regular Setup - ESO
CMX Setup
Stamina Necromancer Solo CMX Setup - Regular Setup - ESO
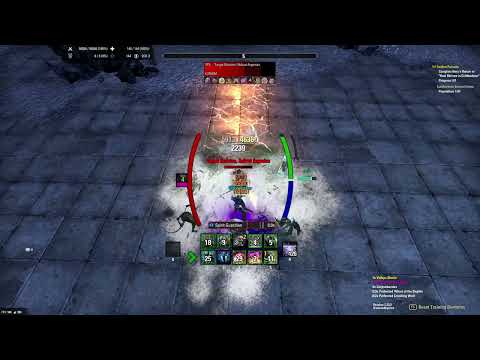
Recording
Parse recording

Gameplay

Dread Cellar
Dungeon
Scalecaller Peak
Dungeon
Dread Cellar
Dungeon Veteran
Scalecaller Peak
Dungeon Veteran Hard Mode

FAQ

Yes. This is a pure class setup, so it keeps Necromancer skill lines and uses Class Masteries instead of subclassing.

Yes. StamCro is a strong solo build, capable of soloing Veteran Dread Cellar.

The default setup uses , , , , and a Maelstrom inferno staff. In fights with no adds, replace with in Instanced content, or otherwise.

Dark Elf is currently the highest damage race in the sim. Nord is the best survivability race, and the parse on this page was done on Nord.

Yes, but the default setup is Dual Wield front bar and Inferno Staff back bar. Replacing the backbar is harder because is very strong for solo.

No, you don't need a different setup. Use the base skills and the Instanced gear setup from this guide for both Maelstrom Arena and Vateshran Hollows.


THANKS FOR READING

Patreon

If you've enjoyed this guide and want to support me, you can do so through Patreon. Your support will help me produce more guides.