

Heavy Attack Arcanist DPS Build - ESO Guide
This build focuses on amplifying Heavy Attacks with the Sergeant's Mail item set, Rakkhat's Voidmantle Mythic and the Empower buff sourced from the Might of the Guild passive, procced by constantly using Ulfsild's Contingency.
Works in normal and veteran dungeons, trials, hard modes, Dragonstar Arena, and Blackrose Prison.
Subclassing
Base Class
This build relies on Crux generation from the Class Mastery script on Ulfsild's Contingency so the base class has to be Arcanist.
Storm Calling Setup


This combination parsed up to 138.4k DPS and it's the easier to play setup
Ardent Flame Setup

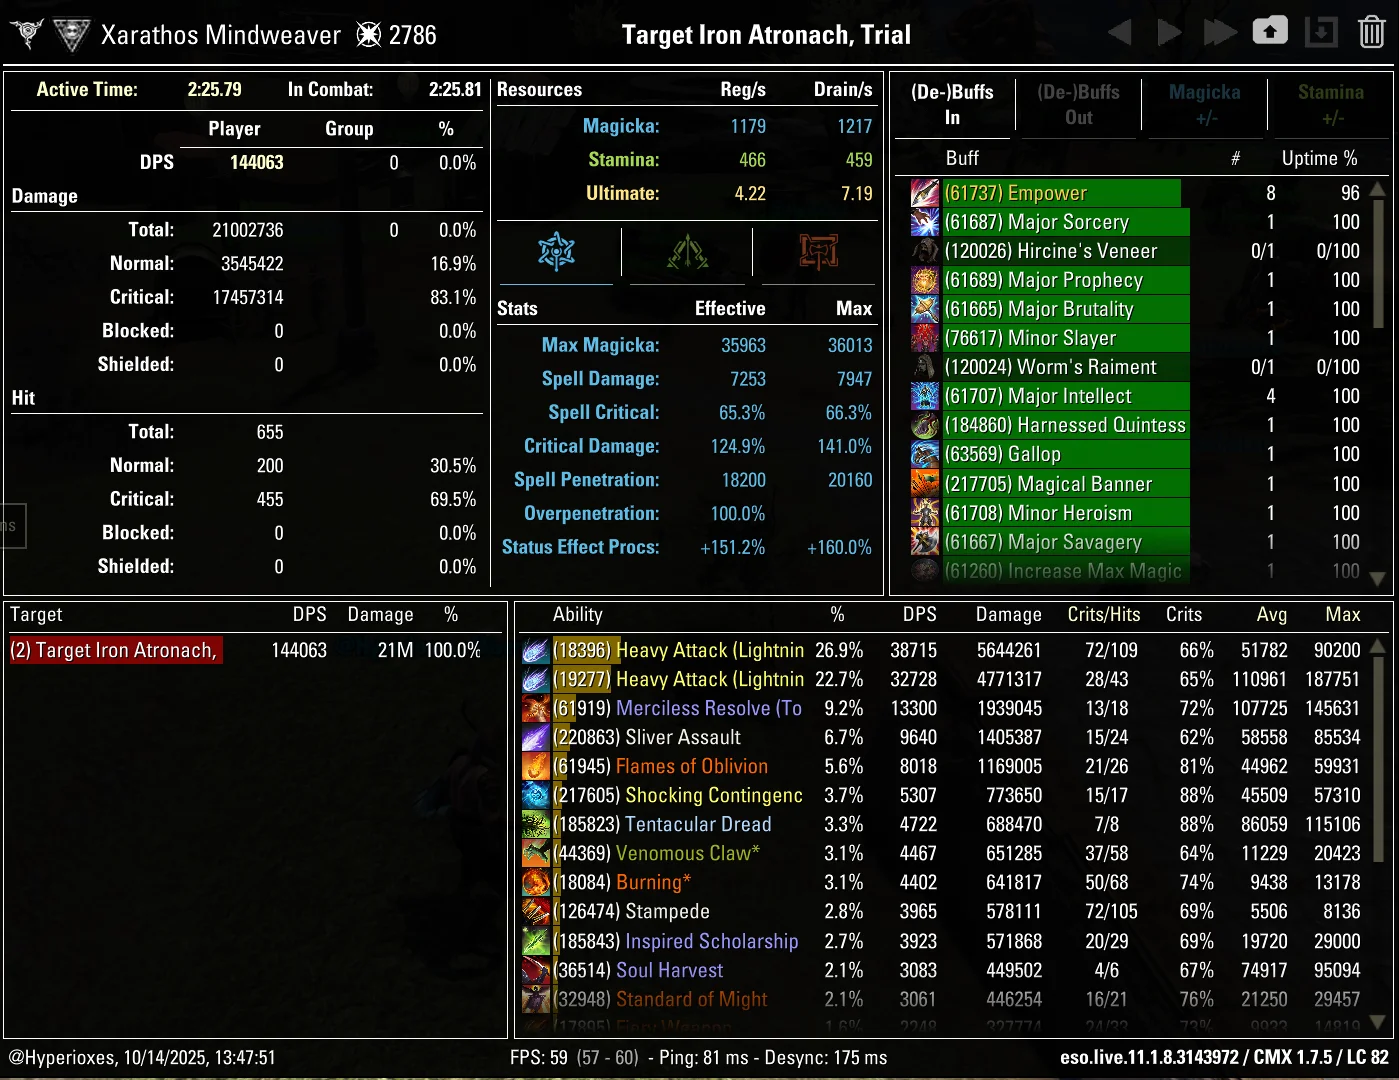
This combination parsed up to 144k DPS and it's the harder to play setup
Skill Setups
Base Setup
A base setup that will work for most situations and which should be your starting point when making situational setups
| Front Bar | Back Bar |
|---|---|
| Slot 1: Ulfsild's Contingency | Slot 1: Concealed Weapon |
| Slot 2: Camouflaged Hunter | Slot 2: Inspired Scholarship |
| Slot 3: Merciless Resolve | Slot 3: Hurricane |
| Slot 4: Tentacular Dread | Slot 4: Elemental Blockade |
| Slot 5: Banner Bearer | Slot 5: Banner Bearer |
| Ultimate: Soul Harvest | Ultimate: The Languid Eye |
- Ulfsild's Contingency ( Shock , Class Mastery , Force ) - your source of crucial Empower buff, which increases damage done by Heavy Attacks by 70%. Since Ulfsild's Contingency is a Mages Guild skill, it will trigger the Might of the Guild passive, which grants you Empower for 10 seconds. Thanks to the Class Mastery it will generate Crux which you'll need for Tentacular Dread. It also deals decent damage in an AoE and grants you Minor Force buff, increasing your Critical Damage by 10%. Ulfsild's Contingency is delayed until the next skill cast but whenever it's needed you can activate it early by bashing your enemy. If you cast this ability as you're finishing your Heavy Attack, the Empower you gain from it will start working just in time to boost the final tick of that Heavy Attack you just finished
- Camouflaged Hunter - this ability will passively grant you Minor Berserk, which means you won't have to rely on healers for it. It will also grant you 3% Weapon and Spell Damage from the Slayer passive
- Merciless Resolve - an ability that will cause your Light and Heavy Attacks to generate stacks. You can spend 5 stacks to fire a powerful arrow that also heals you if you're in Melee range. It also grants you Major Savagery and Prophecy
- Tentacular Dread - a Crux spender which increases enemies' damage taken from you by 11%
- Banner Bearer ( Magic , Cavalier's Charge , Courage ) - increases your Magical damage done by 6%, grants Weapon Damage based on your movement speed and grants Minor Courage, increasing your Weapon and Spell Damage by 215
- Soul Harvest - a cheap ultimate that increases target's damage taken from you by 20%. Having it slotted will also cause you to regain 10 Ultimate whenever you deal a final blow against an enemy
- Concealed Weapon - an ability which passively grants you Minor Expedition, which will increase your Weapon Damage thanks to the Cavalier's Charge script on your Banner Bearer. However you're also getting Minor Expedition from Hurricane, so Concealed Weapon is only useful for filling the gaps between Hurricane casts. It's extremely inconsequential, but you won't have enough time for another active ability, so this is the best thing you can slot. Because of that, this is also your flex slot where you should slot situational skills like for example Resolving Vigor, whenever you need them
- Inspired Scholarship - deals additional damage whenever we deal damage with a class skill, up to once every 3 seconds. This damage also generates Crux if we had none. It also passively provides Major Brutality and Sorcery
- Hurricane - an ability which deals ramping up damage around you over 20 seconds. In this setup it's your only class DoT so it's crucial for proccing Inspired Scholarship. It will also be your only source of Minor Expedition whenever you unslot Concealed Weapon, which is a buff you'll need for your Banner Bearer's Cavalier's Charge . Hurricane will also grant you Major Resolve, but normally it should be provided by the tank, so it's only a benefit if you're playing with a bad tank.
- Elemental Blockade - a ground DoT that will constantly re-apply your backbar weapon enchantment. It will also deal increased damage thanks to the Crushing Wall set and proc Off Balance if your supports aren't already doing it
- The Languid Eye - an ultimate which is worth using over Soul Harvest only when you're starting a fight with a lot of Ultimate stored up
- Whenever you need to slot situational skills, replace Concealed Weapon
- Resolving Vigor - a self-heal you'll need for some fights
- Stampede - an alternative for Elemental Blockade if you can rely on your Healers to keep up Lightning Elemental Blockade. Stampede allows you to trigger the Merciless Charge set which provides a decent DPS boost
- Proximity Detonation - extremely good ability for trash packs, you can pre-cast it as you're running into them
- Elemental Rage - the best ultimate for trash packs
- Banner Bearer ( Magic , Cavalier's Charge , Heroism ) - a Banner Bearer combination which replaces Courage with Heroism . It can be used if your supports are already providing Minor Courage, and it saves you money because the potions that provide Minor Heroism are expensive.
- Inner Light - alternative for Camouflaged Hunter. The 7% Max Magicka it provides is slightly stronger than the 3% Weapon and Spell Damage provided by Camouflaged Hunter so it's a better passive skill if your supports are already providing Minor Berserk
I don't use a static rotation so this is just a list of priorities. Simply recast abilities when they run out and follow this list of priorities when there are multiple things to refresh
If you're tracking the Off Balance debuff, you should cancel your Heavy Attack when there's around 1-2 seconds left on the Off Balance Immunity. This way the next Heavy Attack you start will finish its channel during Off Balance and you'll be able to fit 3 Heavy Attacks during a single Off Balance window
With this many active abilities, you can sometimes benefit from replacing fully charged Heavy Attacks with Medium Attacks (hold Left Mouse Button until first damage tick) whenever there are multiple abilities you need to refresh. You can still maintain all abilities while using only fully charged Heavy Attacks, you'll just have a bit more downtime on them.
The best way to weave backbar abilities into your rotation is by swapping to backbar right after your Heavy Attack finished, casting the ability and then immediately going back to frontbar to start channeling the next Heavy Attack. This is however impossible with high ping
Storm Calling setup
Priority List
- Use Ulfsild's Contingency if your Empower is out or if it's going to run out by the end of the Heavy Attack you're channeling
- Use The Languid Eye if you're starting a fight with a lot of Ultimate stored up
- Use Soul Harvest if it's ready. Ideally right before Off Balance starts, but if it becomes ready just as Off Balance ends it isn't worth waiting for the next one.
- Use Tentacular Dread if you're at 3 Crux and the Tentacular Dread debuff is close to running out or has already ran out
- Use Merciless Resolve if you have at least 5 stacks and Soul Harvest is active. Outside of Soul Harvest you should still cast it when it's at or above 8 stacks, to avoid wasting stacks
- Use Elemental Blockade
- Use Inspired Scholarship
- Use Hurricane
- Use Ulfsild's Contingency as a filler
Pre-buff
These abilities can be pre-cast before entering combat
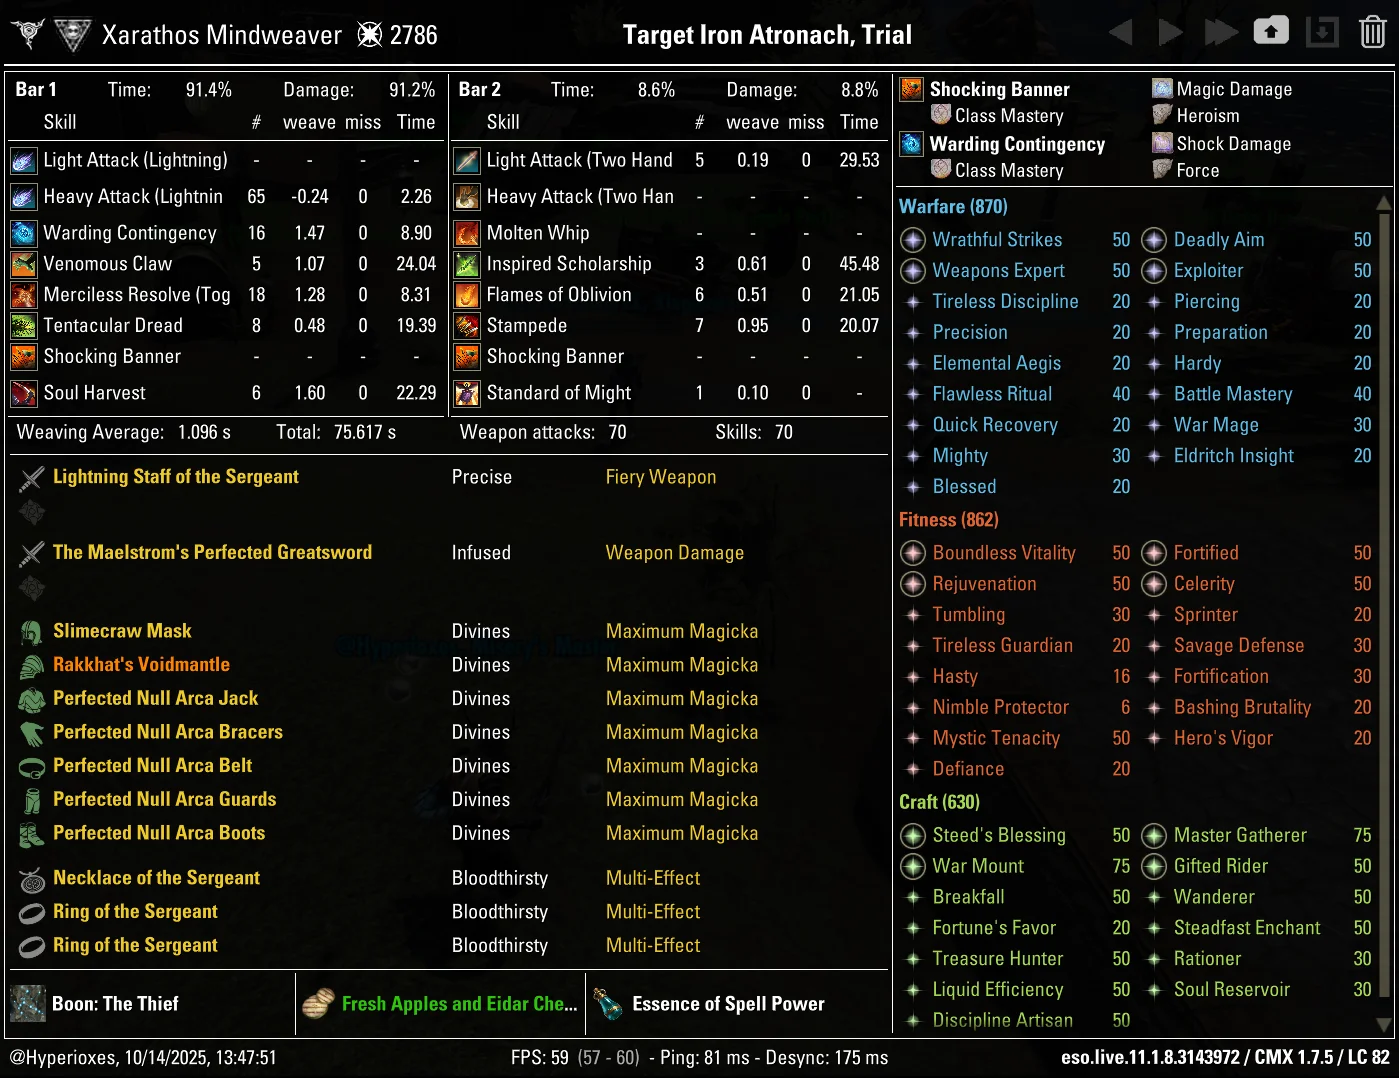
Ardent Flame setup
With this many active abilities you have to sometimes weave Medium Attacks (hold Left Mouse Button until first damage tick)
Priority List
- Use Ulfsild's Contingency if your Empower is out or if it's going to run out by the end of the Heavy Attack you're channeling
- Use Standard of Might if you're starting a fight with a lot of Ultimate stored up
- Use Flames of Oblivion if Molten Whip stacks are about to expire
- Use Soul Harvest if it's ready. Ideally right before Off Balance starts, but if it becomes ready just as Off Balance ends it isn't worth waiting for the next one.
- Use Tentacular Dread if you're at 3 Crux and the Tentacular Dread debuff is close to running out or has already ran out
- Use Merciless Resolve if you have at least 5 stacks and Soul Harvest is active. Outside of Soul Harvest you should still cast it when it's at or above 8 stacks, to avoid wasting stacks
- Use Elemental Blockade
- Use Venomous Claw
- Use Inspired Scholarship
- Use Flames of Oblivion
- Use Ulfsild's Contingency as a filler
Pre-buff
These abilities can be pre-cast before entering combat
Final Setups
A few examples of final setups you could end up with after applying the situational skills to the base setup
Example of a setup you can use for trash packs
| Front Bar | Back Bar |
|---|---|
| Slot 1: Ulfsild's Contingency | Slot 1: Proximity Detonation |
| Slot 2: Camouflaged Hunter | Slot 2: Inspired Scholarship |
| Slot 3: Merciless Resolve | Slot 3: Hurricane |
| Slot 4: Tentacular Dread | Slot 4: Elemental Blockade |
| Slot 5: Banner Bearer | Slot 5: Banner Bearer |
| Ultimate: Soul Harvest | Ultimate: Elemental Rage |
What Changes
Changes compared to the Base Setup
- Proximity Detonation replaces Concealed Weapon
- Elemental Rage replaces The Languid Eye
Example of a setup you can use for trash packs when using the Ardent Flame skill line
| Front Bar | Back Bar |
|---|---|
| Slot 1: Ulfsild's Contingency | Slot 1: Proximity Detonation |
| Slot 2: Inspired Scholarship | Slot 2: Flames of Oblivion |
| Slot 3: Merciless Resolve | Slot 3: Molten Whip |
| Slot 4: Tentacular Dread | Slot 4: Elemental Blockade |
| Slot 5: Banner Bearer | Slot 5: Banner Bearer |
| Ultimate: Soul Harvest | Ultimate: Elemental Rage |
What Changes
Changes compared to the Regular Ardent Flame setup
- Proximity Detonation replaces Venomous Claw
- Elemental Rage replaces Standard of Might
Example of a setup you can use when using the Ardent Flame skill line
| Front Bar | Back Bar |
|---|---|
| Slot 1: Ulfsild's Contingency | Slot 1: Venomous Claw |
| Slot 2: Inspired Scholarship | Slot 2: Flames of Oblivion |
| Slot 3: Merciless Resolve | Slot 3: Molten Whip |
| Slot 4: Tentacular Dread | Slot 4: Elemental Blockade |
| Slot 5: Banner Bearer | Slot 5: Banner Bearer |
| Ultimate: Soul Harvest | Ultimate: Standard of Might |
What Changes
Changes compared to the Base Setup
- Flames of Oblivion replaces Camouflaged Hunter and swaps places with Inspired Scholarship
- Venomous Claw replaces Concealed Weapon
- Molten Whip replaces Hurricane
- Standard of Might replaces The Languid Eye
- Ulfsild's Contingency replaces the Shock script with Flame
- Banner Bearer replaces the Cavalier's Charge script with Class Mastery
Additional Tips
- Inspired Scholarship can swap places with Venomous Claw if you have enough penetration. This way Venomous Claw will snapshot its DoT while you're on a bar with more stats. You'll rarely have enough penetration for that in actual content, but it can be done on the parse dummy
Passives
There are no passives you need to skip with this build
 Class
Class
 Weapon
 Armor
Armor
 Guild
Guild
 Alliance War
 Racial
 Craft
Craft
Class - Herald of the Tome
![]() Fated Fortune - High Priority
Fated Fortune - High Priority
![]() Harnessed Quintessence - High Priority
Harnessed Quintessence - High Priority
![]() Psychic Lesion - High Priority
Psychic Lesion - High Priority
![]() Splintered Secrets - High Priority
Splintered Secrets - High Priority
Class - Storm Calling
![]() Capacitor - Low Priority
Capacitor - Low Priority
![]() Energized - High Priority
Energized - High Priority
![]() Amplitude - High Priority
Amplitude - High Priority
![]() Expert Mage - High Priority
Expert Mage - High Priority
Class - Assassination
![]() Master Assassin - High Priority
Master Assassin - High Priority
![]() Executioner - High Priority
Executioner - High Priority
![]() Pressure Points - High Priority
Pressure Points - High Priority
![]() Hemorrhage - High Priority
Hemorrhage - High Priority
Weapon - Destruction Staff
![]() Tri Focus - High Priority
Tri Focus - High Priority
![]() Penetrating Magic - High Priority
Penetrating Magic - High Priority
![]() Elemental Force - Medium Priority
Elemental Force - Medium Priority
![]() Ancient Knowledge - High Priority
Ancient Knowledge - High Priority
![]() Destruction Expert - Low Priority
Destruction Expert - Low Priority
Weapon - Two Handed
![]() Forceful - Low Priority
Forceful - Low Priority
![]() Heavy Weapons - High Priority
Heavy Weapons - High Priority
![]() Balanced Blade - Low Priority
Balanced Blade - Low Priority
![]() Follow Up - Low Priority
Follow Up - Low Priority
![]() Battle Rush - Low Priority
Battle Rush - Low Priority
Armor - Light Armor
![]() Grace - Low Priority
Grace - Low Priority
![]() Evocation - Low Priority
Evocation - Low Priority
![]() Spell Warding - Low Priority
Spell Warding - Low Priority
![]() Prodigy - High Priority
Prodigy - High Priority
![]() Concentration - High Priority
Concentration - High Priority
Armor - Medium Armor
![]() Dexterity - High Priority
Dexterity - High Priority
![]() Wind Walker - Low Priority
Wind Walker - Low Priority
![]() Improved Sneak - Not needed
Improved Sneak - Not needed
![]() Agility - High Priority
Agility - High Priority
![]() Athletics - Low Priority
Athletics - Low Priority
Guild - Mages Guild
![]() Persuasive Will - Not needed
Persuasive Will - Not needed
![]() Mage Adept - Low Priority
Mage Adept - Low Priority
![]() Everlasting Magic - Low Priority
Everlasting Magic - Low Priority
![]() Magicka Controller - High Priority
Magicka Controller - High Priority
![]() Might of the Guild - High Priority
Might of the Guild - High Priority
Guild - Fighters Guild
![]() Intimidating Presence - Not needed
Intimidating Presence - Not needed
![]() Slayer - High Priority
Slayer - High Priority
![]() Banish the Wicked - Medium Priority
Banish the Wicked - Medium Priority
![]() Skilled Tracker - Not needed
Skilled Tracker - Not needed
![]() Bounty Hunter - Not needed
Bounty Hunter - Not needed
Alliance War - Support
![]() Magicka Aid - Low Priority
Magicka Aid - Low Priority
![]() Combat Medic - Not needed
Combat Medic - Not needed
![]() Battle Resurrection - Not needed
Battle Resurrection - Not needed
Race - Your race
Get all of your racials, no matter which race you are
Craft - Alchemy
![]() Solvent Proficiency - Not needed
Solvent Proficiency - Not needed
![]() Keen Eye: Reagents - Not needed
Keen Eye: Reagents - Not needed
![]() Medicinal Use - High Priority
Medicinal Use - High Priority
![]() Chemistry - Not needed
Chemistry - Not needed
![]() Laboratory Use - Not needed
Laboratory Use - Not needed
![]() Snakeblood - Not needed
Snakeblood - Not needed
Gear
Base Setup
A base setup that will work for most situations and which should be your starting point when making situational setups
Switching gear for trash packs isn't worth it unless you're using gear-swap addons
Default setup
| Gear Slot | Set | Weight/Type | Trait | Enchantment |
|---|---|---|---|---|
 Head Head |
Slimecraw | Medium | Divines | Magicka |
 Shoulders Shoulders |
Rakkhat's Voidmantle | Medium | Divines | Magicka |
 Chest Chest |
Infallible Mage | Light | Divines | Magicka |
 Hands Hands |
Infallible Mage | Light | Divines | Magicka |
 Belt Belt |
Infallible Mage | Light | Divines | Magicka |
 Legs Legs |
Infallible Mage | Light | Divines | Magicka |
 Boots Boots |
Infallible Mage | Light | Divines | Magicka |
 Necklace Necklace |
Sergeant's Mail | Jewelry | Bloodthirsty | Increase Magical Harm |
 Ring Ring |
Sergeant's Mail | Jewelry | Bloodthirsty | Increase Magical Harm |
| Ring |
Sergeant's Mail | Jewelry | Bloodthirsty | Increase Magical Harm |
 Frontbar Main Hand Frontbar Main Hand |
Sergeant's Mail | Lightning Staff | Precise | Shock |
| Backbar Main Hand |
Crushing Wall | Lightning Staff | Infused | Weapon Damage |
When choosing different situational sets you can only replace Infallible Mage. Sergeant's Mail and Rakkhat's Voidmantle are too strong and too crucial for this build to ever be replaced. If you want to use a Medium Armor set, you have to make sure your group is providing enough penetration
Infallible Mage parses 131.6k DPS which is only 6.8k lower than the top setup which is Slivers of Null Arca, but Slivers of Null Arca is focused on Single Target damage and it's a Medium set so when using it, you have to make sure your supports are providing you with enough penetration. Because of that, Infallible Mage is the most practical set.
Gear that can be stronger than the setup from the table in specific situations or when specific circumstances are present
- Sul-Xan's Torment - the best set for trash packs and for bosses that regularly spawn smaller adds
- Slivers of Null Arca - the best set for Single Target damage
- Merciless Charge - replacement for Crushing Wall when your Healers are providing Off Balance
Gear that is easier to obtain and can be used while you work towards the best gear
Crafted:
All of these are tradable and can be bought from other players
Dungeons:
PvP:
All of these are tradable and can be bought from other players
Final Setups
A few examples of final setups you could end up with after applying situational rules to the base setup
This is the crafted gear setup you can start with
| Gear Slot | Set | Weight/Type | Trait | Enchantment |
|---|---|---|---|---|
| Head |
Tharriker's Strike | Light | Divines | Magicka |
| Shoulders |
Tharriker's Strike | Light | Divines | Magicka |
| Chest |
Order's Wrath | Medium | Divines | Magicka |
| Hands |
Order's Wrath | Light | Divines | Magicka |
| Belt |
Order's Wrath | Light | Divines | Magicka |
| Legs |
Order's Wrath | Medium | Divines | Magicka |
| Boots |
Order's Wrath | Light | Divines | Magicka |
| Necklace |
Tharriker's Strike | Jewelry | Bloodthirsty | Increase Magical Harm |
| Ring |
Tharriker's Strike | Jewelry | Bloodthirsty | Increase Magical Harm |
| Ring |
Tharriker's Strike | Jewelry | Bloodthirsty | Increase Magical Harm |
| Frontbar Main Hand |
Assassins's Guile | Lightning Staff | Precise | Shock |
| Backbar Main Hand |
Assassins's Guile | Lightning Staff | Infused | Weapon Damage |
The crafted setup parses 88.4k DPS, although a huge majority of this DPS loss stems from lack of Sergeant's Mail
This is a setup you should use if you don't have access to any Trial gear
| Gear Slot | Set | Weight/Type | Trait | Enchantment |
|---|---|---|---|---|
| Head |
Slimecraw | Medium | Divines | Magicka |
| Shoulders |
Rakkhat's Voidmantle | Medium | Divines | Magicka |
| Chest |
Noble Duelist's Silks | Light | Divines | Magicka |
| Hands |
Noble Duelist's Silks | Light | Divines | Magicka |
| Belt |
Noble Duelist's Silks | Light | Divines | Magicka |
| Legs |
Noble Duelist's Silks | Light | Divines | Magicka |
| Boots |
Noble Duelist's Silks | Light | Divines | Magicka |
| Necklace |
Sergeant's Mail | Jewelry | Bloodthirsty | Increase Magical Harm |
| Ring |
Sergeant's Mail | Jewelry | Bloodthirsty | Increase Magical Harm |
| Ring |
Sergeant's Mail | Jewelry | Bloodthirsty | Increase Magical Harm |
| Frontbar Main Hand |
Sergeant's Mail | Lightning Staff | Precise | Shock |
| Backbar Main Hand |
Crushing Wall | Lightning Staff | Infused | Weapon Damage |
This setup parses 125.4k DPS
Additional Info
- Noble Duelist replaces Infallible Mage
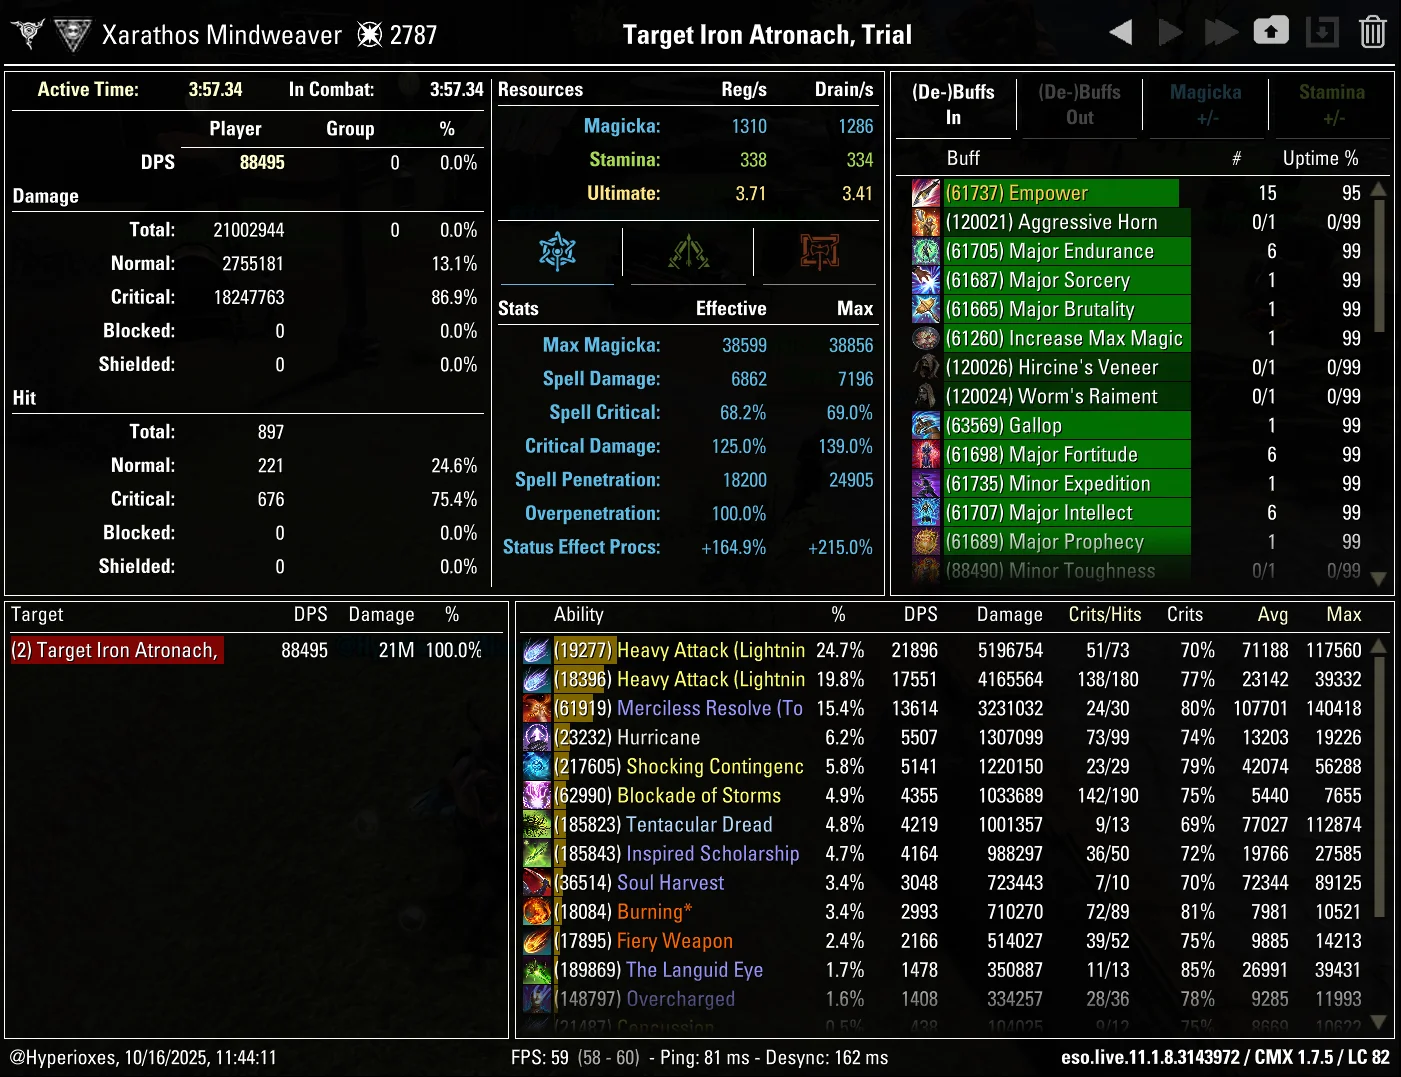
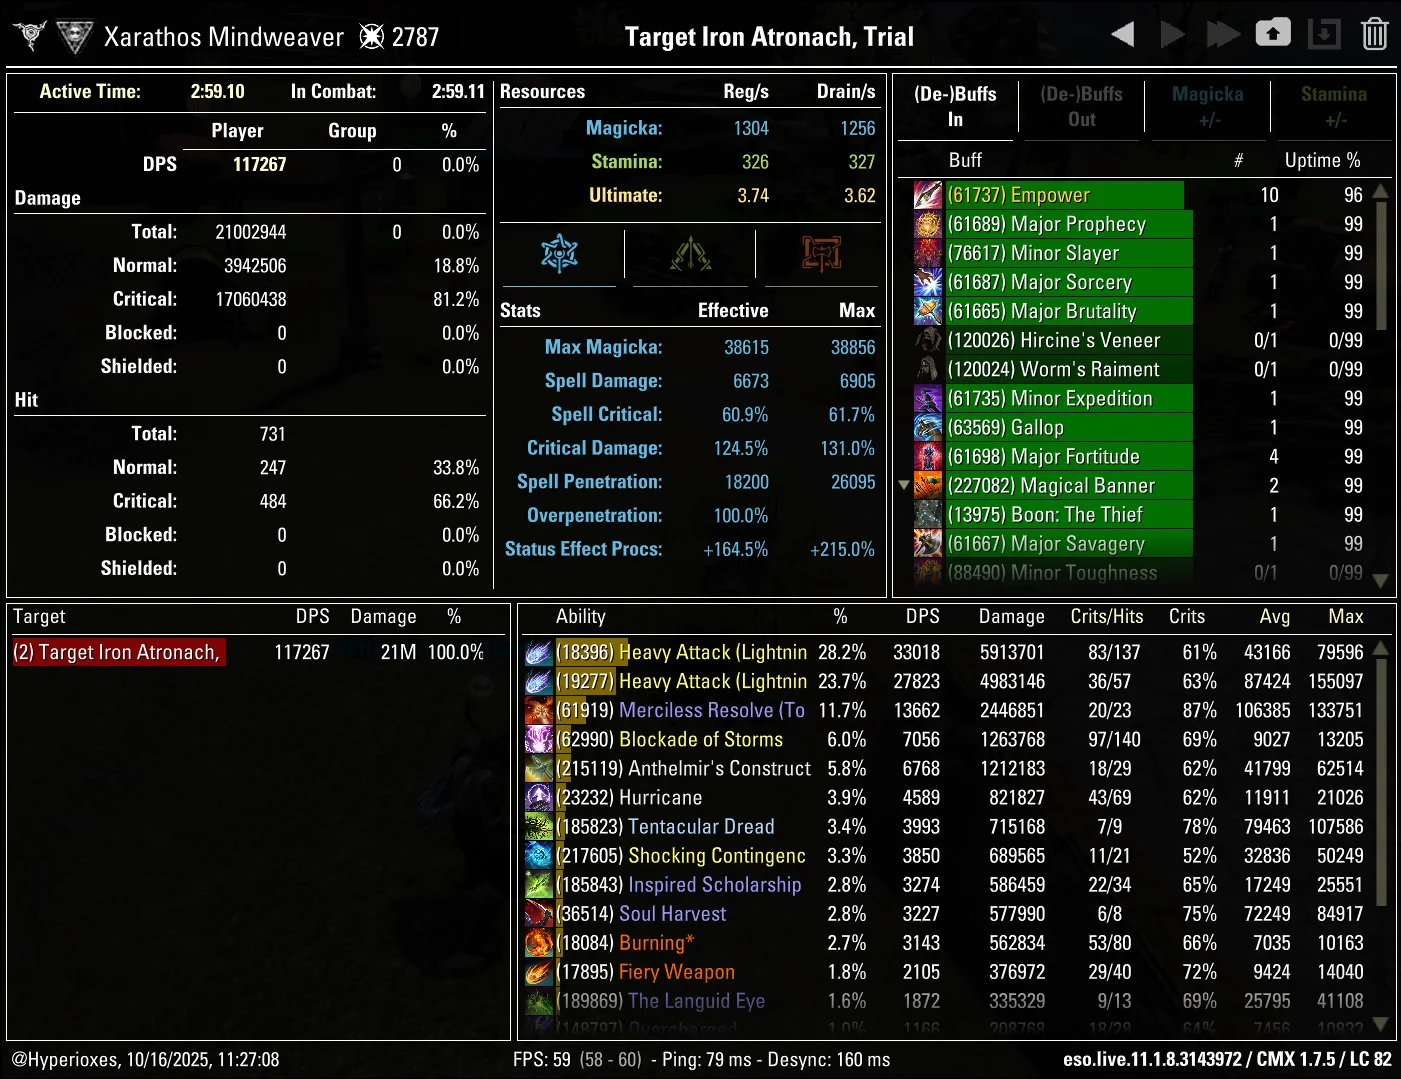
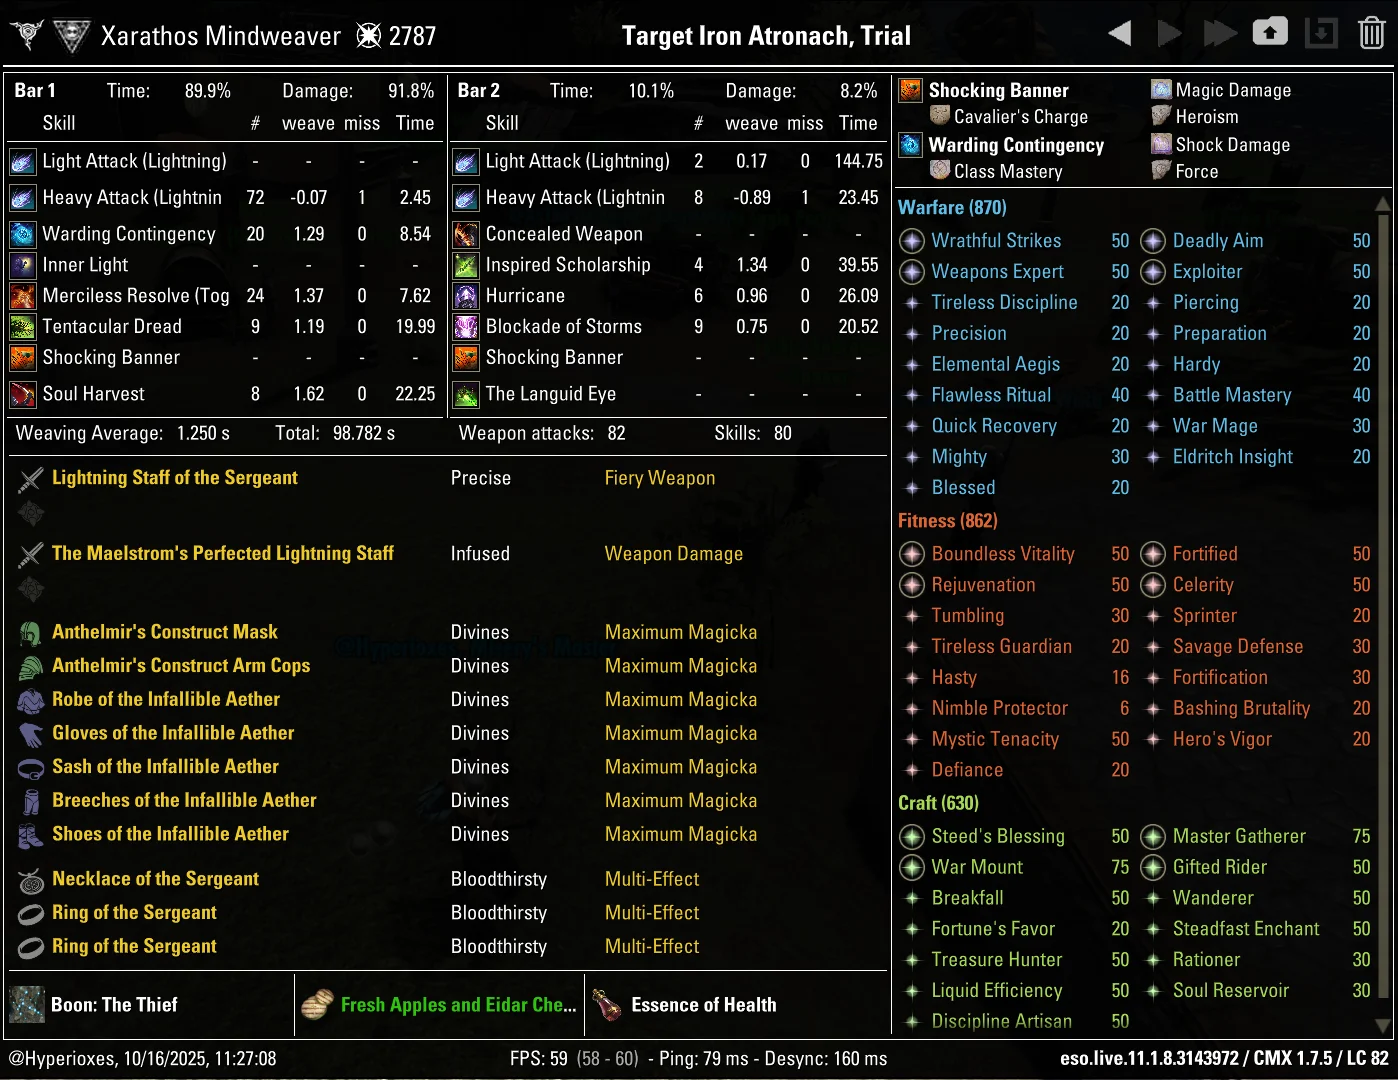
This is a setup you should use if you don't have access to Rakkhat's Voidmantle Mythic
| Gear Slot | Set | Weight/Type | Trait | Enchantment |
|---|---|---|---|---|
| Head |
Anthelmir's Construct | Medium | Divines | Magicka |
| Shoulders |
Anthelmir's Construct | Medium | Divines | Magicka |
| Chest |
Infallible Mage | Light | Divines | Magicka |
| Hands |
Infallible Mage | Light | Divines | Magicka |
| Belt |
Infallible Mage | Light | Divines | Magicka |
| Legs |
Infallible Mage | Light | Divines | Magicka |
| Boots |
Infallible Mage | Light | Divines | Magicka |
| Necklace |
Sergeant's Mail | Jewelry | Bloodthirsty | Increase Magical Harm |
| Ring |
Sergeant's Mail | Jewelry | Bloodthirsty | Increase Magical Harm |
| Ring |
Sergeant's Mail | Jewelry | Bloodthirsty | Increase Magical Harm |
| Frontbar Main Hand |
Sergeant's Mail | Lightning Staff | Precise | Shock |
| Backbar Main Hand |
Crushing Wall | Lightning Staff | Infused | Weapon Damage |
This setup parses 117.2k DPS
Additional Info
- Anthelmir's Construct replaces Rakkhat's Voidmantle and Slimecraw
The best setup for Single Target damage
| Gear Slot | Set | Weight/Type | Trait | Enchantment |
|---|---|---|---|---|
| Head |
Slimecraw | Light | Divines | Magicka |
| Shoulders |
Rakkhat's Voidmantle | Medium | Divines | Magicka |
| Chest |
Slivers of Null Arca | Medium | Divines | Magicka |
| Hands |
Slivers of Null Arca | Medium | Divines | Magicka |
| Belt |
Slivers of Null Arca | Medium | Divines | Magicka |
| Legs |
Slivers of Null Arca | Medium | Divines | Magicka |
| Boots |
Slivers of Null Arca | Medium | Divines | Magicka |
| Necklace |
Sergeant's Mail | Jewelry | Bloodthirsty | Increase Magical Harm |
| Ring |
Sergeant's Mail | Jewelry | Bloodthirsty | Increase Magical Harm |
| Ring |
Sergeant's Mail | Jewelry | Bloodthirsty | Increase Magical Harm |
| Frontbar Main Hand |
Sergeant's Mail | Lightning Staff | Precise | Shock |
| Backbar Main Hand |
Crushing Wall | Lightning Staff | Infused | Weapon Damage |
This setup parsed 138.4k. Keep in mind you have to make sure your supports are providing enough penetration if you want to use this setup, because Slivers of Null Arca is a Medium Armor set.
Additional Info
- Slivers of Null Arca replaces Infallible Mage
Champion Points
Race
The difference between best and worst race is about 5% of DPS and there is no content in the entire game that you'd be blocked from completing because of choosing a bad race.


Other decent options


Mundus
-
 Default
The Thief
5.53% Critical Chance(9.04% with 7 Divines)Use in all content -
 Situational
The Lover
2744 Penetration(4489 with 7 Divines)An option if you're using Medium Armor and your group isn't providing enough penetration, but a Light Armor set with The Thief Mundus is always going to be stronger
Attributes
You should always put all 64 attribute points into Magicka.
Food
-
 Default
Artaeum Pickled Fish Bowl
Max Health +5,414 Max Magicka +4,938Use it for most of regular content.Cheaper alternative Solitude Salmon-Millet SoupDifference Max Health +5,395 −19 Max Magicka +4,936 −2 -
 Full Damage
Tomato Garlic Chutney
Max Magicka +6,048Max Magicka only. Use for parsing or content where you can get away without Max Health. Tomato Garlic Chutney , Firsthold Fruit and Cheese Plate , and Thrice-Baked Gorapple Pie all give the same buff.
Potions
-
Default
Tri-Stat Potion
Restore Health Restore Stamina Restore MagickaMost of the time you should use Tri-Stat potions. They'll greatly improve your sustain. -
Full Damage
Heroism Potion
Restore Magicka Restore Stamina Minor HeroismHeroism potions can provide a 100% uptime on Minor Heroism buff which generates Ultimate, but they're expensive.
Parses
All parses are recorded on the 21 million Target Dummy
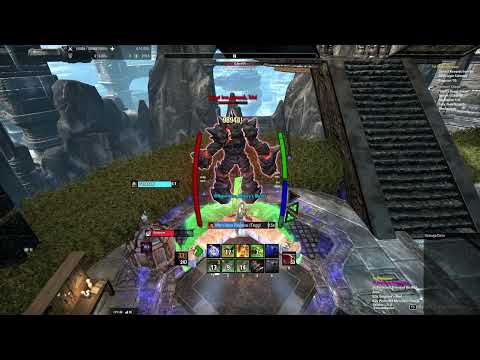


Gameplay
Logs of Veteran Trials and Dungeons I've finished using this build
THANKS FOR READING

If you've enjoyed this guide and want to support me, you can do so through Patreon. Your support will help me produce more guides.