


Bow DPS Build - ESO Guide
Bow DPS build focused purely on group PvE content. This setup takes the most optimal options available while fully committing to using Bows on both bars. It's made for Dungeons and Trials, working well in both organized and unorganized groups.
Works in normal and veteran dungeons, trials, hard modes, Dragonstar Arena, and Blackrose Prison.
Theme
In this build, I'm making 2 suboptimal choices for the sake of Theme
- using Bows on both bars. For example Dual Wield with a Greatsword on backbar would be stronger
- using a Bow spammable - Lethal Arrow. For example a class spammable like Escalating Runeblades would be stronger
From that point, the build always chooses the strongest option
Subclassing
Combination


Base Class
This build can use either Dragonknight, Nightblade or Templar as your base class.
Skill Setups
Base Setup
A base setup that will work for most situations and which should be your starting point when making situational setups
| Front Bar | Back Bar |
|---|---|
| Slot 1: Lethal Arrow | Slot 1: Flames of Oblivion |
| Slot 2: Blazing Spear | Slot 2: Poison Injection |
| Slot 3: Merciless Resolve | Slot 3: Molten Whip |
| Slot 4: Killer's Blade | Slot 4: Endless Hail |
| Slot 5: Acid Spray | Slot 5: Venomous Claw |
| Ultimate: Incapacitating Strike | Ultimate: Standard of Might |
- Lethal Arrow - a spammable which always applies the Poisoned status effect
- Blazing Spear - a 10 second ground DoT which also deals decent AoE direct damage at the start. Having it slotted is necessary to trigger passives of the Aedric Spear skill line
- Merciless Resolve - an ability that will cause your Light and Heavy Attacks to generate stacks. You can spend 5 stacks to fire a powerful arrow that also heals you if you're in Melee range. It also grants you Major Savagery and Prophecy
- Killer’s Blade - an execute which becomes stronger than Lethal Arrow at 30% HP. At 14% HP it also becomes stronger than Merciless Resolve
- Acid Spray - an ability which deals decent damage in a conal AoE and then applies a 6 second DoT to all hit enemies. This is your spammable for when you need to do AoE damage
- Incapacitating Strike - a cheap ultimate which increases your target's damage taken from you by 20% for 8 seconds. If used with 120 or more Ultimate, it lasts 12 seconds instead. You should use it when you know you won't be able to get enough Ultimate for another Standard of Might or when the enemy is on the move so they wouldn't stand inside your Standard of Might
- Flames of Oblivion - an ability that deals lots of damage per cast and passively grants you Major Savagery and Prophecy buffs, which increase your Critical Chance by 12%. It will also trigger the Weapon and Spell Damage buff from Molten Whip
- Poison Injection - a 20 second DoT which deals increased damage to low health targets. It also increases your damage done to its target if you're wearing the Caustic Arrow set, which is something you want to switch to for Single Target fights
- Molten Whip - having this ability slotted will grant you up to 300 Weapon and Spell Damage after using other Ardent Flame skills (in this skill setup it's going to be Venomous Claw, Flames of Oblivion, and Standard of Might). Keeping this buff up is important so re-cast Flames of Oblivion early if the Molten Whip buff is about to expire
- Endless Hail - a 13 second ground DoT with a 2 second delay which will proc your backbar weapon enchant and will deal increased damage thanks to the Thunderous Volley set
- Venomous Claw - a strong DoT that is also guaranteed to proc the Poisoned status effect. It will also trigger the Weapon and Spell Damage buff from Molten Whip
- Standard of Might - an extremely strong ultimate that will deal AoE damage, increase all of your damage done and decrease your damage taken. Stack up your DoTs before using it
Choosing which skill to replace depends on the type of the fight. Acid Spray is weak in Single Target fights while Poison Injection and Venomous Claw are bad in AoE fights
- Barbed Trap - a strong 20 second Single Target DoT which also provides Minor Force and grants 3% Weapon and Spell Damage through the Slayer passive. You have to use it whenever you replace Velothi Ur-Mage's Amulet
- Resolving Vigor - a self-heal you'll need for some fights
- Proximity Detonation - extremely good ability for trash packs, you can pre-cast it as you're running into them
- Anti-Cavalry Caltrops - a decent AoE DoT which can replace one of your Single Target DoTs in AoE fights
- Shooting Star - an ultimate that deals damage in an AoE, leaves a ground DoT and grants you Ultimate for each enemy hit with the initial blast, up to 6 enemies. It's a good replacement for Standard of Might for trash packs, where you wouldn't be able to make use of Standard of Might's entire duration
- Venom Arrow - the other morph of Poison Injection which deals less damage but grants you Major Brutality and Sorcery. Getting these buffs from a skill allows you to use Heroism potions instead of Weapon Power potions, which ends up being stronger, but is very costly to sustain because Heroism potions are expensive
Priority List
This is just a list of priorities. Simply recast abilities when they run out and follow this list of priorities when there are multiple things to refresh.
- Use Flames of Oblivion if Molten Whip's buff is about to run out
- Use Endless Hail
- Use Venomous Claw
- Use Blazing Spear
- Use Poison Injection
- Use Flames of Oblivion
- Use Acid Spray
- Use Incapacitating Strike if you won't be able to get another Standard or if the fight is mobile
- Use Standard of Might
- Use Merciless Resolve if it's ready (skip below 14% HP)
- Use Lethal Arrow (skip below 30% HP)
- Use Killer’s Blade
Pre-buff
These abilities can be pre-cast before entering combat
- Flames of Oblivion
- Endless Hail - it has a 2 second delay, so it can be pre-placed if your tank is counting down before pulling
Final Setups
A few examples of final setups you could end up with after applying the situational skills to the base setup
A setup for trash packs
| Front Bar | Back Bar |
|---|---|
| Slot 1: Lethal Arrow | Slot 1: Flames of Oblivion |
| Slot 2: Blazing Spear | Slot 2: Proximity Detonation |
| Slot 3: Merciless Resolve | Slot 3: Molten Whip |
| Slot 4: Killer's Blade | Slot 4: Endless Hail |
| Slot 5: Acid Spray | Slot 5: Anti-Cavalry Caltrops |
| Ultimate: Incapacitating Strike | Ultimate: Shooting Star |
What Changes
Changes compared to the Base Setup
- Proximity Detonation replaces Poison Injection
- Anti-Cavalry Caltrops replaces Venomous Claw
- Shooting Star replaces Standard of Might
A setup you should use for Single Target fights
| Front Bar | Back Bar |
|---|---|
| Slot 1: Lethal Arrow | Slot 1: Flames of Oblivion |
| Slot 2: Blazing Spear | Slot 2: Poison Injection |
| Slot 3: Merciless Resolve | Slot 3: Molten Whip |
| Slot 4: Killer's Blade | Slot 4: Endless Hail |
| Slot 5: Barbed Trap | Slot 5: Venomous Claw |
| Ultimate: Incapacitating Strike | Ultimate: Standard of Might |
What Changes
Changes compared to the Base Setup
- Barbed Trap replaces Acid Spray
Passives
There are no passives you need to skip with this build.
 Class
Class
 Weapon
 Armor
Armor
 Guild
Guild
 Racial
 Craft
Craft
Class - Ardent Flame
![]() Combustion - High Priority
Combustion - High Priority
![]() Warmth - High Priority
Warmth - High Priority
![]() Searing Heat - High Priority
Searing Heat - High Priority
![]() World in Ruin - High Priority
World in Ruin - High Priority
Class - Assassination
![]() Master Assassin - High Priority
Master Assassin - High Priority
![]() Executioner - High Priority
Executioner - High Priority
![]() Pressure Points - High Priority
Pressure Points - High Priority
![]() Hemorrhage - High Priority
Hemorrhage - High Priority
Class - Aedric Spear
![]() Piercing Spear - High Priority
Piercing Spear - High Priority
![]() Spear Wall - High Priority
Spear Wall - High Priority
![]() Burning Light - High Priority
Burning Light - High Priority
![]() Balanced Warrior - High Priority
Balanced Warrior - High Priority
Weapon - Bow
![]() Vinedusk Training - High Priority
Vinedusk Training - High Priority
![]() Accuracy - High Priority
Accuracy - High Priority
![]() Ranged - High Priority
Ranged - High Priority
![]() Hawk Eye - High Priority
Hawk Eye - High Priority
![]() Hasty Retreat - Low Priority
Hasty Retreat - Low Priority
Armor - Light Armor
![]() Grace - Low Priority
Grace - Low Priority
![]() Evocation - Low Priority
Evocation - Low Priority
![]() Spell Warding - Low Priority
Spell Warding - Low Priority
![]() Prodigy - High Priority
Prodigy - High Priority
![]() Concentration - High Priority
Concentration - High Priority
Armor - Medium Armor
![]() Dexterity - High Priority
Dexterity - High Priority
![]() Wind Walker - Low Priority
Wind Walker - Low Priority
![]() Improved Sneak - Not needed
Improved Sneak - Not needed
![]() Agility - High Priority
Agility - High Priority
![]() Athletics - Low Priority
Athletics - Low Priority
Guild - Fighters Guild
![]() Intimidating Presence - Low Priority
Intimidating Presence - Low Priority
![]() Slayer - High Priority
Slayer - High Priority
![]() Banish the Wicked - Medium Priority
Banish the Wicked - Medium Priority
![]() Skilled Tracker - High Priority
Skilled Tracker - High Priority
![]() Bounty Hunter - Not needed
Bounty Hunter - Not needed
Guild - Mages Guild
![]() Persuasive Will - Not needed
Persuasive Will - Not needed
![]() Mage Adept - Not needed
Mage Adept - Not needed
![]() Everlasting Magic - High Priority
Everlasting Magic - High Priority
![]() Magicka Controller - Not needed
Magicka Controller - Not needed
![]() Might of the Guild - Not needed
Might of the Guild - Not needed
Race - Your race
Get all of your racials, no matter which race you are
Craft - Alchemy
![]() Solvent Proficiency - Not needed
Solvent Proficiency - Not needed
![]() Keen Eye: Reagents - Not needed
Keen Eye: Reagents - Not needed
![]() Medicinal Use - High Priority
Medicinal Use - High Priority
![]() Chemistry - Not needed
Chemistry - Not needed
![]() Laboratory Use - Not needed
Laboratory Use - Not needed
![]() Snakeblood - Not needed
Snakeblood - Not needed
Gear
Base Setup
A base setup that will work for most situations and which should be your starting point when making situational setups
Switching gear for trash packs isn't worth it unless you're using gear-swap addons.
Default setup
| Gear Slot | Set | Weight/Type | Trait | Enchantment |
|---|---|---|---|---|
 Head Head |
Slimecraw | Medium | Divines | Stamina |
 Shoulders Shoulders |
Ansuul's Torment | Medium | Divines | Stamina |
 Chest Chest |
Ansuul's Torment | Medium | Divines | Stamina |
 Hands Hands |
Ansuul's Torment | Medium | Divines | Stamina |
 Belt Belt |
Tide-Born Wildstalker | Light | Divines | Stamina |
 Legs Legs |
Tide-Born Wildstalker | Medium | Divines | Stamina |
 Boots Boots |
Tide-Born Wildstalker | Medium | Divines | Stamina |
 Necklace Necklace |
Velothi Ur-Mage's Amulet | Jewelry | Bloodthirsty | Increase Physical Harm |
 Ring Ring |
Tide-Born Wildstalker | Jewelry | Bloodthirsty | Increase Physical Harm |
| Ring |
Tide-Born Wildstalker | Jewelry | Bloodthirsty | Increase Physical Harm |
 Frontbar Main Hand Frontbar Main Hand |
Ansuul's Torment | Bow | Precise | Flame |
| Backbar Main Hand |
Thunderous Volley | Bow | Infused | Weapon Damage |
When choosing different situational sets you should replace Ansuul’s Torment if the Situational set has Minor Slayer and Tide-Born Wildstalker otherwise, as they're both sets that are decent in both Single Target and AoE fights. You can even replace them both if a situation calls for 2 situational sets, like for example bringing Slivers of Null Arca and Highland Sentinel to a fight which is both Single Target focused and stationary.
For example, a default setup for trash packs would replace Slivers of Null Arca with Sul-Xan's Torment
Gear that can be stronger than the setup from the table in specific situations or when specific circumstances are present
- Slivers of Null Arca - the best set for Single Target damage
- Caustic Arrow - replacement for Thunderous Volley in Single Target fights
- Zaan - a good replacement for Velothi Ur-Mage's Amulet in Single Target fights
- Sul-Xan's Torment - the best set for trash packs and for bosses that regularly spawn smaller adds
- Highland Sentinel - the strongest set if you are able to stand still in a certain encounter
- Roar of Alkosh - a support set that allows you to provide 6000 penetration for your team, as long as they provide you with at least 1 synergy every 10 seconds. Missing out on penetration is a huge DPS loss, so in bad groups, such as PUGs, you will actually do more damage with a support set like Alkosh than you would do with a regular set, because missing out on 6000 armor is a 12.5% damage loss
Gear that is easier to obtain and can be used while you work towards the best gear
Crafted:
All of these are tradable and can be bought from other players
No Overland, Dungeon or Trial gear is listed as the Crafted options are superior.
Final Setups
A few examples of final setups you could end up with after applying situational rules to the base setup
This is the crafted gear setup you can start with
| Gear Slot | Set | Weight/Type | Trait | Enchantment |
|---|---|---|---|---|
| Head |
Tide-Born Wildstalker | Medium | Divines | Stamina |
| Shoulders |
Tide-Born Wildstalker | Medium | Divines | Stamina |
| Chest |
Order's Wrath | Medium | Divines | Stamina |
| Hands |
Order's Wrath | Medium | Divines | Stamina |
| Belt |
Order's Wrath | Light | Divines | Stamina |
| Legs |
Order's Wrath | Medium | Divines | Stamina |
| Boots |
Order's Wrath | Medium | Divines | Stamina |
| Necklace |
Tide-Born Wildstalker | Jewelry | Bloodthirsty | Increase Physical Harm |
| Ring |
Tide-Born Wildstalker | Jewelry | Bloodthirsty | Increase Physical Harm |
| Ring |
Tide-Born Wildstalker | Jewelry | Bloodthirsty | Increase Physical Harm |
| Frontbar Main Hand |
Assassin's Guile | Bow | Precise | Flame |
| Backbar Main Hand |
Assassin's Guile | Bow | Infused | Weapon Damage |
What Changes
Changes compared to the Base Setup
This is a setup you should use if you have don't have access to any Trial gear
| Gear Slot | Set | Weight/Type | Trait | Enchantment |
|---|---|---|---|---|
| Head |
Slimecraw | Medium | Divines | Stamina |
| Shoulders |
Tide-Born Wildstalker | Medium | Divines | Stamina |
| Chest |
Order's Wrath | Medium | Divines | Stamina |
| Hands |
Order's Wrath | Medium | Divines | Stamina |
| Belt |
Order's Wrath | Light | Divines | Stamina |
| Legs |
Order's Wrath | Medium | Divines | Stamina |
| Boots |
Order's Wrath | Medium | Divines | Stamina |
| Necklace |
Velothi Ur-Mage's Amulet | Jewelry | Bloodthirsty | Increase Physical Harm |
| Ring |
Tide-Born Wildstalker | Jewelry | Bloodthirsty | Increase Physical Harm |
| Ring |
Tide-Born Wildstalker | Jewelry | Bloodthirsty | Increase Physical Harm |
| Frontbar Main Hand |
Tide-Born Wildstalker | Bow | Precise | Flame |
| Backbar Main Hand |
Thunderous Volley | Bow | Infused | Weapon Damage |
What Changes
Changes compared to the Base Setup
- Slivers of Null Arca gets replaced by Tide-Born Wildstalker
- It uses 1 additional Medium armor piece because Tide-Born Wildstalker has a penetration line
This is the ideal setup for trash packs
| Gear Slot | Set | Weight/Type | Trait | Enchantment |
|---|---|---|---|---|
| Head |
Slimecraw | Medium | Divines | Stamina |
| Shoulders |
Sul-Xan's Torment | Medium | Divines | Stamina |
| Chest |
Sul-Xan's Torment | Medium | Divines | Stamina |
| Hands |
Sul-Xan's Torment | Medium | Divines | Stamina |
| Belt |
Tide-Born Wildstalker | Light | Divines | Stamina |
| Legs |
Tide-Born Wildstalker | Medium | Divines | Stamina |
| Boots |
Tide-Born Wildstalker | Medium | Divines | Stamina |
| Necklace |
Velothi Ur-Mage's Amulet | Jewelry | Bloodthirsty | Increase Physical Harm |
| Ring |
Tide-Born Wildstalker | Jewelry | Bloodthirsty | Increase Physical Harm |
| Ring |
Tide-Born Wildstalker | Jewelry | Bloodthirsty | Increase Physical Harm |
| Frontbar Main Hand |
Sul-Xan's Torment | Bow | Precise | Flame |
| Backbar Main Hand |
Thunderous Volley | Bow | Infused | Weapon Damage |
What Changes
Changes compared to the Base Setup
- Slivers of Null Arca gets replaced by Sul-Xan's Torment
- Zaan gets replaced by Velothi Ur-Mage's Amulet
This is a setup for Single Target fights
| Gear Slot | Set | Weight/Type | Trait | Enchantment |
|---|---|---|---|---|
| Head |
Zaan | Medium | Divines | Stamina |
| Shoulders |
Zaan | Medium | Divines | Stamina |
| Chest |
Slivers of the Null Arca | Medium | Divines | Stamina |
| Hands |
Slivers of the Null Arca | Medium | Divines | Stamina |
| Belt |
Tide-Born Wildstalker | Light | Divines | Stamina |
| Legs |
Tide-Born Wildstalker | Medium | Divines | Stamina |
| Boots |
Tide-Born Wildstalker | Medium | Divines | Stamina |
| Necklace |
Slivers of the Null Arca | Jewelry | Bloodthirsty | Increase Physical Harm |
| Ring |
Tide-Born Wildstalker | Jewelry | Bloodthirsty | Increase Physical Harm |
| Ring |
Tide-Born Wildstalker | Jewelry | Bloodthirsty | Increase Physical Harm |
| Frontbar Main Hand |
Slivers of the Null Arca | Bow | Precise | Flame |
| Backbar Main Hand |
Caustic Arrow | Bow | Infused | Weapon Damage |
What Changes
Changes compared to the Base Setup
- Slivers of Null Arca gets replaced by Ansuul's Torment because it's a more reliable set which works in both AoE and Single Target fights
- It uses 1 additional Medium armor piece because Ansuul's Torment has a penetration line
Champion Points
Race
The difference between best and worst race is about 5% of DPS and there is no content in the entire game that you'd be blocked from completing because of choosing a bad race.

Other decent options


Mundus

Attributes
You should always put all 64 attribute points into Stamina.
Food
Potions
Use the Weapon Power potions. They'll improve your Stamina sustain and provide Major Brutality.
Heroism potions are an expensive damage option because they generate Ultimate.
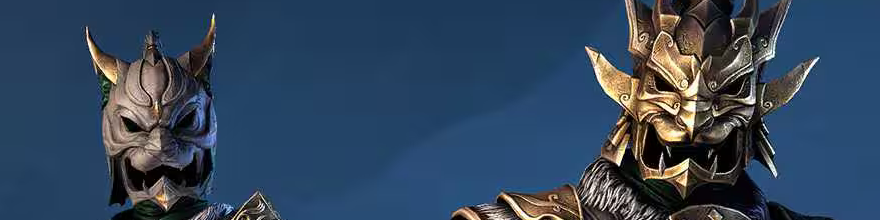
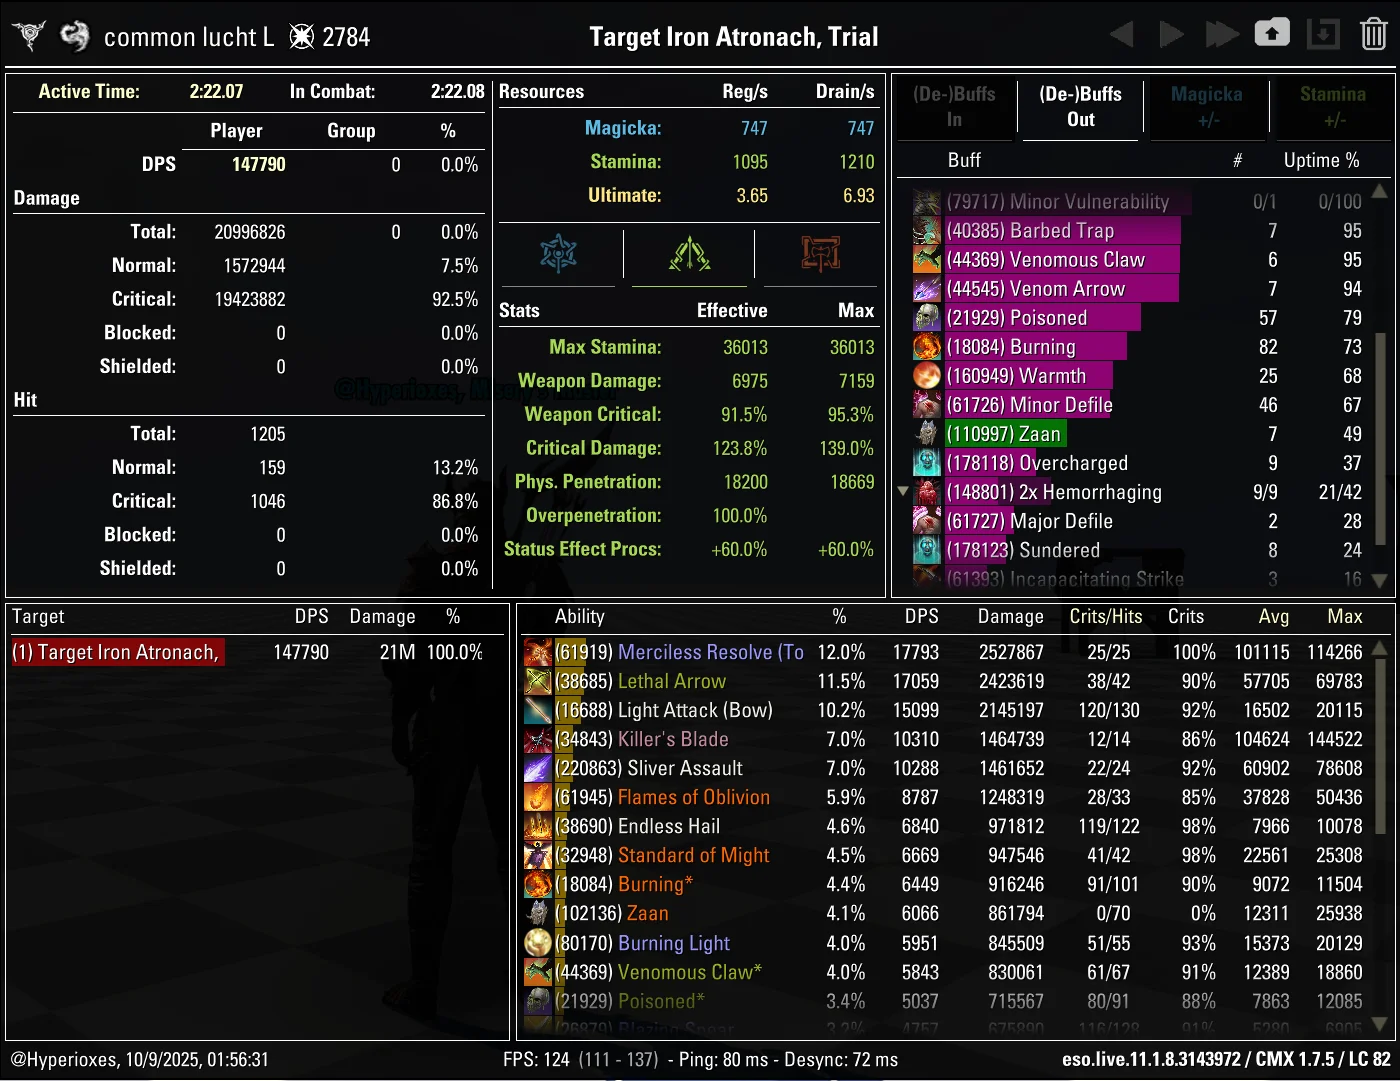
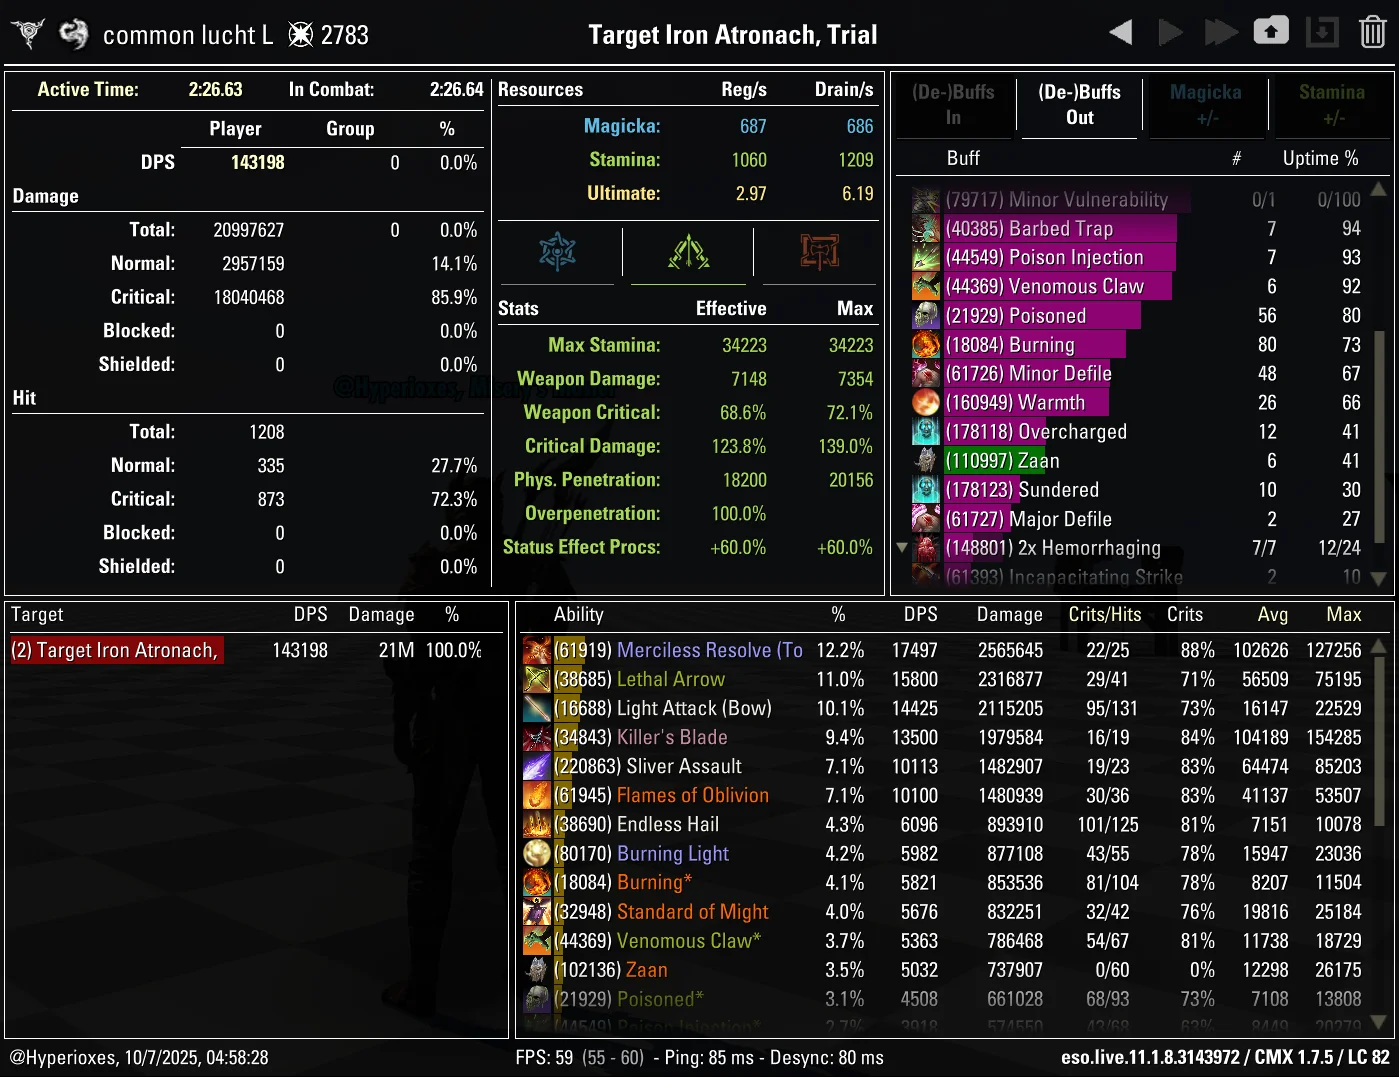
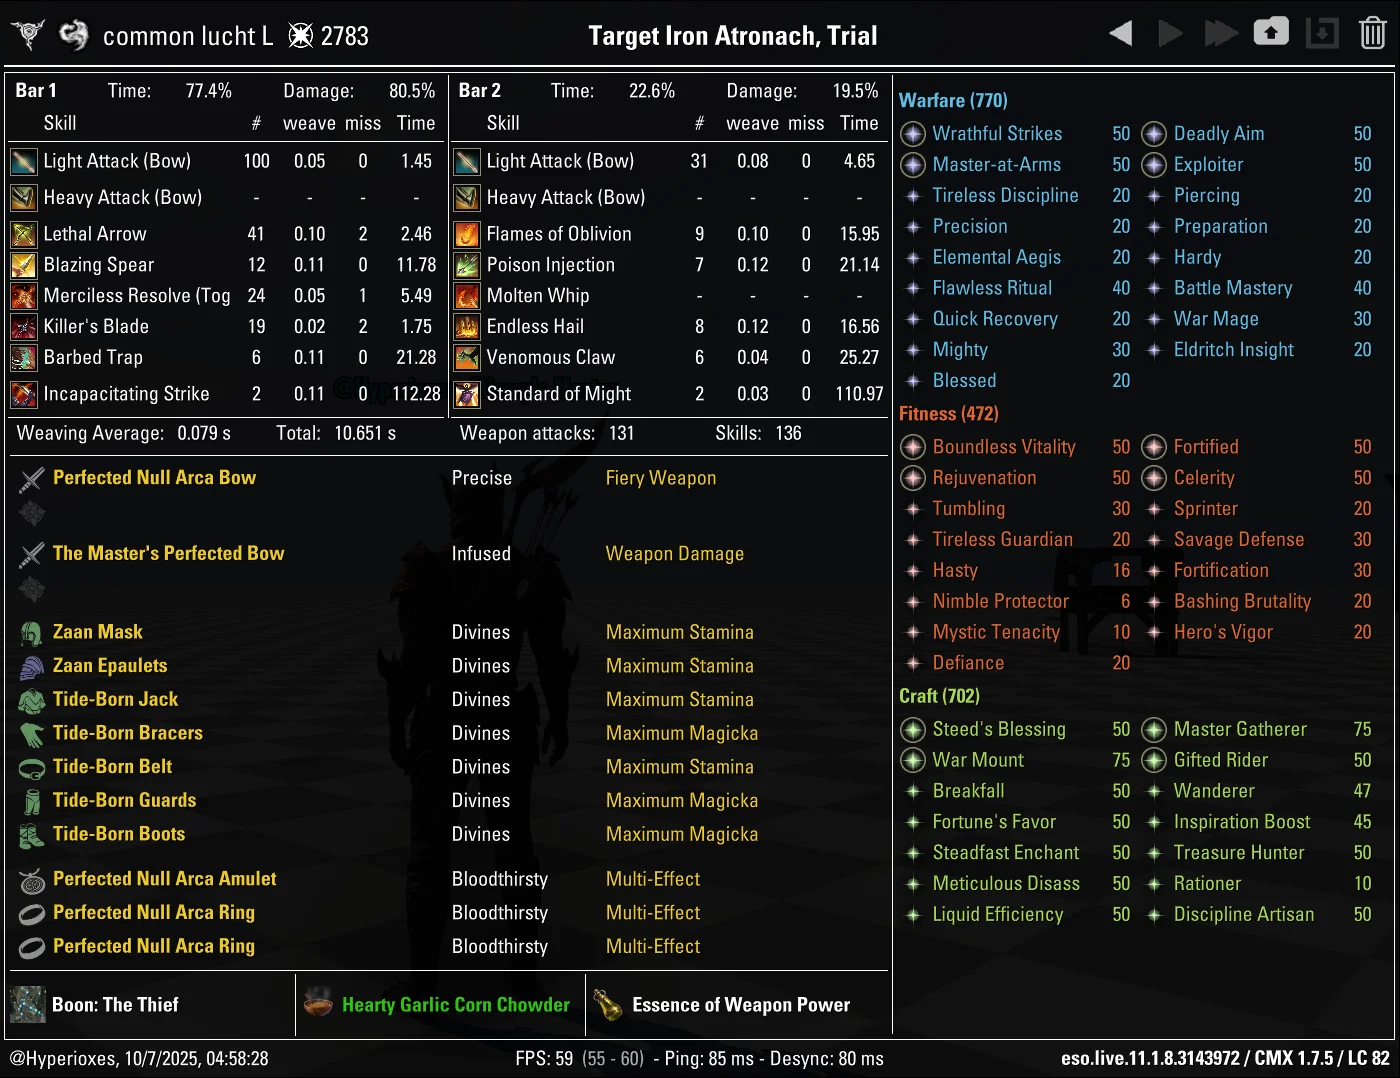
Parses
Gameplay
THANKS FOR READING

If you've enjoyed this guide and want to support me, you can do so through Patreon. Your support will help me produce more guides.