


Beam DPS Build
for every Class
Beam DPS Build for ESO Update 49 is a subclass DPS setup built around Pragmatic Fatecarver, the Arcanist beam skill from Herald of the Tome, and adapted for every class through subclassing. Every class uses Pragmatic Fatecarver as the core of the build, then changes the final subclass combination based on that class.
Fatecarver deals full cleave in a 22 meter line, so it keeps its single-target damage while hitting stacked enemies. Pragmatic Fatecarver also gives you a large damage shield while channeling, making it the most practical setup for most encounters.
Most setups pair Herald of the Tome with Templar's Dawn's Wrath for Radiant Glory as an execute and Solar Barrage for a 5% class damage buff that buffs Fatecarver. Dragonknight is the exception - it drops Dawn's Wrath for Ardent Flame and Earthen Heart and still parses the highest at 147k.
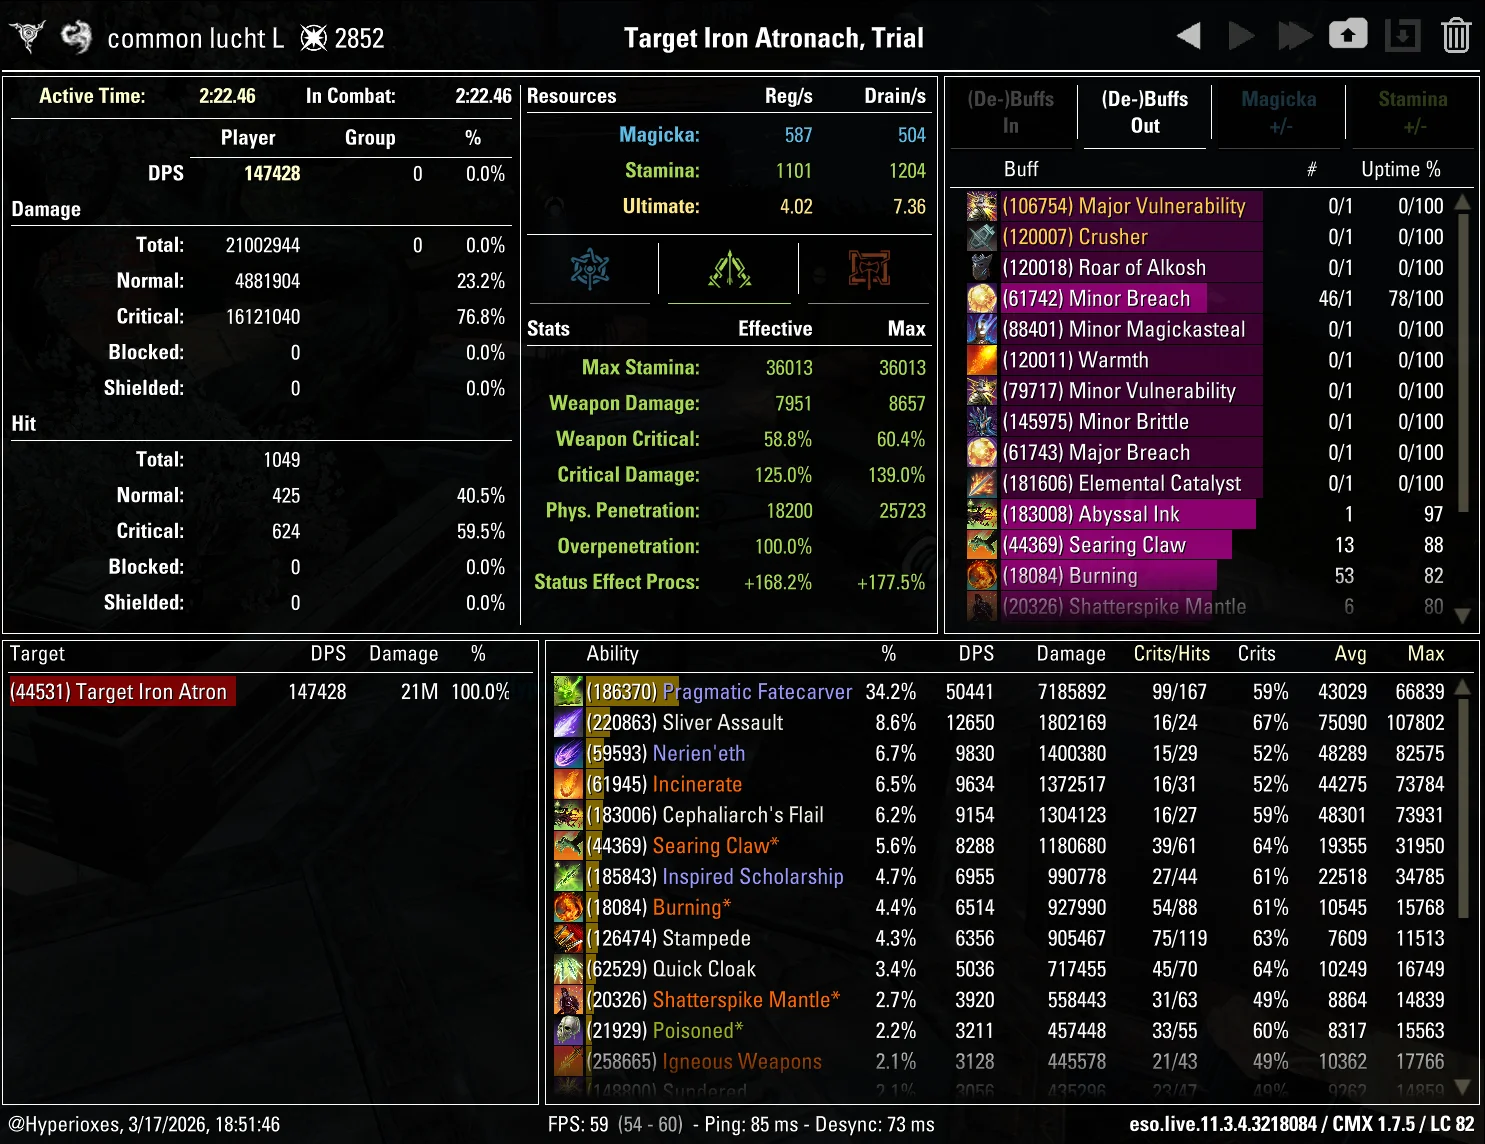
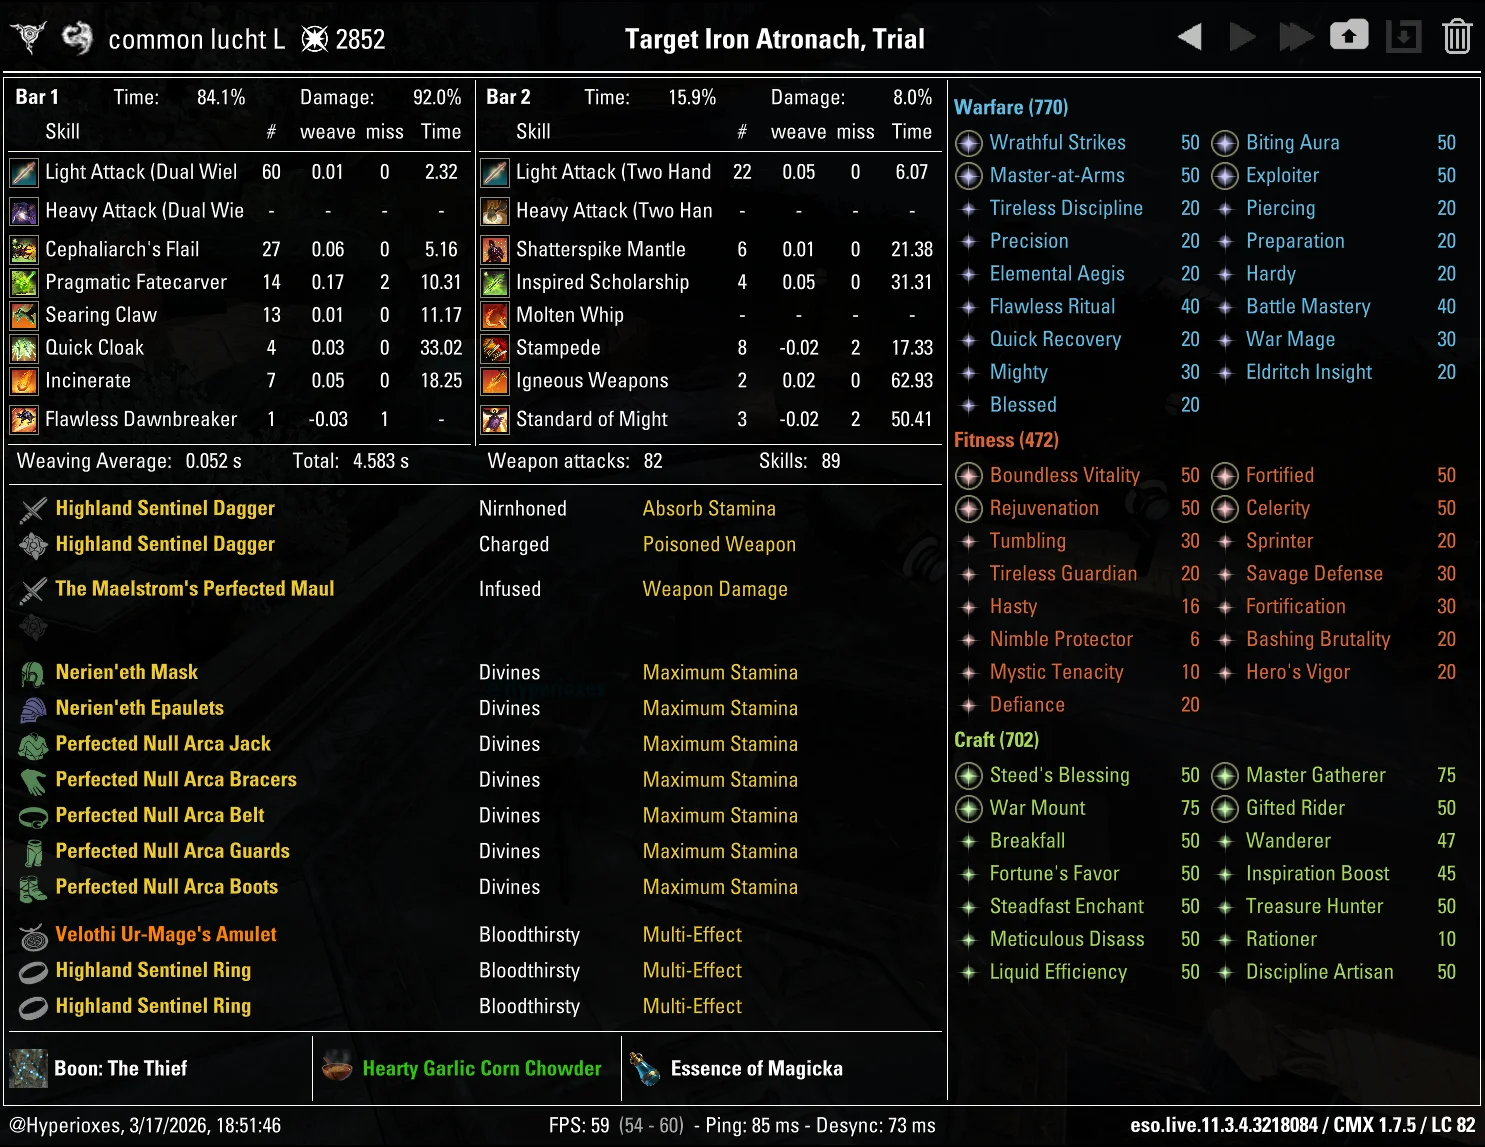
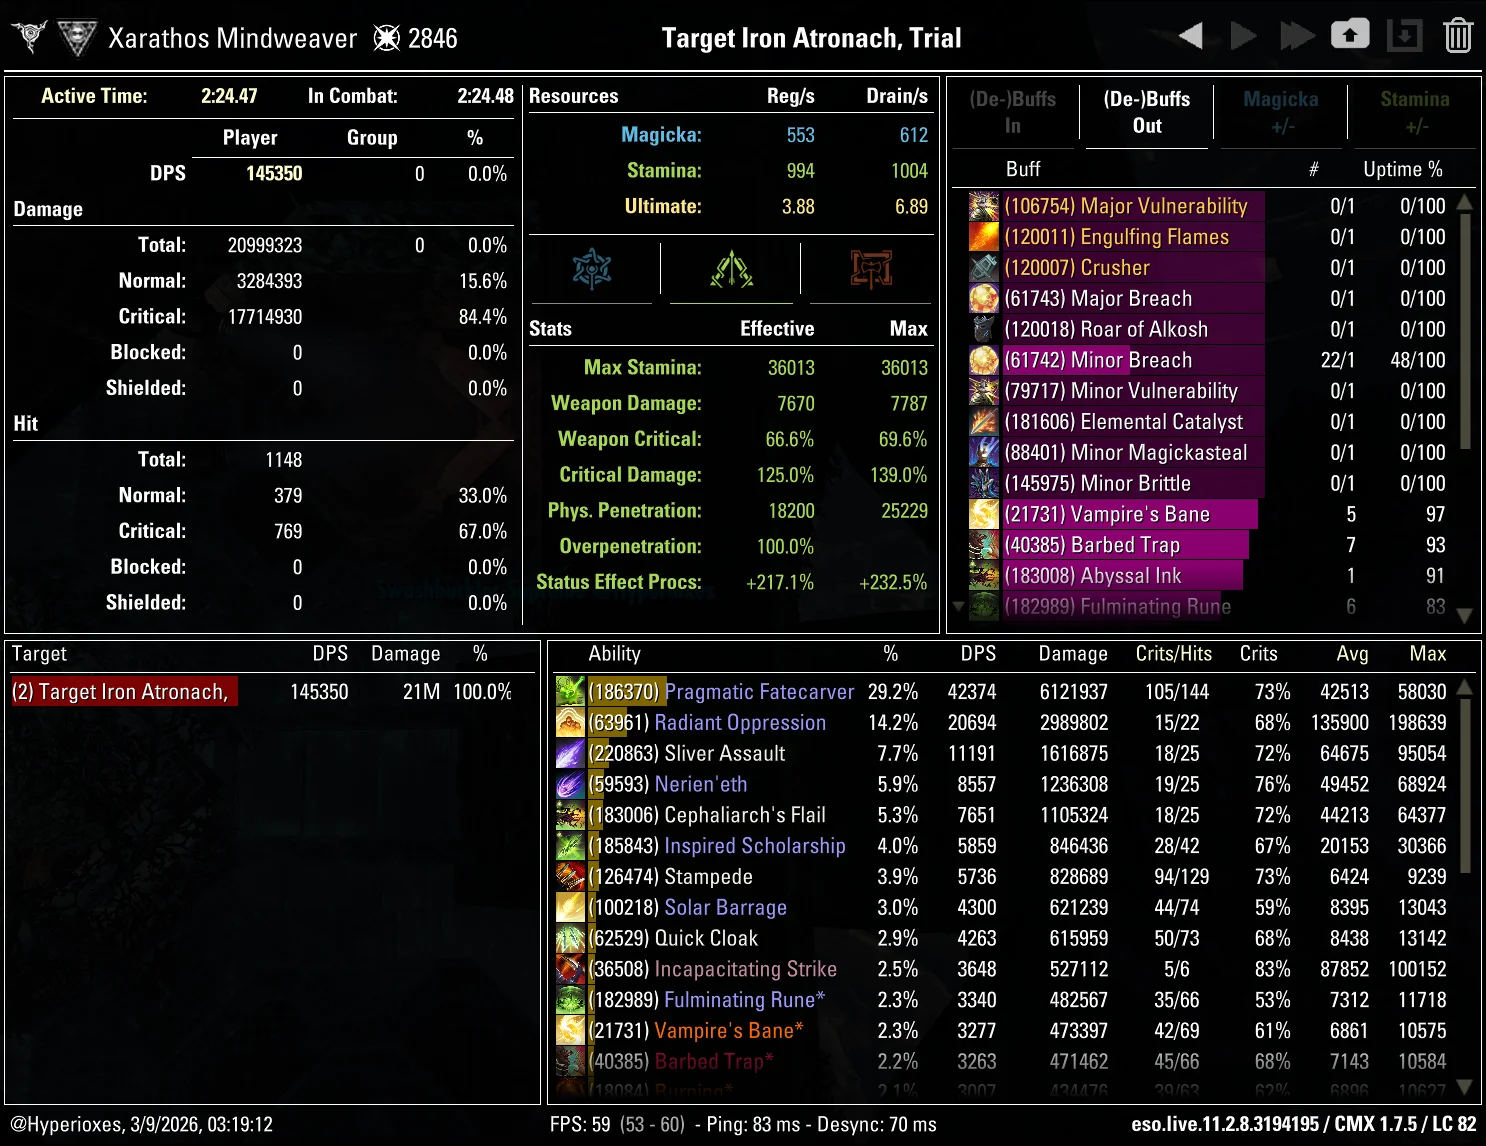
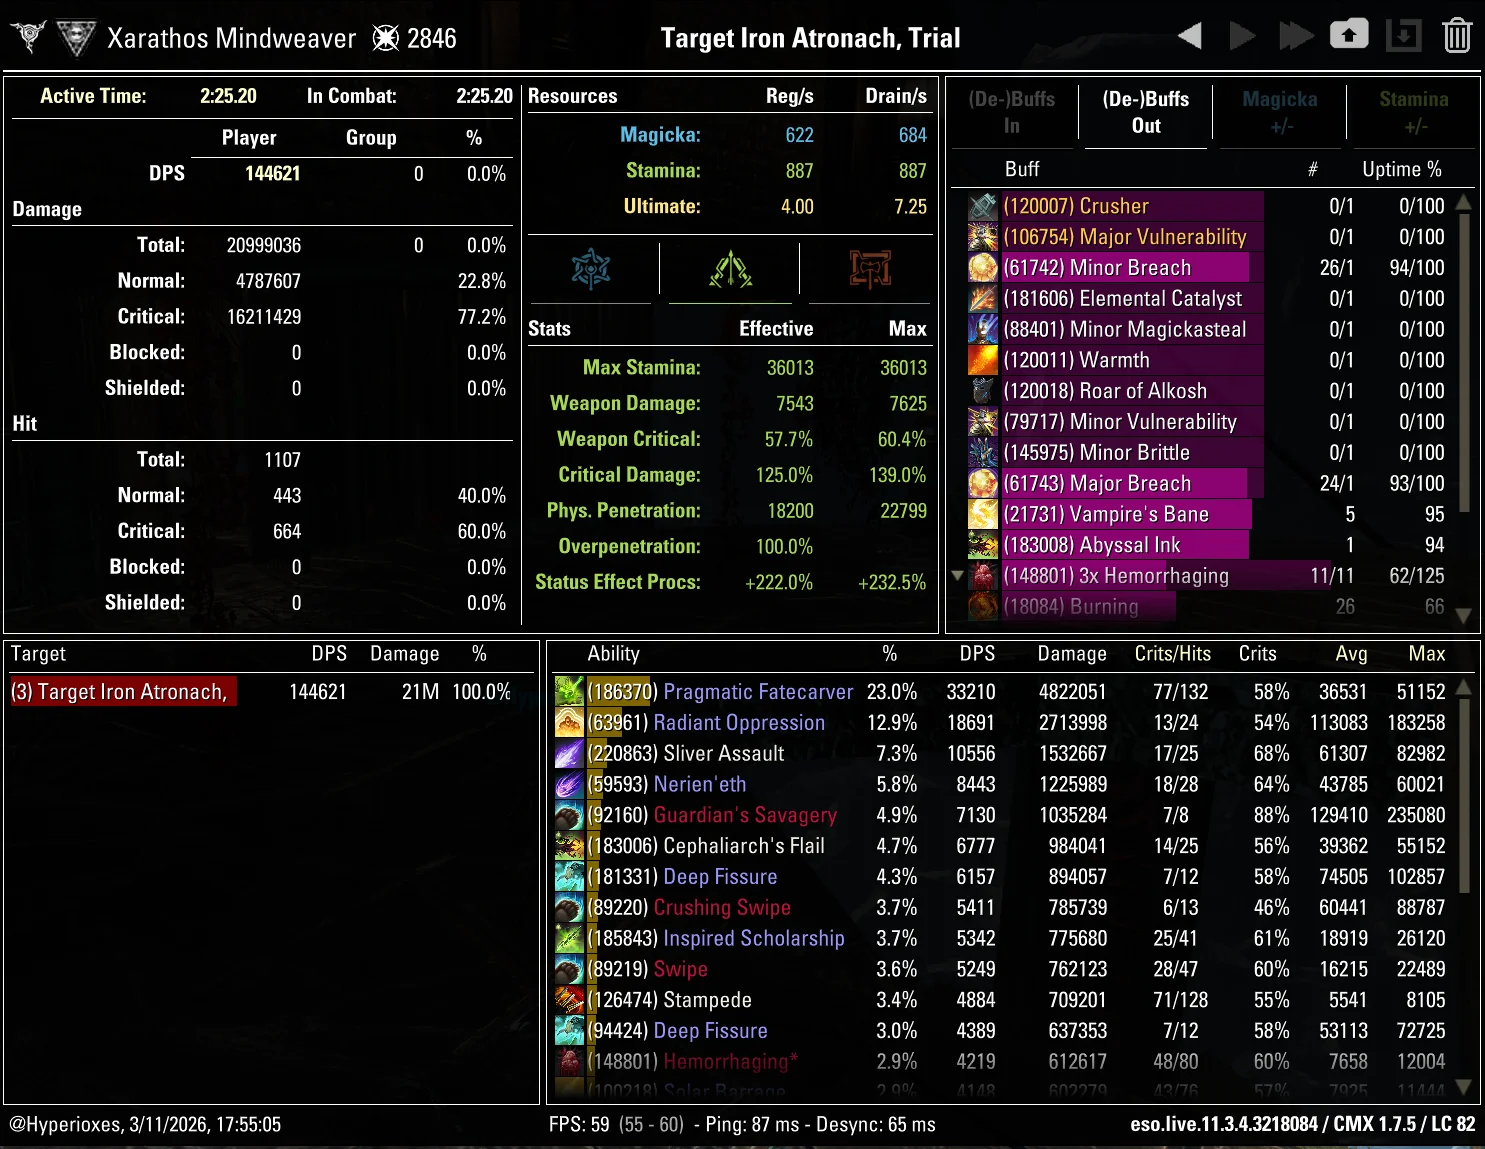
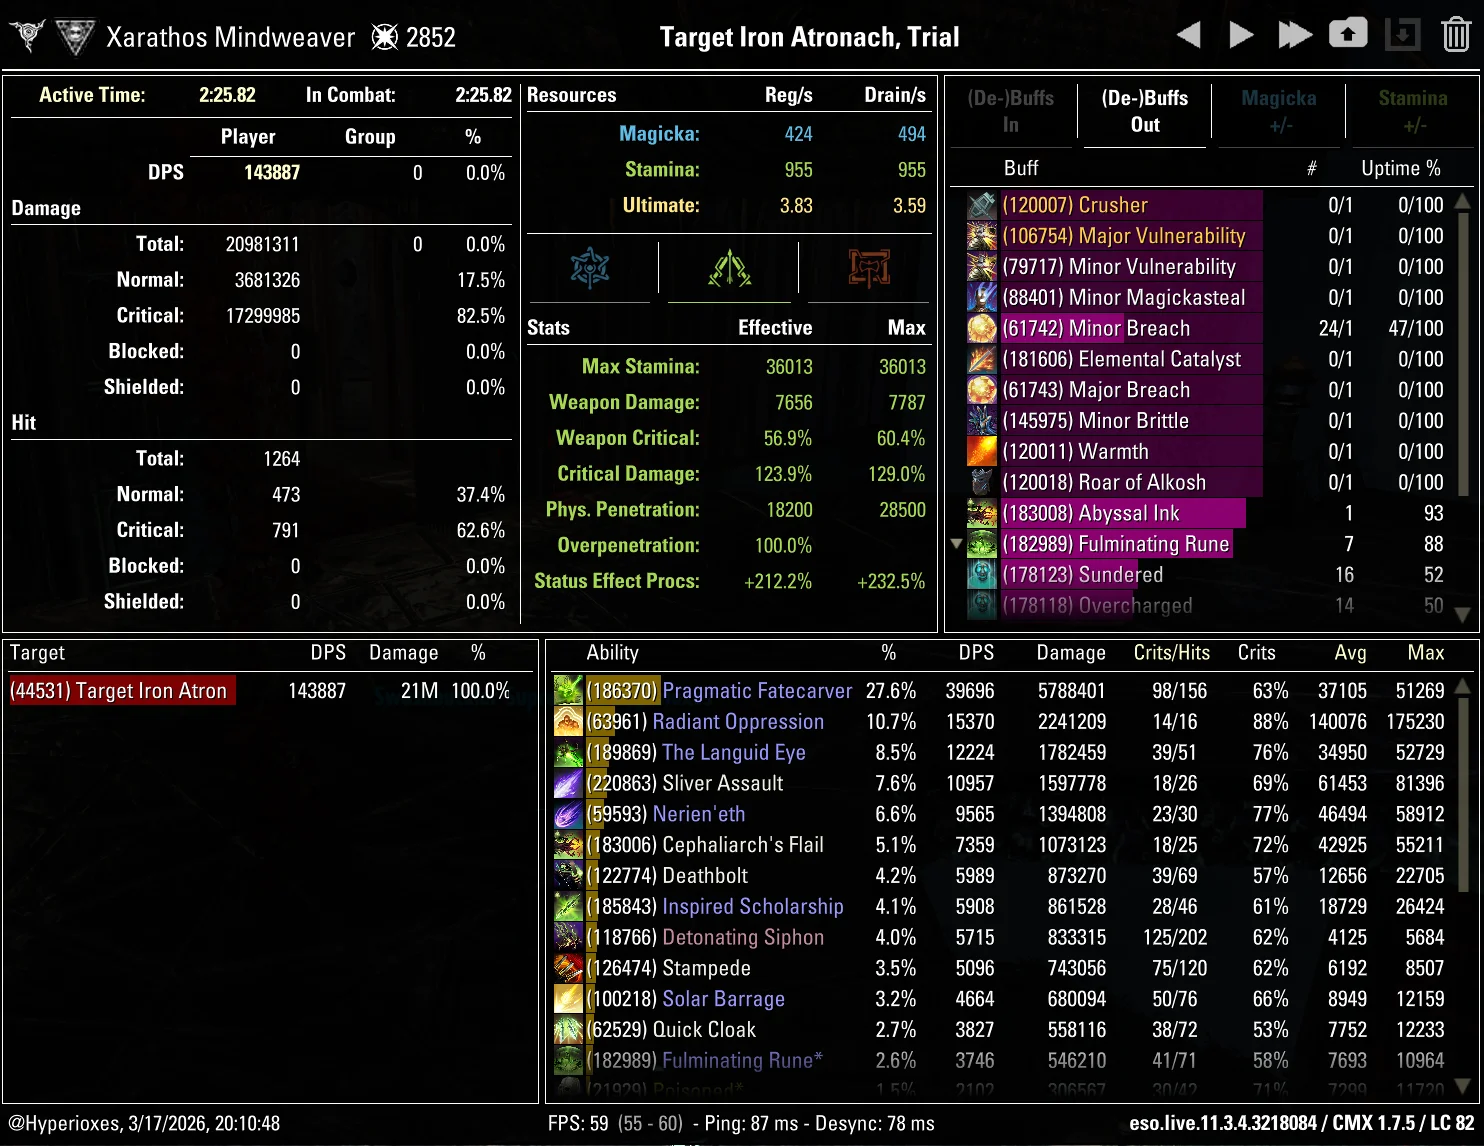
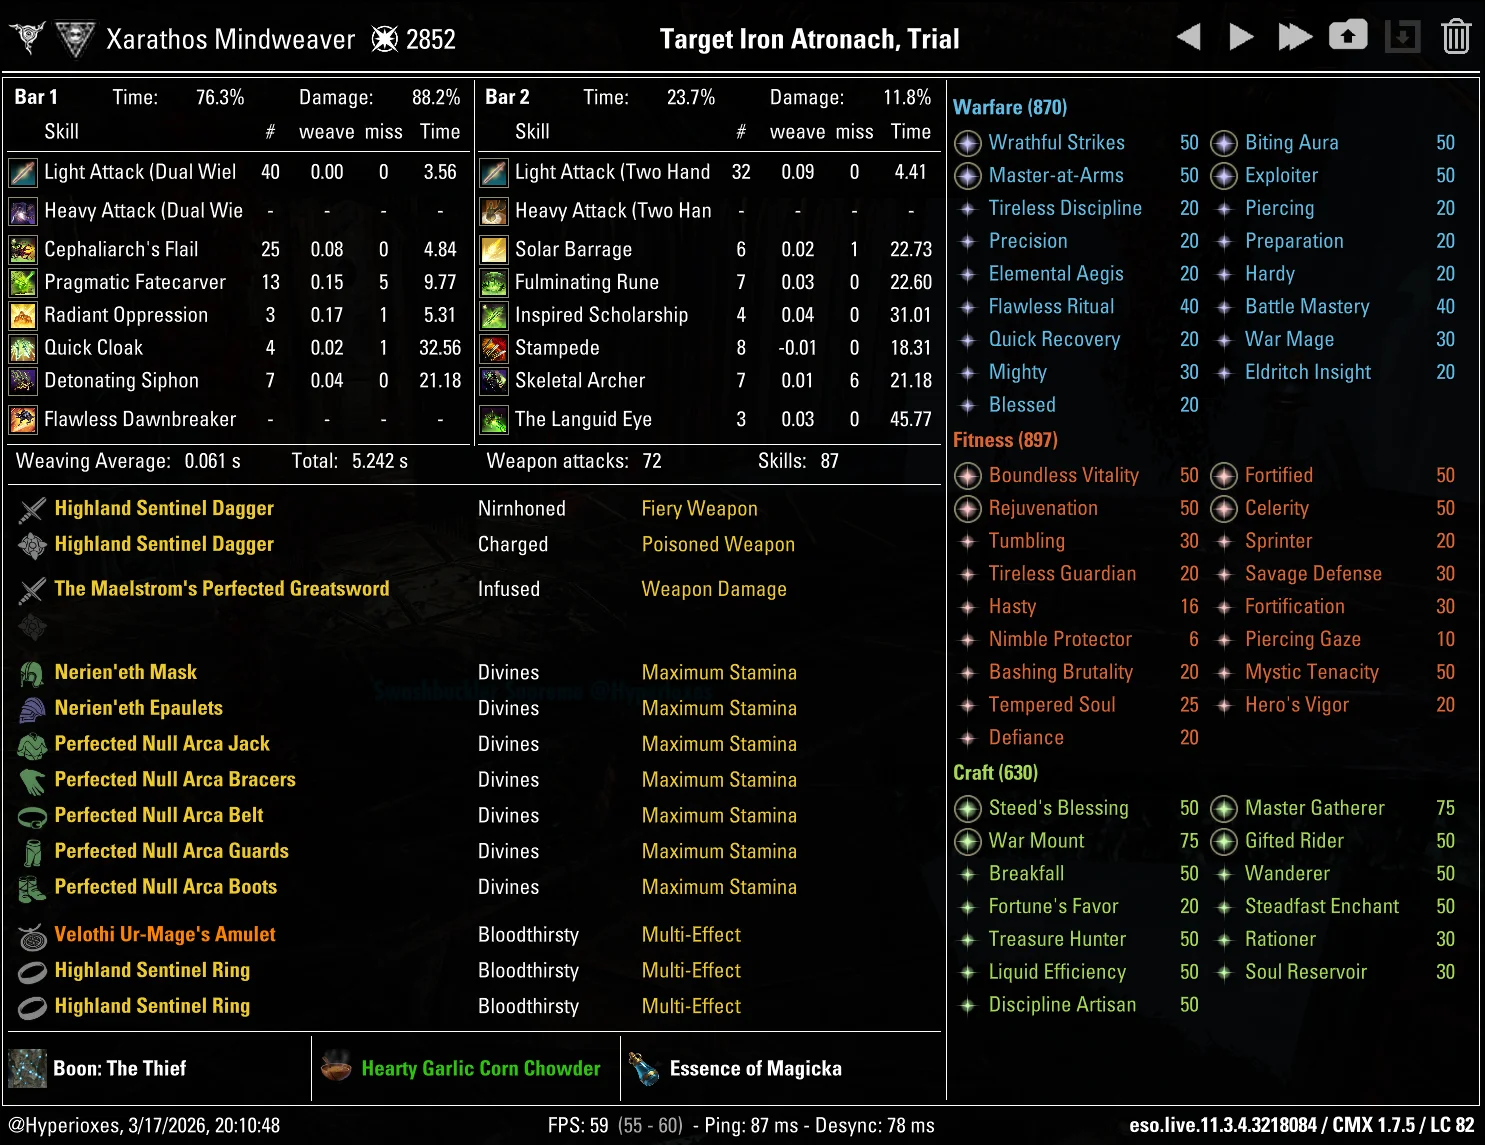
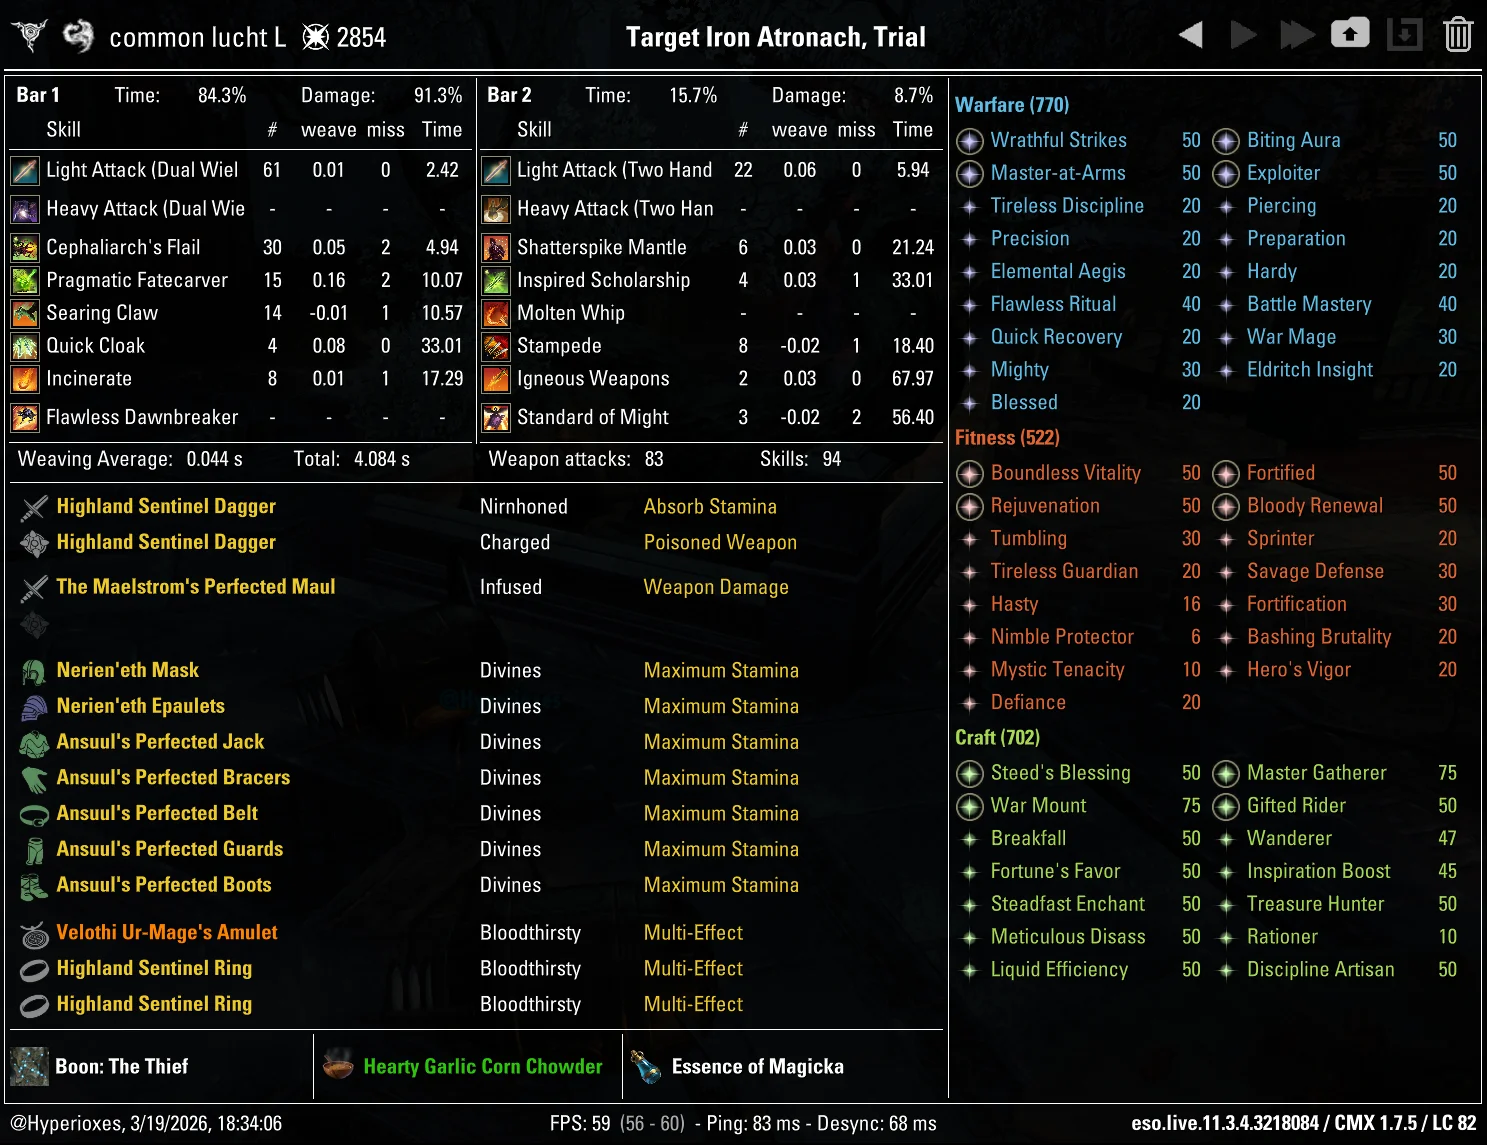
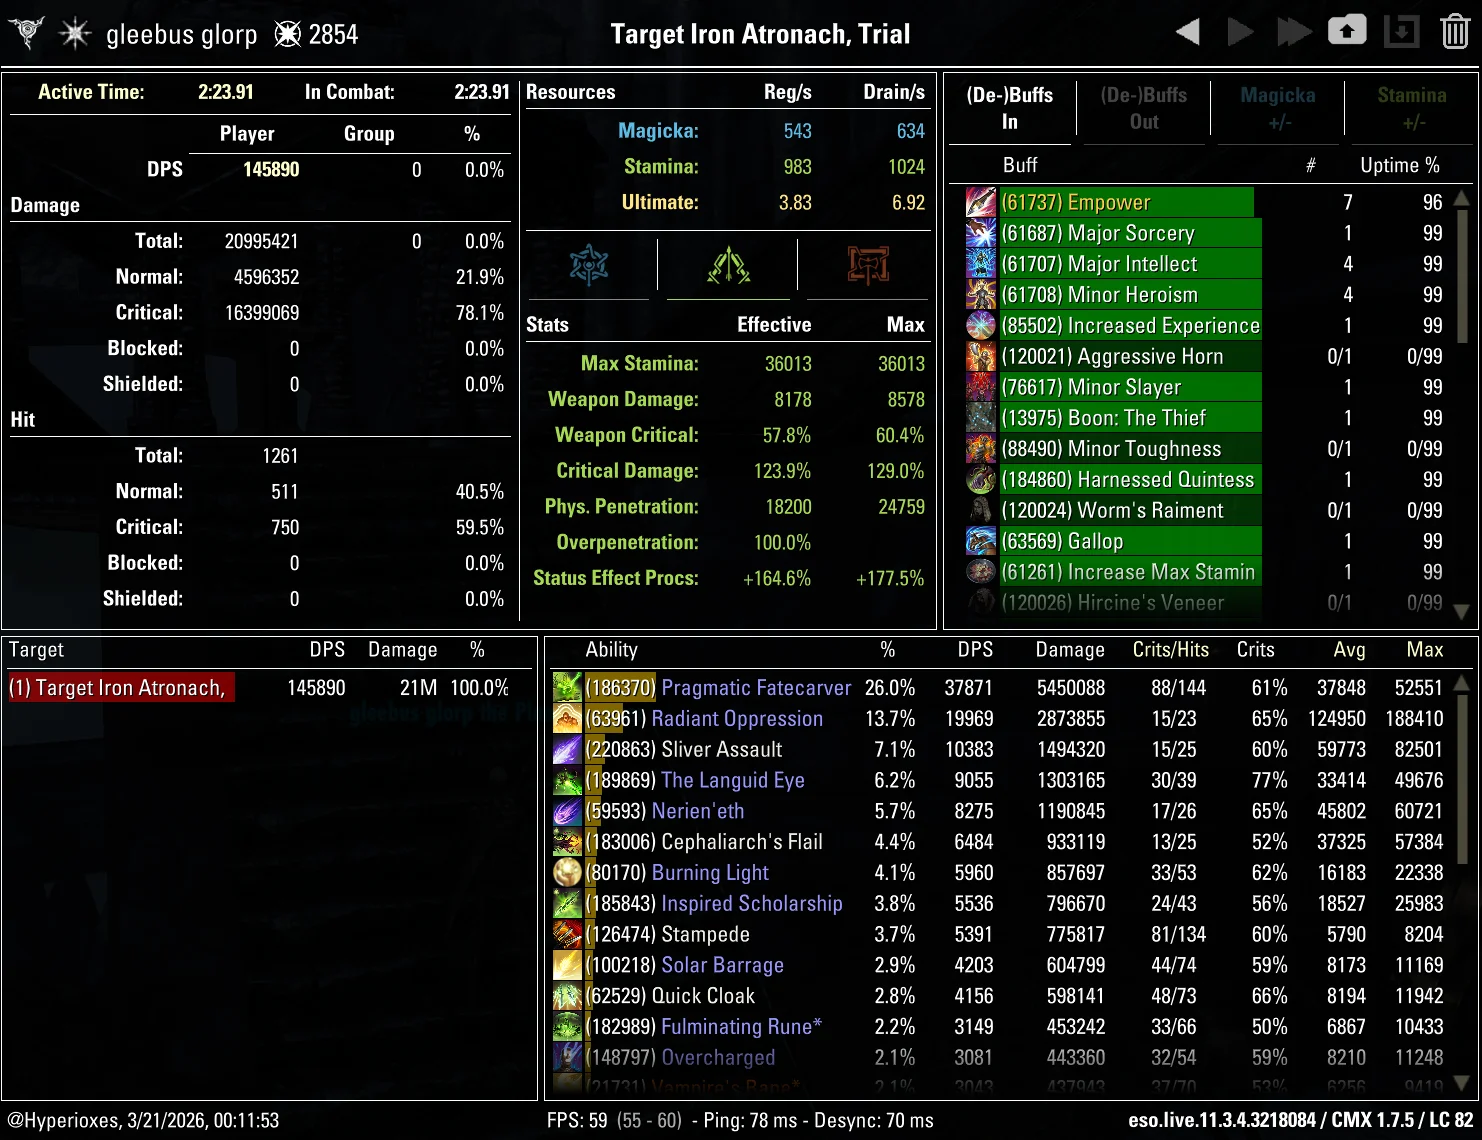
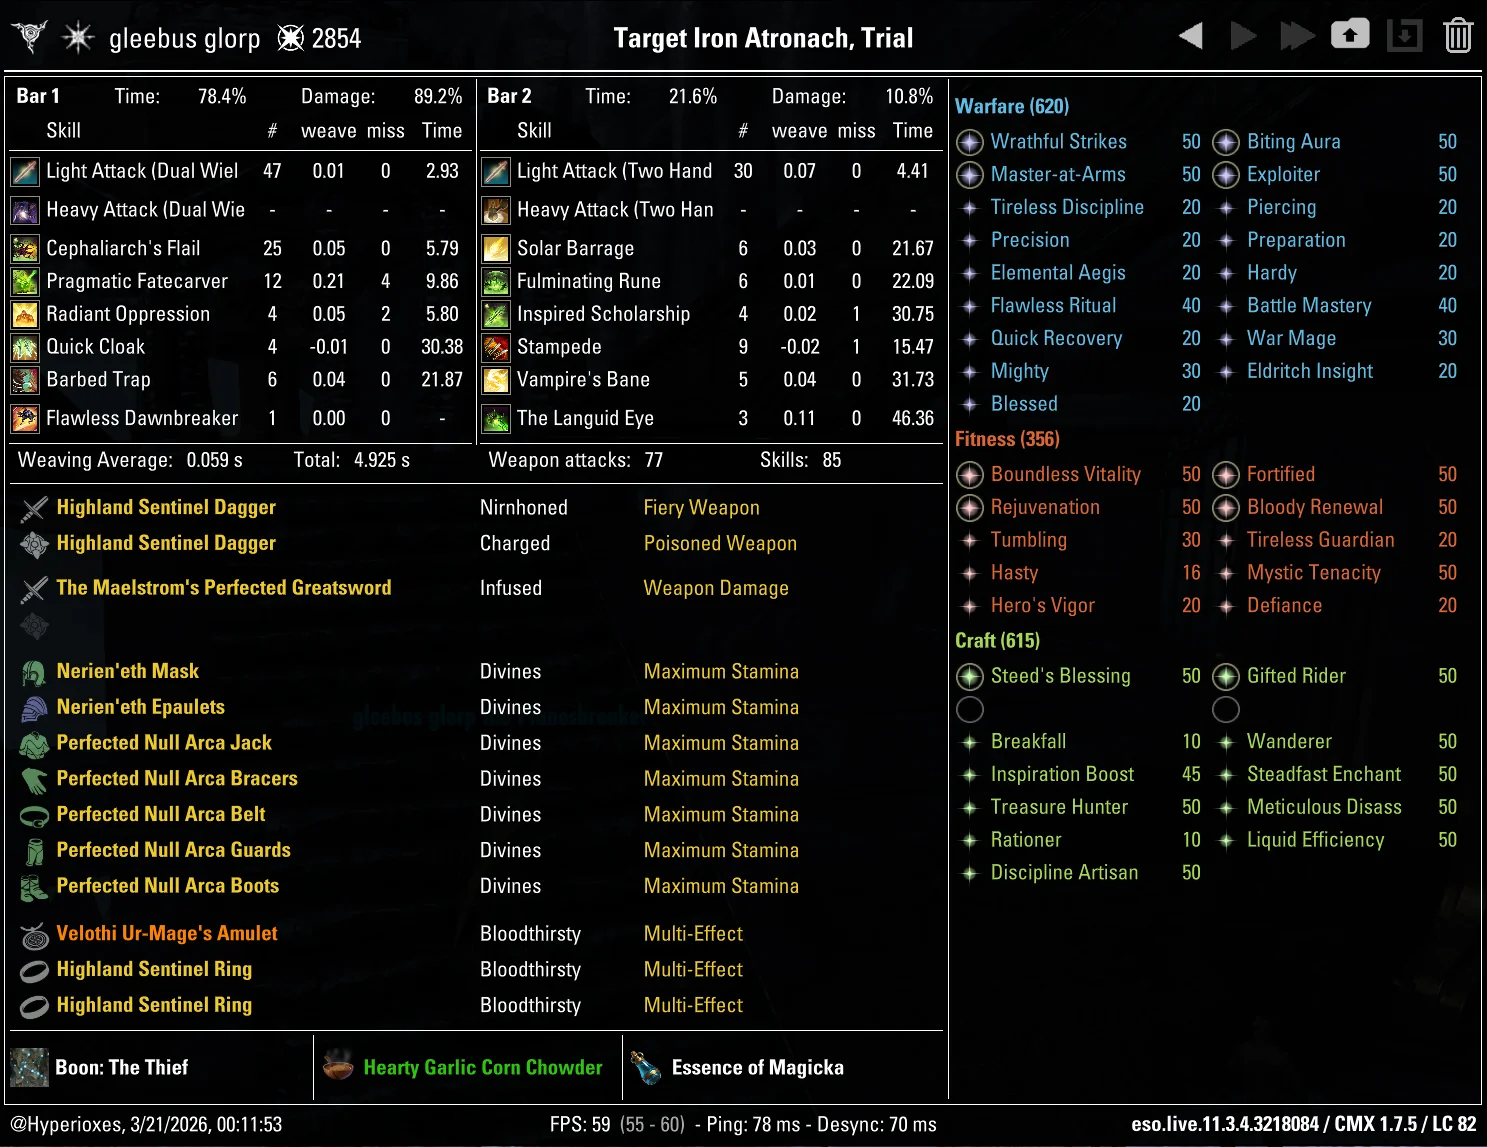
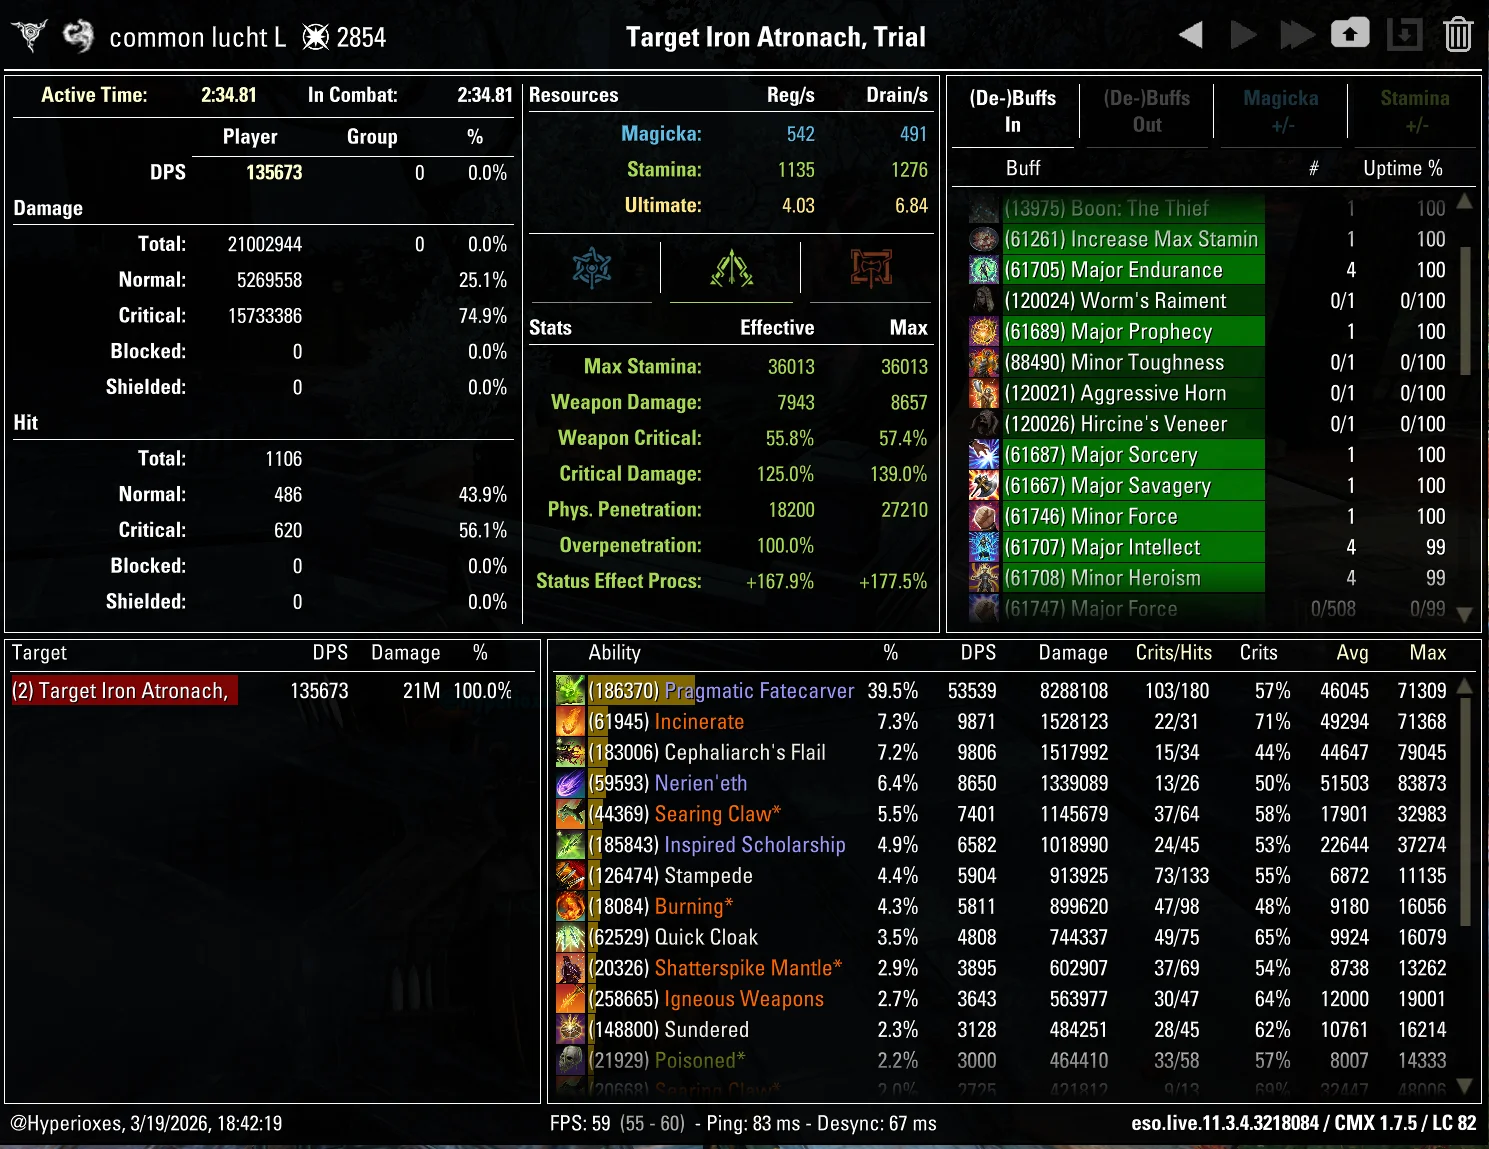
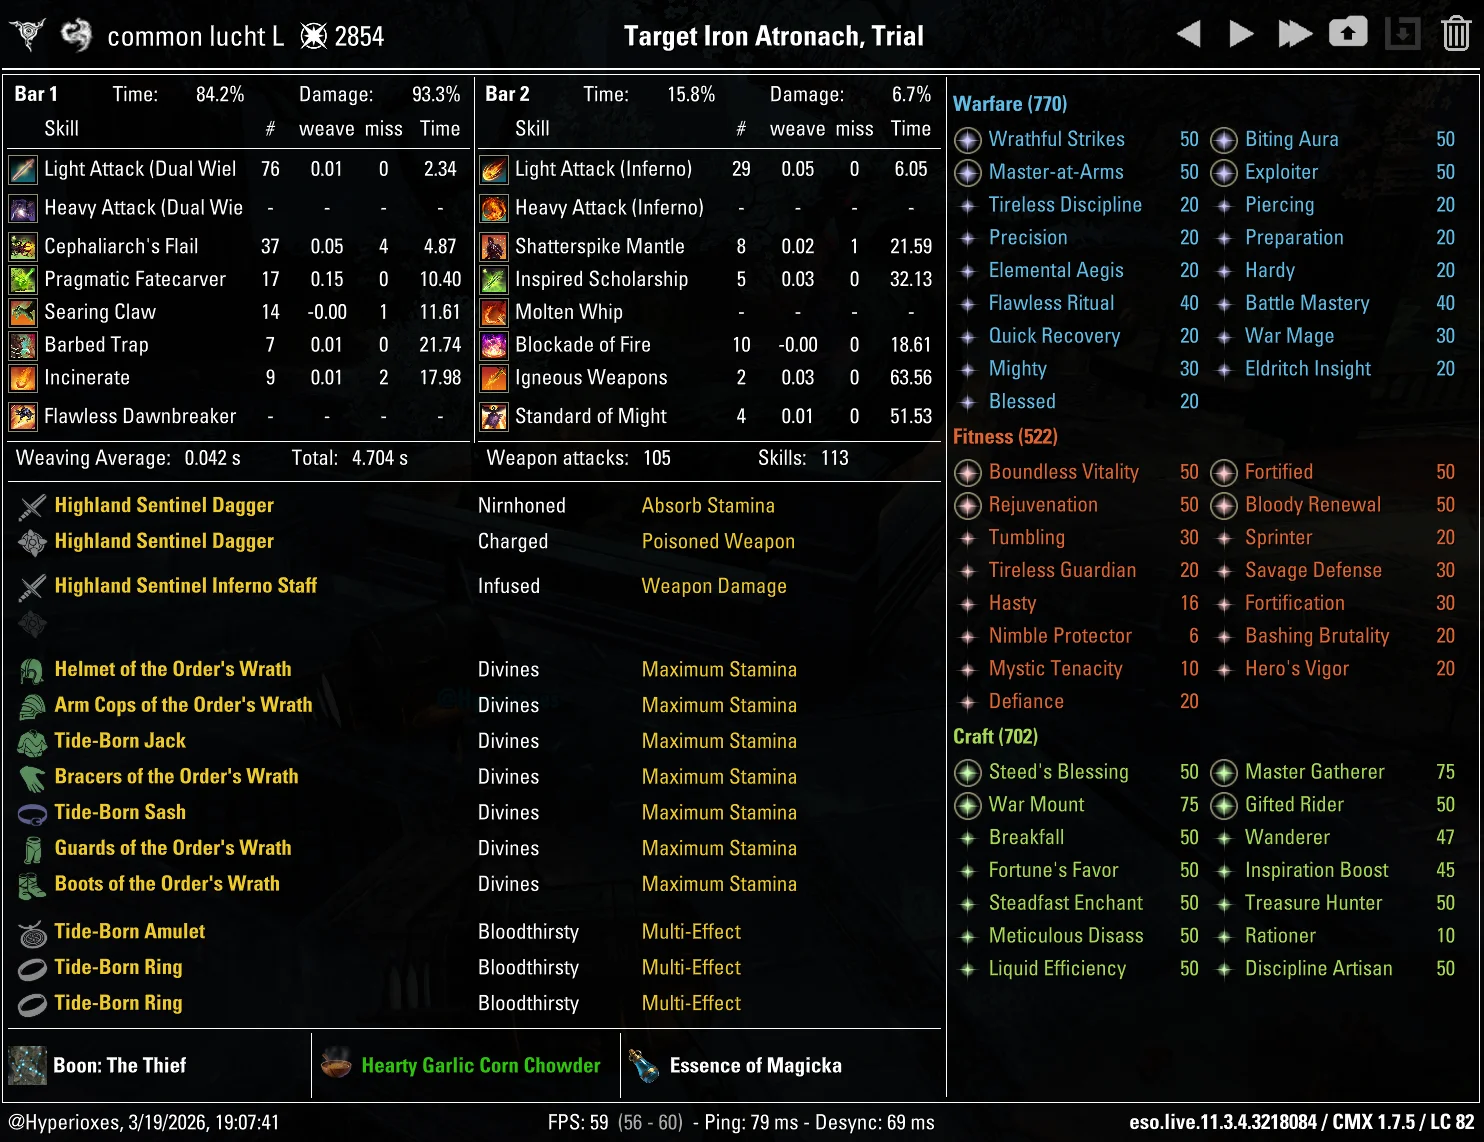
The Dragonknight variant with Slivers of Null Arca parses 147k DPS, Ansuul's Torment hits 143k, Tide-Born Wildstalker lands at 136k, and crafted-only gear still pulls 118k. All parses are on the 21 million dummy.
Works in normal and veteran dungeons, trials, hard modes, Dragonstar Arena, and Blackrose Prison.
Subclassing
Every class can use Beam DPS through subclassing by taking Herald of the Tome for Pragmatic Fatecarver. Dragonknight currently has the highest parsing setup, while the other classes use their recommended subclass combination around the same Fatecarver core.
Base Class
You can use this build with any base class.
(Almost) Always Use These Two


We will (almost) always use Arcanist's Herald of the Tome and Templar's Dawn's Wrath. Herald of the Tome gives us access to the core ability of this build - Pragmatic Fatecarver. Dawn's Wrath provides us with Radiant Glory, an extremely strong execute, and Solar Barrage, a skill which increases damage of class skills by 5% which will affect Pragmatic Fatecarver.
Dragonknight exception
Dragonknight is an exception. It uses Ardent Flame and Earthen Heart skill lines instead of Dawn's Wrath.
3rd Skill Line
Choose one of these as your 3rd skill line. If your base class is Arcanist or Templar you can choose any of them, otherwise you're locked to a single possible combination


Final Combinations
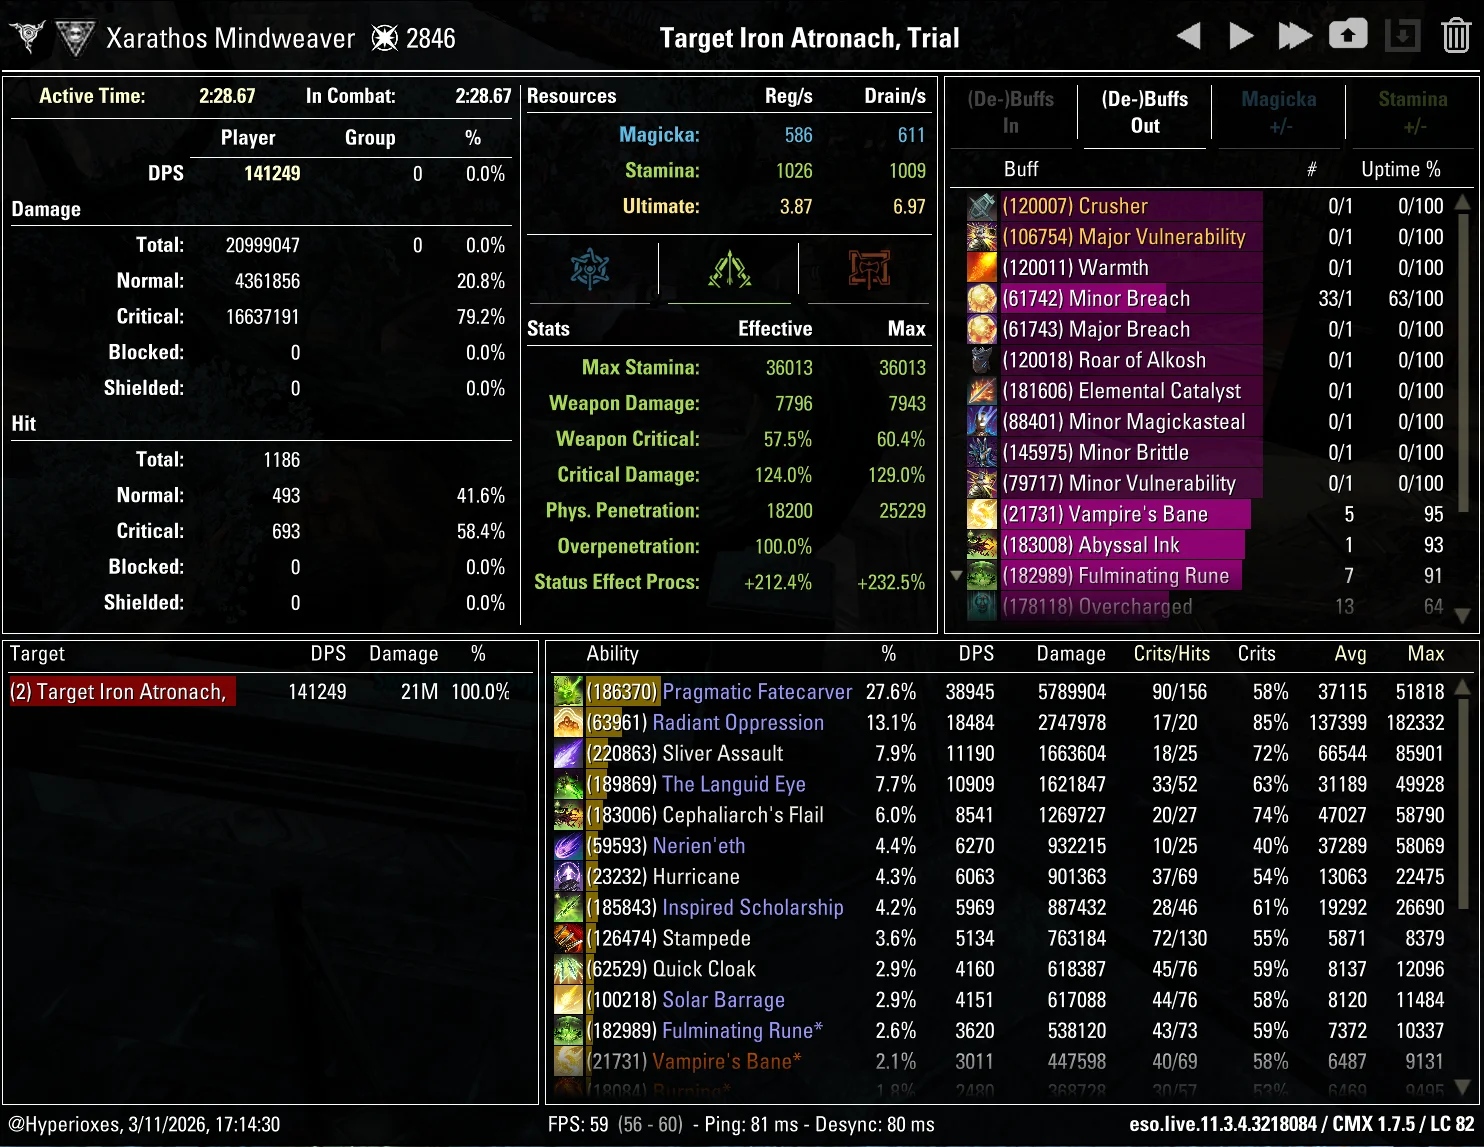
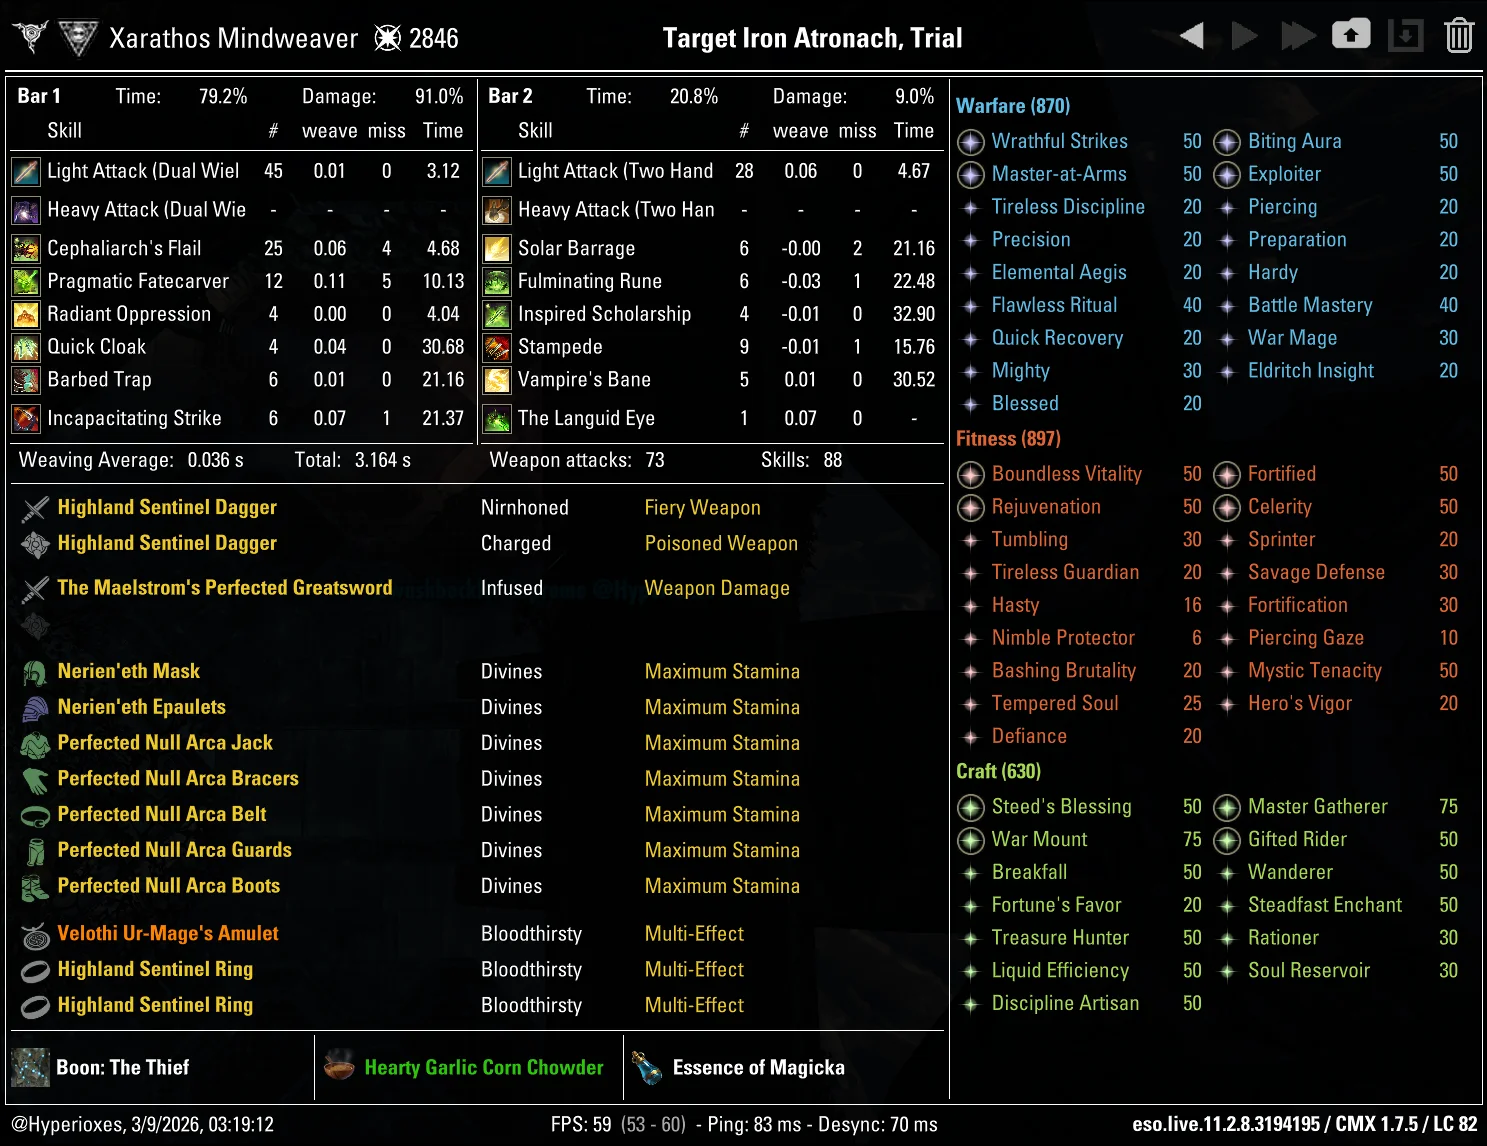
The DPS numbers below come from Iron Atronach dummy parses . Additional Benefits are bonuses that weren't reflected on a dummy parse, but can be useful in actual fights. For example, Aedric Spear's Piercing Spear passive gives bonus Critical Damage, but it wasn't important on the dummy because it already has enough Critical Damage, but it will make a difference in actual content. Balanced Warrior is a defensive example - it grants Weapon and Spell Damage (which is already in the parse) plus Armor, so the Armor is the only additional benefit that's being mentioned.
Additional Benefits
Cons
Additional Benefits
Cons
Additional Benefits
Cons
Additional Benefits
Cons
Cons


Additional Benefits
Cons
Skill Setups
Base Setup
A base setup that uses only Herald of the Tome and Dawn's Wrath skill lines and which should be your starting point to which you'll later add skills from your 3rd skill line
| Front Bar | Back Bar |
|---|---|
| Slot 1: Cephaliarch's Flail | Slot 1: Solar Barrage |
| Slot 2: Pragmatic Fatecarver | Slot 2: Fulminating Rune |
| Slot 3: Radiant Glory | Slot 3: Inspired Scholarship |
| Slot 4: Quick Cloak | Slot 4: Stampede |
| Slot 5: Camouflaged Hunter | Slot 5: Vampire's Bane |
| Ultimate: The Languid Eye | Ultimate: The Languid Eye |
Final Setups
A few examples of final setups you could end up with
Assassination Skill Setups
Trash pack setup
| Front Bar | Back Bar |
|---|---|
| Slot 1: Cephaliarch's Flail | Slot 1: Solar Barrage |
| Slot 2: Pragmatic Fatecarver | Slot 2: Fulminating Rune |
| Slot 3: Radiant Glory | Slot 3: Inspired Scholarship |
| Slot 4: Quick Cloak | Slot 4: Elemental Blockade |
| Slot 5: Camouflaged Hunter | Slot 5: Proximity Detonation |
| Ultimate: Soul Harvest | Ultimate: Elemental Rage |
Default setup
| Front Bar | Back Bar |
|---|---|
| Slot 1: Cephaliarch's Flail | Slot 1: Solar Barrage |
| Slot 2: Pragmatic Fatecarver | Slot 2: Fulminating Rune |
| Slot 3: Radiant Glory | Slot 3: Inspired Scholarship |
| Slot 4: Quick Cloak | Slot 4: Stampede |
| Slot 5: Camouflaged Hunter | Slot 5: Vampire's Bane |
| Ultimate: Soul Harvest | Ultimate: The Languid Eye |
Storm Calling Skill Setups
Trash pack setup
| Front Bar | Back Bar |
|---|---|
| Slot 1: Cephaliarch's Flail | Slot 1: Solar Barrage |
| Slot 2: Pragmatic Fatecarver | Slot 2: Fulminating Rune |
| Slot 3: Radiant Glory | Slot 3: Inspired Scholarship |
| Slot 4: Quick Cloak | Slot 4: Elemental Blockade |
| Slot 5: Camouflaged Hunter | Slot 5: Hurricane |
| Ultimate: The Languid Eye | Ultimate: Elemental Rage |
Default setup
| Front Bar | Back Bar |
|---|---|
| Slot 1: Cephaliarch's Flail | Slot 1: Solar Barrage |
| Slot 2: Pragmatic Fatecarver | Slot 2: Fulminating Rune |
| Slot 3: Radiant Glory | Slot 3: Inspired Scholarship |
| Slot 4: Quick Cloak | Slot 4: Stampede |
| Slot 5: Hurricane | Slot 5: Vampire's Bane |
| Ultimate: The Languid Eye | Ultimate: The Languid Eye |
Animal Companions Skill Setups
Trash pack setup
| Front Bar | Back Bar |
|---|---|
| Slot 1: Cephaliarch's Flail | Slot 1: Solar Barrage |
| Slot 2: Pragmatic Fatecarver | Slot 2: Blue Betty |
| Slot 3: Radiant Glory | Slot 3: Inspired Scholarship |
| Slot 4: Quick Cloak | Slot 4: Elemental Blockade |
| Slot 5: Camouflaged Hunter | Slot 5: Deep Fissure |
| Ultimate: The Languid Eye | Ultimate: Elemental Rage |
Default setup
| Front Bar | Back Bar |
|---|---|
| Slot 1: Cephaliarch's Flail | Slot 1: Solar Barrage |
| Slot 2: Pragmatic Fatecarver | Slot 2: Blue Betty |
| Slot 3: Radiant Glory | Slot 3: Inspired Scholarship |
| Slot 4: Quick Cloak | Slot 4: Stampede |
| Slot 5: Deep Fissure | Slot 5: Vampire's Bane |
| Ultimate: Wild Guardian | Ultimate: Wild Guardian |
Grave Lord Skill Setups
Trash pack setup
| Front Bar | Back Bar |
|---|---|
| Slot 1: Cephaliarch's Flail | Slot 1: Solar Barrage |
| Slot 2: Pragmatic Fatecarver | Slot 2: Fulminating Rune |
| Slot 3: Radiant Glory | Slot 3: Inspired Scholarship |
| Slot 4: Quick Cloak | Slot 4: Elemental Blockade |
| Slot 5: Camouflaged Hunter | Slot 5: Skeletal Archer |
| Ultimate: Glacial Colossus | Ultimate: Elemental Rage |
Default setup
| Front Bar | Back Bar |
|---|---|
| Slot 1: Cephaliarch's Flail | Slot 1: Solar Barrage |
| Slot 2: Pragmatic Fatecarver | Slot 2: Fulminating Rune |
| Slot 3: Radiant Glory | Slot 3: Inspired Scholarship |
| Slot 4: Quick Cloak | Slot 4: Stampede |
| Slot 5: Detonating Siphon | Slot 5: Skeletal Archer |
| Ultimate: Flawless Dawnbreaker | Ultimate: The Languid Eye |
Aedric Spear Skill Setups
Trash pack setup
| Front Bar | Back Bar |
|---|---|
| Slot 1: Cephaliarch's Flail | Slot 1: Solar Barrage |
| Slot 2: Pragmatic Fatecarver | Slot 2: Fulminating Rune |
| Slot 3: Radiant Glory | Slot 3: Inspired Scholarship |
| Slot 4: Quick Cloak | Slot 4: Elemental Blockade |
| Slot 5: Camouflaged Hunter | Slot 5: Proximity Detonation |
| Ultimate: Crescent Sweep | Ultimate: Elemental Rage |
Default setup
| Front Bar | Back Bar |
|---|---|
| Slot 1: Cephaliarch's Flail | Slot 1: Solar Barrage |
| Slot 2: Pragmatic Fatecarver | Slot 2: Fulminating Rune |
| Slot 3: Radiant Glory | Slot 3: Inspired Scholarship |
| Slot 4: Quick Cloak | Slot 4: Stampede |
| Slot 5: Camouflaged Hunter | Slot 5: Vampire's Bane |
| Ultimate: Crescent Sweep | Ultimate: The Languid Eye |
Dragonknight Skill Setups
Trash pack setup
| Front Bar | Back Bar |
|---|---|
| Slot 1: Cephaliarch's Flail | Slot 1: Shatterspike Mantle |
| Slot 2: Pragmatic Fatecarver | Slot 2: Molten Whip |
| Slot 3: Fulminating Rune | Slot 3: Inspired Scholarship |
| Slot 4: Quick Cloak | Slot 4: Elemental Blockade |
| Slot 5: Incinerate | Slot 5: Soul of Flame |
| Ultimate: The Languid Eye | Ultimate: Elemental Rage |
Default setup
| Front Bar | Back Bar |
|---|---|
| Slot 1: Cephaliarch's Flail | Slot 1: Shatterspike Mantle |
| Slot 2: Pragmatic Fatecarver | Slot 2: Molten Whip |
| Slot 3: Searing Claw | Slot 3: Inspired Scholarship |
| Slot 4: Quick Cloak | Slot 4: Stampede |
| Slot 5: Incinerate | Slot 5: Igneous Weapons |
| Ultimate: The Languid Eye | Ultimate: Standard of Might |
Passives
 Class
Class
 Weapon
 Armor
Armor
 Guild
Guild
 Racial
 Craft
Craft
Class - Herald of the Tome
![]() Fated Fortune - High Priority
Fated Fortune - High Priority
![]() Harnessed Quintessence - High Priority
Harnessed Quintessence - High Priority
![]() Psychic Lesion - High Priority
Psychic Lesion - High Priority
![]() Splintered Secrets - High Priority
Splintered Secrets - High Priority
Class - Ardent Flame
![]() Combustion - High Priority
Combustion - High Priority
![]() Traumatic Burns - High Priority
Traumatic Burns - High Priority
![]() Fan the Flames - High Priority
Fan the Flames - High Priority
![]() A Soul Ablaze - Medium Priority
A Soul Ablaze - Medium Priority
Class - Earthen Heart
![]() Heart of Stone - Medium Priority
Heart of Stone - Medium Priority
![]() Landslide - High Priority
Landslide - High Priority
![]() Blessing at the Peak - High Priority
Blessing at the Peak - High Priority
![]() Mountain Giant - Low Priority
Mountain Giant - Low Priority
Class - Aedric Spear
![]() Piercing Spear - High Priority
Piercing Spear - High Priority
![]() Spear Wall - Low Priority
Spear Wall - Low Priority
![]() Burning Light - High Priority
Burning Light - High Priority
![]() Balanced Warrior - High Priority
Balanced Warrior - High Priority
Class - Dawn's Wrath
![]() Enduring Rays - High Priority
Enduring Rays - High Priority
![]() Prism - High Priority
Prism - High Priority
![]() Illuminate - High Priority
Illuminate - High Priority
![]() Restoring Spirit - High Priority
Restoring Spirit - High Priority
Class - Storm Calling
![]() Capacitor - High Priority
Capacitor - High Priority
![]() Energized - High Priority
Energized - High Priority
![]() Amplitude - High Priority
Amplitude - High Priority
![]() Expert Mage - High Priority
Expert Mage - High Priority
Class - Assassination
![]() Master Assassin - High Priority
Master Assassin - High Priority
![]() Executioner - High Priority
Executioner - High Priority
![]() Pressure Points - High Priority
Pressure Points - High Priority
![]() Hemorrhage - High Priority
Hemorrhage - High Priority
Class - Animal Companions
![]() Bond with Nature - Low Priority
Bond with Nature - Low Priority
![]() Savage Beast - High Priority
Savage Beast - High Priority
![]() Flourish - High Priority
Flourish - High Priority
![]() Advanced Species - High Priority
Advanced Species - High Priority
Class - Grave Lord
![]() Reusable Parts - Low Priority
Reusable Parts - Low Priority
![]() Death Knell - High Priority
Death Knell - High Priority
![]() Dismember - High Priority
Dismember - High Priority
![]() Rapid Rot - High Priority
Rapid Rot - High Priority
Weapon - Dual Wield
![]() Slaughter - High Priority
Slaughter - High Priority
![]() Dual Wield Expert - High Priority
Dual Wield Expert - High Priority
![]() Controlled Fury - High Priority
Controlled Fury - High Priority
![]() Ruffian - Medium Priority
Ruffian - Medium Priority
![]() Twin Blade and Blunt - High Priority
Twin Blade and Blunt - High Priority
Weapon - Destruction Staff
![]() Tri Focus - Low Priority
Tri Focus - Low Priority
![]() Penetrating Magic - Medium Priority
Penetrating Magic - Medium Priority
![]() Elemental Force - Medium Priority
Elemental Force - Medium Priority
![]() Ancient Knowledge - Medium Priority
Ancient Knowledge - Medium Priority
![]() Destruction Expert - Low Priority
Destruction Expert - Low Priority
Weapon - Two Handed
![]() Forceful - Low Priority
Forceful - Low Priority
![]() Heavy Weapons - High Priority
Heavy Weapons - High Priority
![]() Balanced Blade - High Priority
Balanced Blade - High Priority
![]() Follow Up - Low Priority
Follow Up - Low Priority
![]() Battle Rush - Low Priority
Battle Rush - Low Priority
Armor - Light Armor
![]() Grace - Low Priority
Grace - Low Priority
![]() Evocation - Low Priority
Evocation - Low Priority
![]() Spell Warding - Low Priority
Spell Warding - Low Priority
![]() Prodigy - High Priority
Prodigy - High Priority
![]() Concentration - High Priority
Concentration - High Priority
Armor - Medium Armor
![]() Dexterity - High Priority
Dexterity - High Priority
![]() Wind Walker - Low Priority
Wind Walker - Low Priority
![]() Improved Sneak - Not needed
Improved Sneak - Not needed
![]() Agility - High Priority
Agility - High Priority
![]() Athletics - Low Priority
Athletics - Low Priority
Guild - Fighter's Guild
![]() Intimidating Presence - Medium Priority
Intimidating Presence - Medium Priority
![]() Slayer - High Priority
Slayer - High Priority
![]() Banish the Wicked - Medium Priority
Banish the Wicked - Medium Priority
![]() Skilled Tracker - Medium Priority
Skilled Tracker - Medium Priority
![]() Bounty Hunter - Not needed
Bounty Hunter - Not needed
Race - Your Race
Get all of your racials, no matter which race you are
Craft - Alchemy
![]() Solvent Proficiency - Not needed
Solvent Proficiency - Not needed
![]() Keen Eye: Reagents - Not needed
Keen Eye: Reagents - Not needed
![]() Medicinal Use - High Priority
Medicinal Use - High Priority
![]() Chemistry - Not needed
Chemistry - Not needed
![]() Laboratory Use - Not needed
Laboratory Use - Not needed
![]() Snakeblood - Not needed
Snakeblood - Not needed
Gear
Base Setup
A base setup that will work for most situations and which should be your starting point when making situational setups
Switching gear for trash packs isn't worth it unless you're using gear-swap addons
| Gear Slot | Set | Weight/Type | Trait | Enchantment |
|---|---|---|---|---|
 Head Head |
Nerieneth | Medium | Divines | Stamina |
 Shoulders Shoulders |
Nerieneth | Light | Divines | Stamina |
 Chest Chest |
Slivers of Null Arca | Medium | Divines | Stamina |
 Hands Hands |
Slivers of Null Arca | Medium | Divines | Stamina |
 Belt Belt |
Slivers of Null Arca | Medium | Divines | Stamina |
 Legs Legs |
Slivers of Null Arca | Medium | Divines | Stamina |
 Boots Boots |
Slivers of Null Arca | Medium | Divines | Stamina |
 Necklace Necklace |
Velothi Ur-Mage's Amulet | Jewelry | Bloodthirsty | Increase Physical Harm |
 Ring Ring |
Highland Sentinel | Jewelry | Bloodthirsty | Increase Physical Harm |
| Ring |
Highland Sentinel | Jewelry | Bloodthirsty | Increase Physical Harm |
 Frontbar Main Hand Frontbar Main Hand |
Highland Sentinel | Dagger | Nirnhoned | Flame |
| Frontbar Off Hand |
Highland Sentinel | Dagger | Charged | Poison |
| Backbar Main Hand |
Merciless Charge | Greatsword | Infused | Weapon Damage |
- Sul-Xan's Torment - best for trash packs and bosses that regularly spawn adds
- Ansuul's Torment - best for AoE boss fights
- Crushing Wall - best for trash packs, replaces Merciless Charge on the backbar. Also needed if you want access to Elemental Rage since it requires a Destruction Staff
Easier to obtain options while working towards the best gear
Crafted (tradable):
PvP (tradable):
- Use Absorb Stamina instead of Flame when using the Dragonknight setup
Final Setups
A few examples of final setups you could end up with after applying situational rules to the base setup
This is the crafted gear setup you can start with
| Gear Slot | Set | Weight/Type | Trait | Enchantment |
|---|---|---|---|---|
| Head |
Order's Wrath | Medium | Divines | Stamina |
| Shoulders |
Order's Wrath | Light | Divines | Stamina |
| Chest |
Tide-Born Wildstalker | Medium | Divines | Stamina |
| Hands |
Tide-Born Wildstalker | Medium | Divines | Stamina |
| Belt |
Tide-Born Wildstalker | Medium | Divines | Stamina |
| Legs |
Tide-Born Wildstalker | Medium | Divines | Stamina |
| Boots |
Tide-Born Wildstalker | Medium | Divines | Stamina |
| Necklace |
Order's Wrath | Jewelry | Bloodthirsty | Increase Physical Harm |
| Ring |
Order's Wrath | Jewelry | Bloodthirsty | Increase Physical Harm |
| Ring |
Order's Wrath | Jewelry | Bloodthirsty | Increase Physical Harm |
| Frontbar Main Hand |
Highland Sentinel | Dagger | Nirnhoned | Flame |
| Frontbar Off Hand |
Highland Sentinel | Dagger | Charged | Poison |
| Backbar Main Hand |
Highland Sentinel | Inferno Staff | Infused | Weapon Damage |
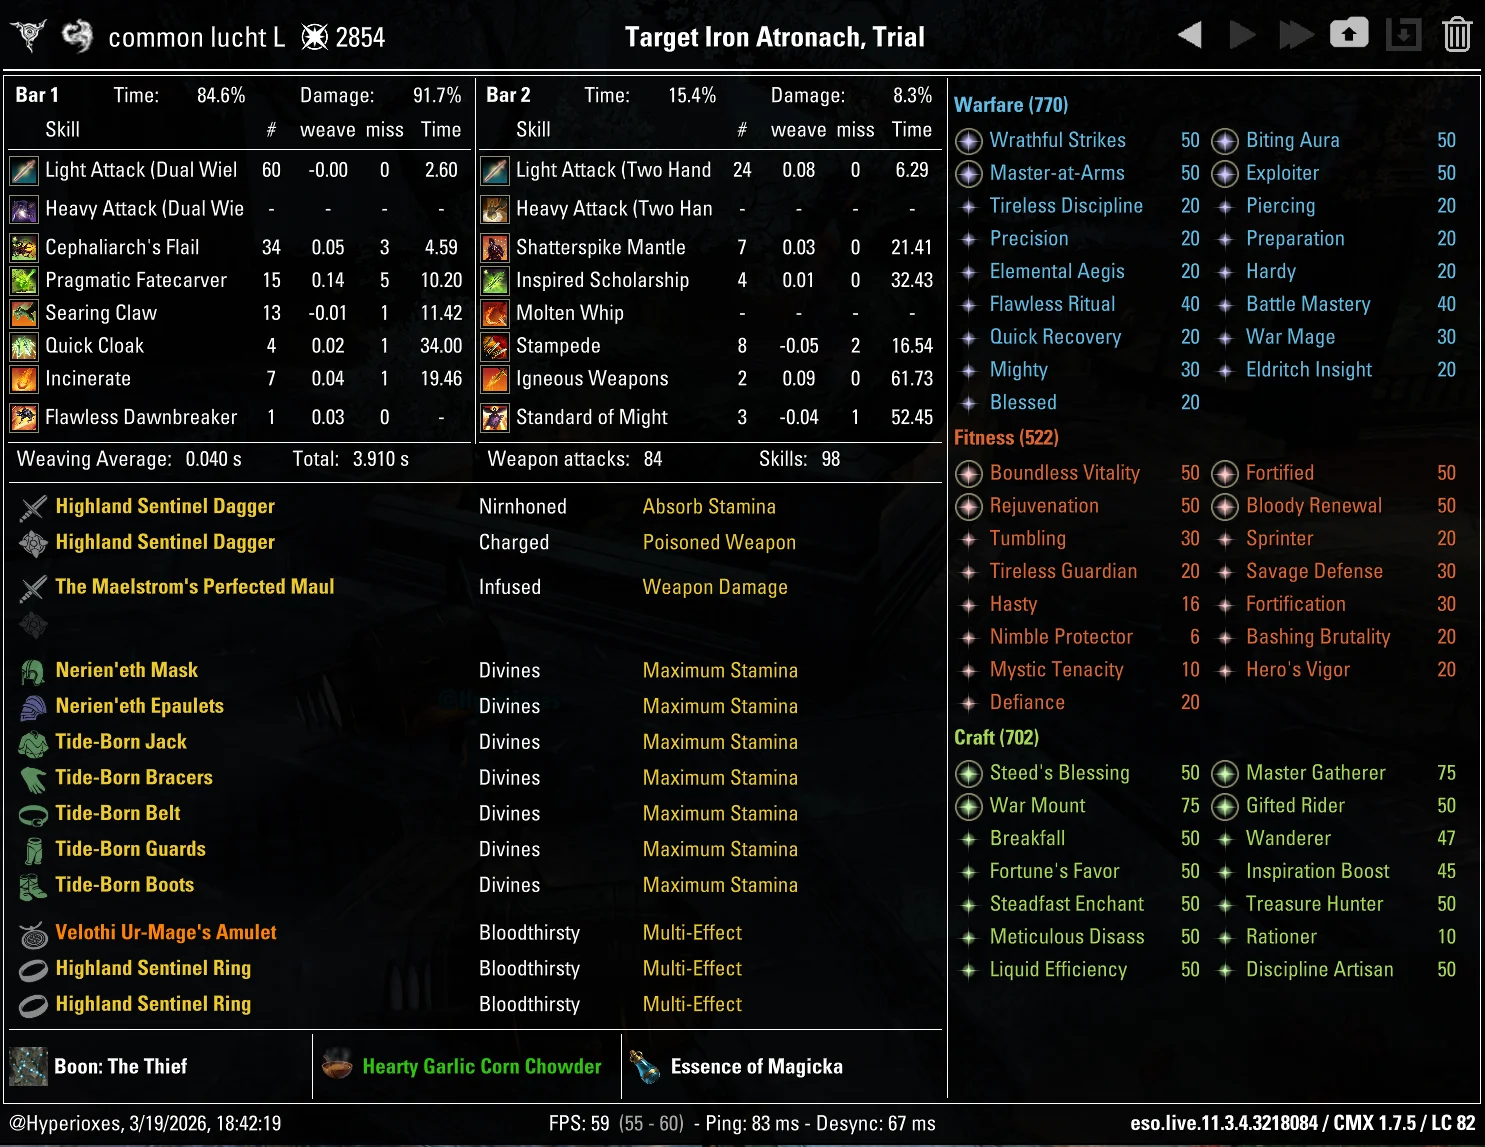
This setup parses 117.9k DPS. Use the Base Skill Setup with the changes shown below. When your setup needs to slot situational skills, replace Fulminating Rune first, then Quick Cloak.
| Front Bar | Back Bar |
|---|---|
| Slot 1: Cephaliarch's Flail | Slot 1: Solar Barrage |
| Slot 2: Pragmatic Fatecarver | Slot 2: Fulminating Rune |
| Slot 3: Radiant Glory | Slot 3: Inspired Scholarship |
| Slot 4: Quick Cloak | Slot 4: Elemental Blockade |
| Slot 5: Barbed Trap | Slot 5: Vampire's Bane |
| Ultimate: The Languid Eye | Ultimate: The Languid Eye |
- Barbed Trap replaces Camouflaged Hunter - you don't get Minor Force from Velothi Ur-Mage's Amulet yet
- Elemental Blockade replaces Stampede - you don't have Merciless Charge yet, and Elemental Blockade is easier to sustain with
This is a setup you should use if you don't have access to any Trial gear
| Gear Slot | Set | Weight/Type | Trait | Enchantment |
|---|---|---|---|---|
| Nerieneth | Medium | Divines | Stamina | |
| Nerieneth | Light | Divines | Stamina | |
| Tide-Born Wildstalker | Medium | Divines | Stamina | |
| Tide-Born Wildstalker | Medium | Divines | Stamina | |
| Tide-Born Wildstalker | Medium | Divines | Stamina | |
| Tide-Born Wildstalker | Medium | Divines | Stamina | |
| Tide-Born Wildstalker | Medium | Divines | Stamina | |
| Velothi Ur-Mage's Amulet | Jewelry | Bloodthirsty | Increase Physical Harm | |
| Highland Sentinel | Jewelry | Bloodthirsty | Increase Physical Harm | |
| Highland Sentinel | Jewelry | Bloodthirsty | Increase Physical Harm | |
| Highland Sentinel | Dagger | Nirnhoned | Flame | |
| Highland Sentinel | Dagger | Charged | Poison | |
| Merciless Charge | Greatsword | Infused | Weapon Damage |
Parses 135.7k DPS.
This is a setup you should use in trash packs
| Gear Slot | Set | Weight/Type | Trait | Enchantment |
|---|---|---|---|---|
| Nerieneth | Medium | Divines | Stamina | |
| Nerieneth | Light | Divines | Stamina | |
| Sul-Xan's Torment | Medium | Divines | Stamina | |
| Sul-Xan's Torment | Medium | Divines | Stamina | |
| Sul-Xan's Torment | Medium | Divines | Stamina | |
| Sul-Xan's Torment | Medium | Divines | Stamina | |
| Sul-Xan's Torment | Medium | Divines | Stamina | |
| Velothi Ur-Mage's Amulet | Jewelry | Bloodthirsty | Increase Physical Harm | |
| Highland Sentinel | Jewelry | Bloodthirsty | Increase Physical Harm | |
| Highland Sentinel | Jewelry | Bloodthirsty | Increase Physical Harm | |
| Highland Sentinel | Dagger | Nirnhoned | Flame | |
| Highland Sentinel | Dagger | Charged | Poison | |
| Crushing Wall | Inferno Staff | Infused | Weapon Damage |
This is a setup you should use in AoE fights
| Gear Slot | Set | Weight/Type | Trait | Enchantment |
|---|---|---|---|---|
| Nerieneth | Medium | Divines | Stamina | |
| Nerieneth | Light | Divines | Stamina | |
| Ansuul's Torment | Medium | Divines | Stamina | |
| Ansuul's Torment | Medium | Divines | Stamina | |
| Ansuul's Torment | Medium | Divines | Stamina | |
| Ansuul's Torment | Medium | Divines | Stamina | |
| Ansuul's Torment | Medium | Divines | Stamina | |
| Velothi Ur-Mage's Amulet | Jewelry | Bloodthirsty | Increase Physical Harm | |
| Highland Sentinel | Jewelry | Bloodthirsty | Increase Physical Harm | |
| Highland Sentinel | Jewelry | Bloodthirsty | Increase Physical Harm | |
| Highland Sentinel | Dagger | Nirnhoned | Flame | |
| Highland Sentinel | Dagger | Charged | Poison | |
| Merciless Charge | Greatsword | Infused | Weapon Damage |
Parses 142.9k DPS.
Champion Points
Race
The difference between best and worst race is about 5% of DPS and there is no content in the entire game that you'd be blocked from completing because of choosing a bad race.


Other decent options


Mundus

Attributes
You should always put all 64 attribute points into Stamina
Food
Your sustain can vary greatly because it's impacted by your race, your chosen skill lines, the amount of synergies provided by your teammates, and by your armor type. Choose the food with more Stamina Recovery if you can't sustain.
Potions
Most of the time you should use Tri-Stat potions. They'll greatly improve your sustain.
Heroism potions provide 100% uptime on Minor Heroism which generates Ultimate, but they're extremely expensive.
Parses
All parses are recorded on the 21 million Target Dummy


Gameplay
FAQ
Not exactly. Beam DPS uses Arcanist's Herald of the Tome skill line for Pragmatic Fatecarver, but this build is designed for every class through subclassing. Every class uses Pragmatic Fatecarver as the core of the build, then changes the final subclass combination based on that class.
Yes. Magicka Arcanist is still viable in ESO, especially because Pragmatic Fatecarver remains one of the strongest cleave skills in the game. This page is broader than a normal Magicka Arcanist build, because it uses Fatecarver through subclassing to create Beam DPS setups for every class.
Yes. Every class can use Beam DPS through subclassing. The build takes Herald of the Tome for Pragmatic Fatecarver, then changes the final subclass combination depending on the class.
Dragonknight currently has the highest parsing Beam DPS setup on this page, but every class has a recommended Beam DPS subclass setup. The best option depends on whether you want the highest parse or a specific class identity.
Pragmatic Fatecarver is better for most real content. It gives a large damage shield and interrupt immunity while channeling. Exhausting Fatecarver can deal slightly more damage, but it is harder to sustain and does not provide the same defensive value.
Yes. Beam DPS is strong for dungeons and trials because Pragmatic Fatecarver deals full cleave damage in a long line while giving a large shield during the channel. It is especially useful when enemies can be stacked or lined up.
Yes. As of Update 46, beam abilities including Pragmatic Fatecarver were changed from Damage over Time to Direct Damage.
Yes. Fatecarver hits everything in a 22 meter line in front of you and deals full damage. It does not lose single-target damage when hitting multiple enemies, which is why it is one of the strongest cleave abilities in ESO.
THANKS FOR READING

If you've enjoyed this guide and want to support me, you can do so through Patreon. Your support will help me produce more guides.